D-Link DSL-321B User Manual
D-Link DSL-321B Manual
 |
View all D-Link DSL-321B manuals
Add to My Manuals
Save this manual to your list of manuals |
D-Link DSL-321B manual content summary:
- D-Link DSL-321B | User Manual - Page 1
- D-Link DSL-321B | User Manual - Page 2
...21 PPPoE/PPPoA ...22 Static IP Address...23 Bridge Mode ...24 LAN SETUP ...25 Use the Modem for DHCP 26 Disable the DHCP Server 26 TIME AND DATE ...27 PARENTAL CONTROL ...28 ADVANCED ...29 DNS SETUP ...29 ADVANCED ADSL...30 MAINTENANCE ...31 PASSWORD ...31 D-Link DSL-321B User Manual 2 - D-Link DSL-321B | User Manual - Page 3
• ADSL Internet service • Computer with: • 200MHz Processor • 64MB Memory • CD-ROM Drive • Ethernet Adapter with TCP/IP Protocol Installed • Internet Explorer v6 or later, FireFox v1.5, or Safari 1.3 or above • Windows 2000/XP/Vista • D-Link Click'n Connect Utility D-Link DSL-321B User Manual 3 - D-Link DSL-321B | User Manual - Page 4
Telnet enables a network manager to access the Modem's management software remotely. • Easy Installation - The Modem uses a web-based graphical user interface program for convenient management access and easy set up. Any common web browser software can be used to manage the Modem. D-Link DSL-321B - D-Link DSL-321B | User Manual - Page 5
seven seconds. Ethernet Port Use the Ethernet port to connect the Modem to a computer or an Ethernet LAN. Power Button Push in to power-on the Modem Push again to power-off the Modem. Power Insert Use the adapter shipped with the Modem to connect to power source. D-Link DSL-321B User Manual 5 - D-Link DSL-321B | User Manual - Page 6
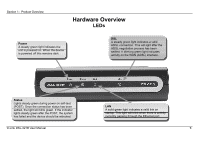
steady green during power on self-test (POST). Once the connection status has been settled, the light will blink green. If the indicator lights steady green after the POST, the system has failed and the device should be rebooted. D-Link DSL-321B User Manual LAN A solid green light indicates a valid - D-Link DSL-321B | User Manual - Page 7
The DSL-321B uses an HTML-based web interface for setup and management. The Web configuration manager may be accessed using any operating system capable of running web browser software, including Windows 98 SE, Windows ME, Windows 2000, Windows XP, and Windows Vista. D-Link DSL-321B User Manual 7 - D-Link DSL-321B | User Manual - Page 8
is enabled by default on many browsers. Modem or similar firewall hardware. The IP address can be assigned in a number of ways. Your network service provider will give you instructions about any additional connection software or NIC configuration that may be required. D-Link DSL-321B User Manual - D-Link DSL-321B | User Manual - Page 9
Modem automatically detects all types of ADSL, ADSL2, and ADSL2+ modulation. Security Protocol This is the method your ADSL service provider will use to verify your Username and Password when you log on to their network. Your Modem supports the PAP and CHAP protocols. D-Link DSL-321B User Manual - D-Link DSL-321B | User Manual - Page 10
be the base IP address used for DHCP service on the LAN when DHCP is enabled. LAN Subnet Mask for the DSL-321B This is the subnet mask used by the DSL-321B, and will be used throughout your LAN. The default subnet mask is 255.255.255.0. This can be changed later. D-Link DSL-321B User Manual 10 - D-Link DSL-321B | User Manual - Page 11
do not create a tripping hazard. As with any electrical appliance, observe common sense safety procedures. The Modem can be placed on a shelf or desktop, ideally you should be able to see the LED indicators on the front if you need to view them for troubleshooting. D-Link DSL-321B User Manual 11 - D-Link DSL-321B | User Manual - Page 12
memory including user account information and LAN IP settings. The device settings will be restored to the factory default IP address 192.168.1.1 and the subnet mask is 255.255.255.0, the default management Username is "admin" and the default Password is "admin." D-Link DSL-321B User Manual 12 - D-Link DSL-321B | User Manual - Page 13
or hub for another device, connect to any on the other MDI-X ports (1x, 2x, etc.) with a crossed cable. Computer to Modem Connection You can connect the Modem directly to a 10/100BASE-TX Ethernet adapter card (NIC) installed on a PC using the Ethernet cable provided. D-Link DSL-321B User Manual 13 - D-Link DSL-321B | User Manual - Page 14
a web-browser such as Internet Explorer and enter the IP address of the Modem (192.168.1.1). Type "admin" for the User Name and "admin" in the Password field. If you get a Page Cannot be Displayed error, please refer to the Troubleshooting section for assistance. D-Link DSL-321B User Manual 14 - D-Link DSL-321B | User Manual - Page 15
of the Modem's opening page to launch a series of setup windows. Alternatively, you can tick the Manual Setup check box and click the desired setting option radio button in the middle of the window. The manual ADSL connection setup is described later in this manual. D-Link DSL-321B User Manual 15 - D-Link DSL-321B | User Manual - Page 16
characters. Once you have filled out the fields in this window, including re-typing the new password in the Confirm Password field, click the Next button to continue. If you do not want to change the password, click the Skip button to proceed to the next step. D-Link DSL-321B User Manual 16 - D-Link DSL-321B | User Manual - Page 17
window and subsequent Quick Setup windows. The Connection Type options are 1483 Bridged IP LLC, 1483 Bridged IP VC-Mux, 1483 Routed IP LLC, 1483 Routed IP VC-Mux, PPPoE LLC, PPPoE VC-Mux, PPPoA LLC, and on the information entered in the previous Setup Wizard window. D-Link DSL-321B User Manual 17 - D-Link DSL-321B | User Manual - Page 18
QUICK SETUP - PPPOE/PPPOA CONFIGURATION Type in the User Name and Password used to identify and verify your account to the ISP. If you are instructed to change the VPI or VCI number, type in the correct setting -Mux. Click Next to go to the last Setup Wizard window. D-Link DSL-321B User Manual 18 - D-Link DSL-321B | User Manual - Page 19
1483 Routed IP LLC and 1483 Routed IP VC-Mux. Click Next to go to the last Setup Wizard window. QUICK SETUP - BRIDGE MODE CONFIGURATION If you are instructed to are 1483 Bridged IP LLC and 1483 Bridged IP VC-Mux. Click Next to go to the last Setup Wizard window. D-Link DSL-321B User Manual 19 - D-Link DSL-321B | User Manual - Page 20
CONFIRMATION DIALOG Click the OK button to proceed with the Modem reboot. QUICK SETUP - REBOOT TIME INDICATOR The following window opens to indicate the amount of time it will take to reboot the Modem. QUICK SETUP - REBOOT CONFIRMATION DIALOG Click OK to continue. D-Link DSL-321B User Manual 20 - D-Link DSL-321B | User Manual - Page 21
/PPPoA, Static IP Address, and Bridge Mode, click on the ADSL Setup link button on the left side of the first window that appears when you successfully access the web manager. Click the PPPoE/PPPoA radio button to access the first Manual ADSL Connection Setup window: D-Link DSL-321B User Manual 21 - D-Link DSL-321B | User Manual - Page 22
click the Apply Settings button. This will save the settings and reboot the Modem to let your changes take effect. 7. Upon restarting, the Modem should automatically establish the WAN connection. If it does not, click the Connect button at the bottom of this window. D-Link DSL-321B User Manual 22 - D-Link DSL-321B | User Manual - Page 23
instructed to change the VPI or VCI values, type in the values assigned for your account. 4. When you are satisfied that all the WAN settings are configured correctly, click the Apply Settings button. This will save the settings and reboot the Modem to let your changes take effect. D-Link DSL-321B - D-Link DSL-321B | User Manual - Page 24
instructed to change the VPI or VCI values, type in the values assigned for your account. 3. When you are satisfied that all the WAN settings are configured correctly, click the Apply Settings button. This will save the settings and reboot the Modem to let your changes take effect. D-Link DSL-321B - D-Link DSL-321B | User Manual - Page 25
DHCP on the LAN will also be changed. The IP address pool can be up to 253 IP addresses. There are two options for DHCP service: • You can use the Modem as a DHCP server for your LAN. • You can disable DHCP service and manually configure IP settings for workstations. D-Link DSL-321B User Manual 25 - D-Link DSL-321B | User Manual - Page 26
use another DHCP server to obtain IP settings. If you configure IP settings manually, make sure to use IP addresses in the subnet of the Modem. You will need to use the Modem's IP address as the Default Gateway for the workstation in order to provide Internet access. D-Link DSL-321B User Manual 26 - D-Link DSL-321B | User Manual - Page 27
configure system time on the Modem, click the Copy Your Computer's Time Settings button, or set the time and date manually by using the Date and Time drop-down menus. When you are finished, click the Apply Settings button to set the system time and date information. D-Link DSL-321B User Manual 27 - D-Link DSL-321B | User Manual - Page 28
drop-down menu to toggle the Allow/Deny setting for each time period. Clicking the Apply Settings button will allow your setting to take effect. D-Link DSL-321B User Manual 28 - D-Link DSL-321B | User Manual - Page 29
automatically" option. Auto discovery DNS instructs the Modem to automatically obtain the DNS IP address from the ISP through DHCP. If your WAN connection uses a Static IP address, auto discovery for DNS cannot on the left panel to let your changes take effect. D-Link DSL-321B User Manual 29 - D-Link DSL-321B | User Manual - Page 30
Leave the Capability setting at the bottom of the window unchanged unless otherwise instructed by your ISP. Both Bitswap Enable and Seemless Rate Adaption (SRA) Enable deal with tests that determine the line condition between your Modem and the ISP's Central office. D-Link DSL-321B User Manual 30 - D-Link DSL-321B | User Manual - Page 31
Password field to be certain you have typed it correctly. Click the Apply Settings button and then click the Reboot button on the left panel to let your changes take effect. The system User Name remains "admin," this cannot be changed using the Web manager interface. D-Link DSL-321B User Manual - D-Link DSL-321B | User Manual - Page 32
the Modem to its factory default settings, click the Restore Device button. You will be prompted to confirm your decision to reset the Modem. The Modem will reboot with the factory default settings including IP settings (192.168.1.1) and Administrator password (admin). D-Link DSL-321B User Manual - D-Link DSL-321B | User Manual - Page 33
file in the Save As window that immediately opens. The default location is your desktop. Note Performing a Firmware Upgrade can sometimes change the configuration settings. Be sure to backup the Modem's configuration settings before upgrading the firmware. D-Link DSL-321B User Manual 33 - D-Link DSL-321B | User Manual - Page 34
test may be done through the local or external interface to test connectivity to known IP addresses. The diagnostics feature executes a series of tests of your system software and hardware connections. Use this window when working with your ISP to troubleshoot problems. D-Link DSL-321B User Manual - D-Link DSL-321B | User Manual - Page 35
and Debugging. Click the Apply Settings button and then click the Reboot button on the left panel to allow your new settings to take effect. D-Link DSL-321B User Manual 35 - D-Link DSL-321B | User Manual - Page 36
. Device Info To access the Device Info window, click the Device Info button in the Status directory. Use this window to quickly view basic current information about the LAN and WAN interfaces and device information including Firmware Version and MAC address. D-Link DSL-321B User Manual 36 - D-Link DSL-321B | User Manual - Page 37
Section 3 - Configuration Connected Clients To access the Connected Clients window, click the Connected Clients button in the Status directory. The Connected LAN Clients list displays active DHCP clients when the Modem is acting as a DHCP server. D-Link DSL-321B User Manual 37 - D-Link DSL-321B | User Manual - Page 38
Section 3 - Configuration Statistics To access the Statistics window, click the Statistics button in the Status directory. Use this window to monitor traffic on the Ethernet or ADSL connection. This window also displays information concerning ADSL status. D-Link DSL-321B User Manual 38 - D-Link DSL-321B | User Manual - Page 39
Section 3 - Configuration To access the Help window, click the Help directory. Help D-Link DSL-321B User Manual 39 - D-Link DSL-321B | User Manual - Page 40
in Question 2 to reset the Modem. • Check that all the cables are firmly connected at both ends. • Check the LEDs on the front of the Modem. The Power indicator should be on, the Status indicator should flash, and the DSL and LAN indicators should be on as well. D-Link DSL-321B User Manual 40 - D-Link DSL-321B | User Manual - Page 41
sure the service has been enabled/connected by your ISP and that your ISP username and password are correct. 5. What can I do if my Modem can't be detected by running the installation CD? • Ensure the Modem is powered be able to surf the Internet without any problem. D-Link DSL-321B User Manual 41 - D-Link DSL-321B | User Manual - Page 42
IP Address After you install your new D-Link adapter, by default, the TCP/IP settings should be set to obtain an IP address from a DHCP server (i.e. wireless Modem) automatically. To verify your IP employee or administrator to verify their wireless network settings. D-Link DSL-321B User Manual 42 - D-Link DSL-321B | User Manual - Page 43
Default Gateway the same as the LAN IP address of your Modem (192.168.1.1). Set Primary DNS the same as the LAN IP address of your Modem (192.168.1.1). The Secondary DNS is not needed or you may enter a DNS server from your ISP. Step 5 Click on the OK twice to save your settings. D-Link DSL-321B - D-Link DSL-321B | User Manual - Page 44
2 • ITU G.992.1 (G.dmt) Annex B • ITU G.992.2 (G.lite) Annex B • ITU G.994.1 (G.hs) ADSL2 Standards • ITU G.992.3 (G.dmt.bis) Annex B ADSL2+ Standards • ITU G.992.5 Annex B Protocols • TCP/UDP • ARP interface: one RJ-45 port for 10/100BASE-T Ethernet connection D-Link DSL-321B User Manual 44
-
 1
1 -
 2
2 -
 3
3 -
 4
4 -
 5
5 -
 6
6 -
 7
7 -
8
-
9
-
10
-
11
-
12
-
13
-
14
-
15
-
16
-
17
-
18
-
19
-
20
-
21
-
22
-
23
-
24
-
25
-
26
-
27
-
28
-
29
-
30
-
31
-
32
-
33
-
34
-
35
-
36
-
37
-
38
-
39
-
40
-
41
-
42
-
43
-
44
 |
 |