D-Link DSN-4200 DSN Series SAN Arrays VMWare ESX Manual - Page 8
Connecting the ESX Server Host to the iSCSI Array
 |
View all D-Link DSN-4200 manuals
Add to My Manuals
Save this manual to your list of manuals |
Page 8 highlights
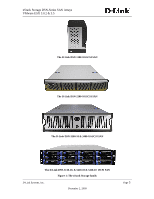
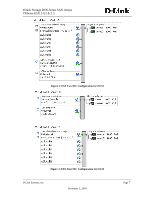
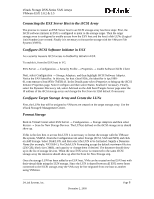
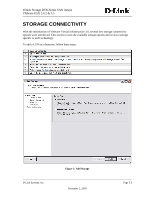
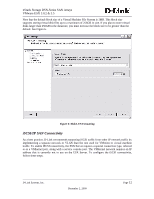
xStack Storage DSN-Series SAN Arrays VMware ESX 3.0.2 & 3.5 Connecting the ESX Server Host to the iSCSI Array The process to connect an ESX Server host to an iSCSI storage array has three steps: First, the iSCSI software initiator in ESX is configured to point to the storage target. Then the target storage array is configured to enable access from the ESX host and the host's disk LUNs (Logical Unit Numbers) are created. Finally it is necessary to format the storage with the VMware File System (VMFS). Configure iSCSI Software Initiator in ESX As a security measure iSCSI access is disabled by default in ESX. To enable it, from the ESX host in VC: ESX Server → Configuration → Security Profile → Properties → enable Software iSCSI Client Next, select Configuration → Storage Adapters, and then highlight iSCSI Software Adapter. Notice the SAN Identifier. In this test, for host r3esx1950c, the identifier is iqn.199801.com.vmware:r3esx1950c-7b658143. In the Details pane select Properties to bring up the iSCSI Initiator Properties page. Select Configure and then select Status: Enabled if necessary. Finally, select the Dynamic Discovery tab, select Add and on the Add Send Targets Server page enter the IP address of the iSCSI storage array and change the Port from its 3260 default if necessary. Configure Target Storage Array and Create the LUNs First, the LUNs that will be assigned to VMware are created on the target storage array. Use the xStack Storage® Management Center. Format Storage Back in Virtual Center select ESX Server → Configuration → Storage Adapters and then select Rescan → Scan for New Storage Devices. The LUN(s) defined on the iSCSI storage array should show up. If this is the first host to access this LUN it is necessary to format the storage with the VMware file system, VMFS3. From the Configuration tab select Storage (SCSI, SAN and NFS) and click on Add Storage. Select Disk/LUN, and then select the LUN to be formatted. Supply a Datastore Name (for example, NX1950-1). For Disk/LUN Formatting accept the default maximum file size (256 GB), block size (1MB), and capacity or change them if desired. The datastore should show up in the list of storage devices. When the next ESX server is connected to the same iSCSI storage array the datastore should show up after the Scan for New Storage step. Once the storage LUN has been added to an ESX host, VMs can be created on that ESX host with their virtual disks using the LUN storage. Since the LUN is shared between all ESX server hosts connected to the iSCSI storage array the VMs may be live migrated from one host to another using VMotion. D-Link Systems, Inc. December 2, 2009 Page 8
-
 1
1 -
2
-
 3
3 -
 4
4 -
 5
5 -
 6
6 -
 7
7 -
 8
8 -
 9
9 -
 10
10 -
 11
11 -
 12
12 -
 13
13 -
14
-
15
-
16
-
17
-
18
-
19
-
20
-
21
-
22
-
23
 |
 |