D-Link DWA-181 Quick Install Guide - Page 3
Installation - Windows - driver
 |
View all D-Link DWA-181 manuals
Add to My Manuals
Save this manual to your list of manuals |
Page 3 highlights
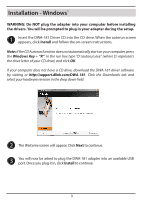
Installation - Windows® 10 WARNING: Do NOT plug the adapter into your computer before installing the drivers. You will be prompted to plug in your adapter during the setup. 1 Insert the DWA-181 Driver CD into the CD drive. When the autorun screen appears, click Install and follow the on-screen instructions. Note: If the CD Autorun function does not automatically start on your computer, press the Windows Key + "R". In the run box type "D:\autorun.exe" (where D: represents the drive letter of your CD drive) and click OK. If your computer does not have a CD drive, download the DWA-181 driver software by visiting or http://support.dlink.com/DWA-181. Click the Downloads tab and select your hardware revision in the drop down field. 2 The Welcome screen will appear. Click Next to continue. 3 You will now be asked to plug the DWA-181 adapter into an available USB port. Once you plug it in, click Install to continue. 3
-
 1
1 -
 2
2 -
 3
3 -
 4
4 -
 5
5 -
 6
6 -
 7
7 -
 8
8
 |
 |
