DIRECTV Sat-Go Owners Manual
DIRECTV Sat-Go Manual
 |
View all DIRECTV Sat-Go manuals
Add to My Manuals
Save this manual to your list of manuals |
DIRECTV Sat-Go manual content summary:
- DIRECTV Sat-Go | Owners Manual - Page 1
Owner's Manual - DIRECTV Sat-Go | Owners Manual - Page 2
QUALIFIED SERVICE PERSONNEL. IMPORTANT: Be sure not to place your DIRECTV Sat-Go system near anything WET or HOT! CAUTION: There is a danger of explosion if batteries are incorrectly replaced. Replace only with same or equivalent type. TIP: We highly recommend plugging the DIRECTV Sat-Go system - DIRECTV Sat-Go | Owners Manual - Page 3
the DIRECTV access card as detailed in this manual). • Place it on a flat, hard surface - do not operate the DIRECTV Sat-Go system on a carpet or other padded surface. • Always unplug your DIRECTV Sat-Go system before moving it. • Always unplug the DIRECTV Sat-Go system, TV and other equipment before - DIRECTV Sat-Go | Owners Manual - Page 4
as much as possible without impairing image readability. Burn-in is not covered by the warranty. The LCD Panel consists of 3 million cells. It is therefore possible that a few cells might be flawed. . Unauthorized changes or modifications to this equipment may void the user's authority to operate it. 3 - DIRECTV Sat-Go | Owners Manual - Page 5
Up Your DIRECTV® Sat-Go 29 Connecting your DIRECTV Sat-Go to a Telephone Line (when used in the home). . . . .29 Connecting your DIRECTV Sat-Go system to a second TV or Monitor 30 Completing the Connections 31 Installing the DIRECTV Access Card 32 Guided Setup for DIRECTV® Service 33 Activating - DIRECTV Sat-Go | Owners Manual - Page 6
Menu Map 51 Troubleshooting 53 TV Problems 53 Remote Control Problems 55 Signal Problems 55 Running the System Test 56 System Errors 57 Warranty 58 Who is Covered 58 What is Covered 58 What is Excluded 59 To Get Warranty Service 60 DIRECTV Protection Plan 61 DIRECTV PROTECTION PLAN Bene - DIRECTV Sat-Go | Owners Manual - Page 7
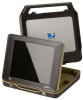
Contents The following items are included with your Sat-Go portable TV and antenna: TV and Receiver Antenna / DIRECTV Sat-Go Case DC Cable Phone Cable RG-179 (15') Satellite/Antenna Cable Screwdriver TV INPUT POWER TV ON OFF ACTIVE LIST GUIDE EXIT SELECT BACK INFO MENU CHAN VOL - DIRECTV Sat-Go | Owners Manual - Page 8
the DIRECTV Sat-Go case is the antenna and contains the easily removable TV. 11 22 3 DIRECTV Sat-Go Case Opened 1 DIRECTV Sat-Go TV Display 2 DIRECTV Sat-Go! TV Receiver 3. DIRECTV Sat-Go Case Cover / Antenna Sat-Go Case / Antenna 3 11 22 Antenna Rear View (TV removed) 1. DIRECTV Sat-Go Case - DIRECTV Sat-Go | Owners Manual - Page 9
DIRECTV® Sat-Go Sat-Go TV An integrated TV receiver is stored inside the DIRECTV Sat-Go case. 7 1 2 3 4 5 6 TV Rear View TV Front View 1. Cable Compartment The Cable compartment stores the AC power cable (permanently attached). 2. Remote Control 3. Access Card Slot The DIRECTV access card - DIRECTV Sat-Go | Owners Manual - Page 10
Using Your DIRECTV® Sat-Go TV Display Panel TV MENU TV INPUT/ SELECT VOL - VOL + 1 2 3 4 5 1. TV MENU Displays the TV Menu to adjust TV settings. This menu automatically times out after a few seconds. 2. TV INPUT / SELECT Changes the input source, or selects the highlighted TV MENU item - DIRECTV Sat-Go | Owners Manual - Page 11
Before Using Your DIRECTV® Sat-Go TV Receiver Panel SIGNAL GUIDE MENU SELECT ACTIVE INFO 1 23 4 5 6 7 89 1. (Earphones) Connects personal earphones to the TV for personal listening. 2. SIGNAL Displays the Signal Strength Meter. This is used for pointing the antenna for the strongest - DIRECTV Sat-Go | Owners Manual - Page 12
7 1. SAT Connects the DIRECTV Sat-Go TV to the DIRECTV Sat-Go antenna or a residential DIRECTV antenna. 2. PHONE JACK Connects the TV to a telephone wall jack. We require a land-based telephone connection to communicate periodically with your TV. 3. (USB Port) For future use. 4. SERVICE PORT (RS232 - DIRECTV Sat-Go | Owners Manual - Page 13
Before Using Your DIRECTV® Sat-Go Remote Control 1) Remote Control in DIRECTV Mode All the functions for DIRECTV® service can be controlled with the Remote control. Some function can also be adjusted with the buttons on the TV display panel. NOTE: To use your remote control in DIRECTV mode, the - DIRECTV Sat-Go | Owners Manual - Page 14
Using Your DIRECTV® Sat-Go 2) Remote Control in TV Mode All the functions for TV mode can be controlled with the Remote control. Some function can also be adjusted with the buttons on the front panel of the LCD. NOTE: To use your remote control in TV mode, the MODE switch on the remote control - DIRECTV Sat-Go | Owners Manual - Page 15
In live TV, displays the Mini Guide; other functions vary - look for onscreen hints NUMBER KEYS Tune to a channel directly; also input Inserting the Batteries You must insert or replace the batteries in the remote control when you: + Purchase the DIRECTV Sat-Go. + Find that the remote control is - DIRECTV Sat-Go | Owners Manual - Page 16
Before Using Your DIRECTV® Sat-Go Inserting Battery into the TV You must insert or replace the batteries in the DIRECTV Sat-Go system when you: + Purchase the DIRECTV Sat-Go system. + Find that the DIRECTV Sat-Go TV is no longer operating correctly. TIP: The Low Portable Battery symbol displays - DIRECTV Sat-Go | Owners Manual - Page 17
to set up the DIRECTV Sat-Go TV and antenna. Select the most appropriate procedure depending on your requirements. Finding a Suitable Antenna Site When selecting a site to obtain a satellite signal, choose a location with an unobstructed view of the southern sky--no trees, leaves, or buildings can - DIRECTV Sat-Go | Owners Manual - Page 18
DIRECTV Sat-Go TV and Antenna 1 2 3 1. Open the DIRECTV Sat-Go case and antenna by opening the latches and lifting the handle. 2. Lift the TV display to an upright position allowing space to rotate the antenna. After rotating the antenna, you may remove the integrated TV/Receiver. (The antenna - DIRECTV Sat-Go | Owners Manual - Page 19
to the Antenna The DIRECTV Sat-Go comes pre-assembled with the Antenna cable connected to the SAT connector on the TV rear connector panel and to the SAT connector on the rear antenna base. AV IN 1 COMPONENT AV IN 2 Note: You can place the antenna up to 15' from the DIRECTV Sat-Go TV for remote - DIRECTV Sat-Go | Owners Manual - Page 20
. 3. Plug the AC power cable into a grounded 3-prong outlet. 4. Replace the cable cover. For DC power 1. Remove the DC cable from the DIRECTV Sat-Go case. 2. Remove the TV from the DIRECTV Sat-Go case. 3. Connect the DC cable to the DC connector on the side of the receiver and to a DC power source - DIRECTV Sat-Go | Owners Manual - Page 21
the details to begin receiving your DIRECTV® service. 1 Make sure the MODE SWITCH on the remote control is set to DIRECTV. 2 Press TV POWER ON. The DIRECTV Sat-Go TV will turn on. 3 Simply follow the onscreen directions to complete your setup functions. You'll be guided though various selections and - DIRECTV Sat-Go | Owners Manual - Page 22
Antenna Coordinates Antenna coordinates (Direction and Angle numbers) are based on the ZIP code of your location. You can use these coordinates when aligning your antenna to the satellites. 1. Turn on the DIRECTV Sat-Go, press the (POWER) button on the TV display. 2. Select Repeat Satellite Setup - DIRECTV Sat-Go | Owners Manual - Page 23
live TV. You have now successfully set up the DIRECTV Sat-Go and are receiving the DIRECTV satellite signal. 3. On the Signal Strength screen, Highlight Done and press SELECT. Note: If this is a new setup, the Receiver will gather satellite information for a few minutes. Moving the antenna after - DIRECTV Sat-Go | Owners Manual - Page 24
sure the access card from your receiver is fully inserted into the access card slot and oriented correctly. • Verify the antenna cable: - Using the 15' cable (provided), connect the antenna and receiver - To place the TV and Receiver more than 15' from the antenna RG-6 cable is highly recommended - DIRECTV Sat-Go | Owners Manual - Page 25
to get the best picture and sound quality. Note that the back panels of your equipment may not exactly match those illustrated. NOTE: Not all cables come with your DIRECTV Sat-Go you may need to purchase additional cables depending on your setup. TIP: When working with cables, be sure to connect - DIRECTV Sat-Go | Owners Manual - Page 26
described on the following. Component Connection (Best Quality) 1. Connect the Component video cable to the component video output jacks (Y/Pb/Pr) on the VCR or DVD Player and to the component video input jacks (COMPONENT AV IN 2) on the DIRECTV Sat-Go TV rear connector panel. 2. Connect the audio - DIRECTV Sat-Go | Owners Manual - Page 27
and to the video input jack (AV IN 1) on the DIRECTV Sat-Go TV rear connector panel. 2. Connect the audio cable to the audio output jacks (L/R) on the VCR or DVD Player and to the audio input jacks (AV IN 1) on the DIRECTV Sat-Go TV rear connector panel. LINE OUT S-VIDEO OUT R - AUDIO - L VIDEO - DIRECTV Sat-Go | Owners Manual - Page 28
a phone jack on your wall (or into a phone splitter that is plugged into a phone jack) and the other end into the PHONE JACK on the DIRECTV Sat-Go TV rear connector panel. A phone connection is not required for outdoor use, but you will need to connect to a phone line occasionally if you want to - DIRECTV Sat-Go | Owners Manual - Page 29
Your DIRECTV® Sat-Go Connecting your DIRECTV Sat-Go system to a second TV or Monitor The DIRECTV Sat-Go system has a special signal output capability that allows you to connect a second TV or monitor to your DIRECTV Sat-Go TV. 1. Connect the video cable to the video input jack on the second TV or - DIRECTV Sat-Go | Owners Manual - Page 30
Setting Up Your DIRECTV® Sat-Go Completing the Connections Plug all power cords into electrical sockets. AC DC 29 - DIRECTV Sat-Go | Owners Manual - Page 31
DIRECTV Sat-Go TV. The DIRECTV access card provides the ability to view DIRECTV® programming. This card should not be removed unless Customer Service instructs you to do so and must be properly inserted to obtain DIRECTV programming. In the event you are directed to replace the access card, please - DIRECTV Sat-Go | Owners Manual - Page 32
and then select Setup. Guided Setup for DIRECTV® Service Now that your DIRECTV Sat-Go equipment is all hooked up and plugged in, you're ready to finish all the details to begin receiving your DIRECTV service. 1) Make sure the MODE switch on the remote control is set to DIRECTV. 2) Press TV POWER ON - DIRECTV Sat-Go | Owners Manual - Page 33
sure you're picking up a satellite signal (DIRECTV channel). • Have on hand your service address, social security number and a valid major credit card. • Note your access card and receiver ID numbers (find these by pressing MENU, then go to Settings and press SELECT. Then go to Setup and press SELECT - DIRECTV Sat-Go | Owners Manual - Page 34
the DIRECTV logo), press TV POWER ON. To access the channel of your choice, simply key in its numbers on your remote control (the channel will appear in a few seconds, or press ENTER after the numbers and it will appear right away). You can also navigate to different channels through the Guide. Keep - DIRECTV Sat-Go | Owners Manual - Page 35
RIGHT, UP or DOWN. Press SELECT to access the information or channel. Getting Around in the Guide Press the GUIDE key on your remote control, then choose how you want to filter the Guide. Select All Channels, or channels in a specific category. Moving through the Guide is simple: • The UP, DOWN, LEFT - DIRECTV Sat-Go | Owners Manual - Page 36
program to autotune and your TV will tune to it automatically when program. Follow the onscreen instructions to set the program Guide or the To Do List (press LIST); then, select the Autotune item in the left menu, and follow the onscreen instructions your VCR properly to your TV, then set up your VCR - DIRECTV Sat-Go | Owners Manual - Page 37
hours a day on DIRECTV® Pay Per View. You'll find them listed in the Guide in the 100s, with previews on channel 100. Tune to a pay per view program or press INFO on a highlighted pay per view program. Select a Buy option and follow the onscreen instructions. As long as your TV has been connected to - DIRECTV Sat-Go | Owners Manual - Page 38
OFF TIP: Make sure the MODE switch on the remote control is set to TV. Set the MODE switch to TV and then press MENU on your remote control or you can press TV Menu on the TV Display Panel to easily access the TV Menu. Once the TV Menu is displayed, use the UP and DOWN arrows on - DIRECTV Sat-Go | Owners Manual - Page 39
You can change the size of the screen to that which best corresponds to your viewing requirements. NOTE: This is typically used for content that is natively displayed in Widescreen format. 1) Press MENU to display the TV Menu. 2) Highlight Picture and press SELECT. 3) Highlight Size and press SELECT - DIRECTV Sat-Go | Owners Manual - Page 40
broadcasting service. Backlight Brightness You can easily adjust the brightness of the Liquid Crystal Display (LCD). 1) Press Menu to display the TV Menu option: - Low - High Internal Battery You can check Internal Battery level. 1) Press Menu to display the TV Menu. 2) Highlight Settings and press - DIRECTV Sat-Go | Owners Manual - Page 41
Using the TV Menu Parental Controls This feature allows you to block certain channels or programs so children cannot view programs that are not age appropriate. NOTE: This Parental Controls menu is adapted to external input (AV IN 1). When the input is DIRECTV, this menu is deactivated. To adjust - DIRECTV Sat-Go | Owners Manual - Page 42
ratings. 1) In the Parental Controls menu, select No Rating Program and press SELECT. 2) Press SELECT on a desired option of the followings. - View: When TV signal or movies display without restriction ratings, All signals will be unblocked, and you can view any other program - Block: When - DIRECTV Sat-Go | Owners Manual - Page 43
Test, Satellite Setup, Remote Setup, Audio Setup, Display Setup, TV Type, Access Card and System Reset screens. • Info & Test - The System Info option lets you view the current system information. The System Test option lets you run a test on the tuner, access card, receiver ID and phone line. • Sat - DIRECTV Sat-Go | Owners Manual - Page 44
Menu, select Settings, select Setup, then select Audio in the left menu and follow the onscreen instructions. To temporarily change the audio, from the Menu, select Audio Options, then select the audio track you prefer. Once the program is over or you change the channel, the audio will change back - DIRECTV Sat-Go | Owners Manual - Page 45
out DIRECTV® Pay Per View listings by category. While in the Guide, press Channel or News. Your search will be quicker if you narrow your search by selecting subcategories; just follow the onscreen instructions Guide's number of days of programming supported by your TV will appear on your list. 44 - DIRECTV Sat-Go | Owners Manual - Page 46
access to the channels you like best, or perhaps a grouping of family channels just for the kids. When you're using a Favorites list, the Guide will only display those channels you've chosen - and you'll also only see those channels when you change channels using Chans / Get on your remote control - DIRECTV Sat-Go | Owners Manual - Page 47
lets you get messages from DIRECTV. If you have Caller ID service, you can also view phone calls you've received or turn call notifi service through your local telephone company, and your TV must be connected to a phone line. DIRECTV Messages This feature lets you view a listing of current DIRECTV - DIRECTV Sat-Go | Owners Manual - Page 48
for quicker access. Use Block All or Allow All to save time if you wish to affect a large number of channels. Spending From the left menu, select Spending, then set your preferred spending limit for any single pay per view purchase. Simply key in the amount using the numbers on your remote control - DIRECTV Sat-Go | Owners Manual - Page 49
Channel Banner will tell you if the receiver is locked, temporarily unlocked, or unlocked. Locked Unlocked Temporarily Unlocked Now, lock it Once you've set the restrictions you want, choose Lock Now from the left menu. You'll be directed temporarily unlocked, turning the TV power off will relock - DIRECTV Sat-Go | Owners Manual - Page 50
Internal Battery 0 ~ 100% Change Password New Password, Confirm Block On, Off MPAA Ratings G, PG, PG-13, R, NC-17, X, View Parental Controls TV Rating - Children Age Fantasy Violence Age Dialogue TV-Y, TV-Y7, View TV-Y7, View TV-G, TV-PG, TV-14, TV-MA, View TV-PG, TV-14, View TV Rating - DIRECTV Sat-Go | Owners Manual - Page 51
Menu Map Menu (for DIRECTV® Service) Settings Setup Scheduler Info & Test, Sat. & Ant., Remote, Audio, Display, TV Type, Access Card, Reset, Done To Do List, History, Purchase, Manual Favorite Channels --- (Moves to the Favorites - Editing Settings menu.) Parental Controls --- (Moves to the - DIRECTV Sat-Go | Owners Manual - Page 52
button on the TV display panel or the SELECT button on the remote control. • If problems persist, turn off all equipment that is connected to your DIRECTV Sat-Go system, wait a few minutes. Problems with Caller ID • You must subscribe to Caller ID service through your local phone company. Also - DIRECTV Sat-Go | Owners Manual - Page 53
channel. • Press the TV INPUT key on the remote control to make sure that the TV input is set to DIRECTV. • Press the POWER button on the front of the TV. • Press the RESET button behind the access card door on the TV receiver base. Temporary loss of the satellite signal or Searching for Satellite - DIRECTV Sat-Go | Owners Manual - Page 54
replacing batteries. • If you're entering a channel number that is less than four digits long, the TV might wait two seconds before tuning to the channel. Press ENTER after entering a channel number to tune immediately. • If you are trying to operate a device other than the DIRECTV Sat-Go TV that - DIRECTV Sat-Go | Owners Manual - Page 55
trouble with your TV or antenna, run the system test. It will also allow you to get your access card and receiver ID numbers or to initiate diagnostic procedures on your TV. First make sure that: • All connections - jacks, cables, etc. - are in place correctly. • There are batteries in the remote - DIRECTV Sat-Go | Owners Manual - Page 56
across the many types and brands of automobile batteries the "low battery warning" on the DIRECTV Sat-Go may be triggered some time before it is in fact near a critical point for any given automobile battery. DIRECTV has designed the DIRECTV Sat-Go system to adhere to industry standards for voltage - DIRECTV Sat-Go | Owners Manual - Page 57
-Day Warranty DIRECTV warrants your DIRECTV® Sat-Go system (Model Number: Z11-500) and any included accessories against defects in material or workmanship for a period of 90 days after the date of purchase. Who is Covered? You must have proof of purchase to receive warranty service. A sales receipt - DIRECTV Sat-Go | Owners Manual - Page 58
hardware or software provided by DIRECTV, installing software modifications, "hacks" or utilizing service access or "back doors" will void this limited warranty. Reception transmission problems caused by signal conditions, telephone line, or cable or antenna systems outside the unit. - A product that - DIRECTV Sat-Go | Owners Manual - Page 59
and service and for proof of purchase. Attach it here and record the serial and model numbers in case you need them. These numbers are located on the product. Model No Serial No Purchase Date Dealer/Address/Phone Access Card Receiver ID DIRECTV Protection Plan The DIRECTV® Sat-Go system is - DIRECTV Sat-Go | Owners Manual - Page 60
relocate the receiving satellite antenna. • Increase the separation between the equipment and the DIRECTV Sat-Go system. • Connect the equipment into an outlet on a circuit different from that to which the DIRECTV Sat-Go system is connected. • Consult the dealer or an experienced radio/TV technician - DIRECTV Sat-Go | Owners Manual - Page 61
the REN without the decimal point (e.g., 03 is a REN of 0.3). If this DIRECTV Sat-Go system causes harm to the telephone network, the telephone company will notify you in advance that temporary discontinuance of service may be required. But if advance notice isn't practical, the telephone company - DIRECTV Sat-Go | Owners Manual - Page 62
DIRECTV Sat-Go unit Dimensions Type LCD Panel Display Area Max. Resolution Viewing Angle Satellite In Specification 18.8" x 19.2" x 4.8" A-Si Active Matrix TFT-LCD USB Service Port AV Out USB 2.0 - Type A RS-232 Serial Port for TV software LiPB battery 12.6V, 5.5A Power Consumption 70W(Max.) - DIRECTV Sat-Go | Owners Manual - Page 63
any time. ©2007 DIRECTV, Inc. DIRECTV, the Cyclone Design logo and ADVANCED PROGRAM GUIDE are registered trademarks of DIRECTV, Inc. This product incorporates equipment attached to the receiver. Please contact the manufacturer of such equipment for additional information. Rev. 1.0i - Z11-500.070302 - DIRECTV Sat-Go | Owners Manual - Page 64
City Tulsa Medford Portland Philadelphia Pittsburgh Providence Charleston Rapid City Sioux Falls Knoxville Memphis Amarillo Dallas El Paso Houston San Antonio Salt Lake City Richmond Direction Angle 19 44 20 44 19 46 20 51 16 37 15 35 22 44 22 42 17 36 18 36 17 43 18 42 - DIRECTV Sat-Go | Owners Manual - Page 65
Dish-Pointing Coordinates State VA VT WA WA WI WI WV WY City Roanoke Burlington Seattle Spokane Madison Milwaukee Charleston Cheyenne Direction Angle 22 42 23 32 13 32 14 33 20 39 20 39 22 41 16 42 64
-
 1
1 -
 2
2 -
 3
3 -
 4
4 -
 5
5 -
 6
6 -
 7
7 -
8
-
9
-
10
-
11
-
12
-
13
-
14
-
15
-
16
-
17
-
18
-
19
-
20
-
21
-
22
-
23
-
24
-
25
-
26
-
27
-
28
-
29
-
30
-
31
-
32
-
33
-
34
-
35
-
36
-
37
-
38
-
39
-
40
-
41
-
42
-
43
-
44
-
45
-
46
-
47
-
48
-
49
-
50
-
51
-
52
-
53
-
54
-
55
-
56
-
57
-
58
-
59
-
60
-
61
-
62
-
63
-
64
-
65
 |
 |

Owner’s Manual