Danby DPAC9008 User Manual - Page 12
Danby DPAC9008 Manual
 |
View all Danby DPAC9008 manuals
Add to My Manuals
Save this manual to your list of manuals |
Page 12 highlights
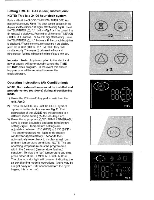
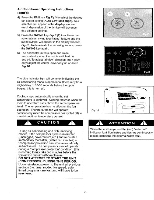
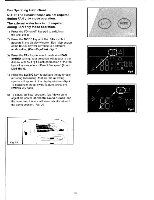
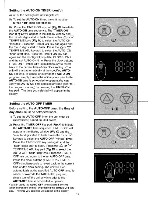
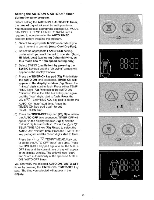
DRY (Dehumidifier) Operating Instructions NOTE: During dehumidifier mode, the exhaust hoses do not have to be vented outdoors but should remain attached to the unit The external water tank must be Installed during dehumidifier mode. 1) Press the WO (on/off) key pad to switch on the unit. 0 2) Press the MODE key until the DRY symbol (Dehumidifying) appears in the display window. Each depression of the MODE key will advance to a different mode selling (Auto-Cool-Dry -Fan). 3) Press the appropriate A V (TEMP I TIMER ADJ) key to select a (relative humidity) operating setting between 35% - 90% RH (adjustable in increments of 5%) For continuous (non-stop) dehumidifier operation press the in. V . (TEMP / TIMER ADJ) key pad until the symbol "- - 'appears in the display window. NOTE: The compressor will not cycle off during "continuous" mode. The set relative humidity level will flash m the display window for approximately 5 seconds then automatically revert back to display actual. room ambient relative humidity conditions. NOTE: The set operating RH level must be programmed within the 5 second (flashing) condition. To view the "set' relative humidity program any time, press either of the TEMP/TIMER ADJ buttons. NOTE: There is no fan speed adjustment during dehumidifying mode. (the fan speed is factory set for low'7 The blue (RUN) indicator light illuminates indicating dehumidifying mode is operational (there may be a slight delay of 10-30 seconds before the cycle begins, this is normal). IMPORTANT: The relative humidity setting selected should always be sal a few degrees lower than the room ambient relative humidity conditions. to ensure normal dehumidifying operation. NOTE: it is not recommended to operate your Dehumidifier, below temperatures of 15.5°C (60°F), this could result in icing -up conditions of the evaporator coils, and minimize efficiency. 4) During try' mode when the external tank ts full. the unit will alarm (beep) for 20 seconds and the water full red Indicator light vAll illuminate and the water lull icon in the control panel will begin to flash continuously . Al this time dehumidification will stop immediately. However, the fan motor will continue to operate (this is normal). Carefully remove the water tank from the cabinet, dispose of the water. Replace the water tank back to it's original position and the Dehumidifying process will automatically resume. It may lake 3-5 minutes for the compressor to restart This is normal, 5) This unit also has provisions for a continuous "drain" option (for basement applications having a floor drain). The required drain hose is included with this unit. Drain Hose Specifications: Standard garden hose. For continuous direct drain operation. Remove (unscrew) the drain cap at the back of the cabinet located directly above the external tank. Attach suitable length (of drain hose) to the direct drain fitting. (do not over tighten) Position the open end of the drain hose as close as possible to the floor drain. Check the hose connection for leaks. NOTE: Direct drain operation is Intended for floor drain applications only. Direct drain operation should not be used in stem pipe and/or sink applications. II
-
 1
1 -
2
-
3
-
4
-
5
-
6
-
 7
7 -
 8
8 -
 9
9 -
 10
10 -
 11
11 -
 12
12 -
 13
13 -
 14
14 -
 15
15 -
 16
16 -
 17
17 -
18
-
19
-
20
-
21
-
22
-
23
 |
 |
