Dell 1100 Owner's Manual
Dell 1100 - Laser Printer B/W Manual
 |
UPC - 708562765657
View all Dell 1100 manuals
Add to My Manuals
Save this manual to your list of manuals |
Dell 1100 manual content summary:
- Dell 1100 | Owner's Manual - Page 1
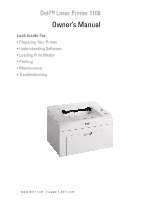
Dell™ Laser Printer 1100 Owner's Manual Look Inside For: • Preparing Your Printer • Understanding Software • Loading Print Media • Printing • Maintenance • Troubleshooting www.dell.com | support.dell.com - Dell 1100 | Owner's Manual - Page 2
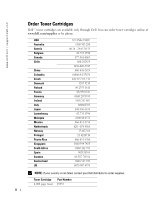
www.dell.com | support.dell.com Order Toner Cartridges Dell™ toner cartridges are available only through Dell. You can order toner cartridges online at www.dell.com/supplies or by phone. USA Australia Austria Belgium Canada Chile China Colombia Czech Denmark Finland France Germany Ireland Italy - Dell 1100 | Owner's Manual - Page 3
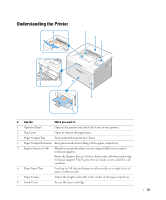
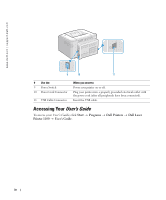
Cover Open to remove the paper jams. 3 Paper Output Tray Stack printed document face down. 4 Paper Output Extension Keep print media from falling off the paper output tray. 5 Express Service Code Identify your printer when you use support.dell.com or contact technical support. Enter the Express - Dell 1100 | Owner's Manual - Page 4
or off. Plug your printer into a properly grounded electrical outlet with the power cord (after all peripherals have been connected). Insert the USB cable. Accessing Your User's Guide To access your User's Guide, click Start → Programs → Dell Printers → Dell Laser Printer 1100 → User's Guide. iv - Dell 1100 | Owner's Manual - Page 5
your printer. NOTICE: A NOTICE indicates either potential damage to hardware or loss of data and tells you how to avoid the problem. Dell Inc. is strictly forbidden. Trademarks used in this text: Dell, DELL logo, and Dell Toner Management System are trademarks of Dell Inc.; Microsoft and Windows - Dell 1100 | Owner's Manual - Page 6
Contents Understanding the Printer iii Accessing Your User's Guide iv CAUTION: SAFETY INFORMATION 1 WAARSCHUWING: VEILIGHEIDSINFORMATIE DE SEGURANÇA 10 UPOZORNĚNÍ: BEZPEČNOSTNÍ INFORMACE 11 PRZESTROGA: INFORMACJE O BEZPIECZEŃSTWIE 12 1 Preparing Your Printer Setting Up the Printer 13 Using - Dell 1100 | Owner's Manual - Page 7
/Me 26 In Windows 2000/XP 27 5 Maintenance Ordering Supplies 29 Replacing the Toner Cartridge 30 Cleaning Your Printer 33 Cleaning the Exterior 33 Cleaning the Interior 33 6 Troubleshooting Clearing Jams in the Paper Tray 35 Paper Feed Jam 35 Paper Exit Jam 36 Fuser Area Jam 38 Tips for - Dell 1100 | Owner's Manual - Page 8
-User Manufacturer Guarantee (Latin America and the Caribbean Only 73 Dell Inc. Ink and Toner Cartridges Limited Warranties 75 Ink and Toner Cartridges Limited Warranty (U.S. and Canada Only) . . . 75 Ink and Toner Cartridges Limited Warranty (Latin America Only) . . . . . 76 Dette skema er alene - Dell 1100 | Owner's Manual - Page 9
safety and to help protect your system and working environment from potential damage. • This printer is certified as a "Class 1" laser product under the U.S. Department of Health and Human Services (DHHS) Radiation Performance Standard according to the Radiation control for Health and Safety Act of - Dell 1100 | Owner's Manual - Page 10
www.dell.com | support.dell.com WAARSCHUWING: VEILIGHEIDSINFORMATIE Volg de onderstaande veiligheidsrichtlijnen om uw persoonlijke veiligheid te garanderen en uw systeem en werkomgeving tegen mogelijke schade te beschermen. • Deze printer is gecertificeerd als een "Klasse 1" laserproduct volgens de - Dell 1100 | Owner's Manual - Page 11
af procedurer, der ikke er angivet i denne manual, kan resultere i farlig bestråling. • Service eller reparation, som ikke er beskrevet i betjeningsvejledningen, skal udføres af en uddannet servicerepræsentant. • Denne printer Dell fraskriver sig ansvaret i forbindelse med brugen af ikke-Dell- - Dell 1100 | Owner's Manual - Page 12
www.dell.com | support.dell.com VAROITUS: TURVALLISUUSTIEDOT (Department of Health and Human Services Radiation Performance Standard) mukaisesti Yhdysvaltain sisällä syntyvä säteily jää suojakotelon ja kansien sisälle, lasersäteitä ei pääse ulos normaalin käytön yhteydessä. VAROITUS: Laitteen - Dell 1100 | Owner's Manual - Page 13
av produktet og som er lett tilgjengelig. • Overlat andre former for service og reparasjoner enn det som er beskrevet i bruksanvisningen, til en profesjonell komponenter som er godkjent av Dell. Sikkerhetsfunksjonene ved noen deler er ikke alltid åpenbar. Dell fraskriver seg ansvar knyttet til - Dell 1100 | Owner's Manual - Page 14
www.dell.com | support.dell.com VARNING: säkerhetsinformation Följ anvisningarna här nedan för att skydda dig själv, systemet och arbetsmiljön mot skador. • Skrivaren har certifierats vara en laserprodukt av klass 1 enligt den amerikanska standarden Department of Health and Human Services (DHHS) - Dell 1100 | Owner's Manual - Page 15
1 1968 г. Dell Dell Dell 7 - Dell 1100 | Owner's Manual - Page 16
www.dell.com | support.dell.com 1 x DHHS 1968 x x x x Dell Dell .Dell 8 - Dell 1100 | Owner's Manual - Page 17
takılmalıdır.. • Kullanım talimatlarında belirtilenlerin dışındaki bakım ve onarımlar için profesyonel bir servis personeline başvurun. • Bu ürün, Dell tarafından onaylanmış belli parçaların kullanımıyla güvenlik standartlarını karşılamak üzere tasarlanmıştır. Bazı parçaların güvenlik özellikleri - Dell 1100 | Owner's Manual - Page 18
danos potenciais. • Esta impressora está certificada como produto laser de "Classe 1", segundo a norma Radiation Performance (Desempenho das radiações) do U.S. Department of Health and Human Services (DHHS - Departamento de saúde e serviços humanos dos Estados Unidos), em conformidade com o controlo - Dell 1100 | Owner's Manual - Page 19
při použití konkrétních komponentů autorizovaných společností Dell. Bezepčnostní charakteristiky některých dílů nemusí být vždy zřejmé. Společnost Dell nepřebírá odpovědnost spojenou s použitím komponentů, které nejsou společností Dell autorizovány. UPOZORNĚNÍ: Nepoužívejte toto zařízení při bouřce - Dell 1100 | Owner's Manual - Page 20
www.dell.com | support.dell.com PRZESTROGA: INFORMACJE O BEZPIECZEŃSTWIE Aby zapewnić sobie bezpieczeństwo Act) z roku 1968. • Ponieważ promieniowanie emitowane we wnętrzu drukarki jest ograniczone osłonami ochronnymi i zewnętrzną obudową, w trakcie normalnego użytkowania promień lasera nie - Dell 1100 | Owner's Manual - Page 21
LEDs signify different things, depending on their sequence. LEDs that are off, on, and/or blinking indicate printer conditions, such as printer status, intervention (for example, out of paper and jammed paper), or service. For more information on what the LEDs sequence means and what you can do, see - Dell 1100 | Owner's Manual - Page 22
www.dell.com | support.dell.com Button Item To print a demo page Manual feeding To cancel a print job Manual Duplex feeding Description In Ready mode, press and hold slowly, and release. for 2 seconds until both LEDs blink Press each time you load a sheet of paper in the tray, when you select - Dell 1100 | Owner's Manual - Page 23
to print. The Dell Toner Management System™ window also displays the level of toner remaining and allows you to order replacement toner cartridges. • User's Guide- HTML documentation provides detailed information about using your printer. Installing Dell Software A printer driver is software that - Dell 1100 | Owner's Manual - Page 24
fails. You can remove the software using the Drivers and Utilities CD or the Windows uninstall. NOTE: Close all programs before uninstalling software. 1 From the Start menu, select Programs → Dell Printers → Dell Laser Printer 1100 → Dell Printer Software uninstall. 2 Select the software you want to - Dell 1100 | Owner's Manual - Page 25
printing on a variety of print media. Selecting the appropriate print media for your printer helps you avoid printing problems. To get the best possible print quality, use only high-quality, copier-grade paper. The following table provides information on the input source, including the print media - Dell 1100 | Owner's Manual - Page 26
www.dell.com | support.dell.com Paper Envelopes No.10 DL C5 C6 Monarch Labels Letter A4 Transparencies Letter A4 Card sheet of paper for manual feed mode 90 to 163 g/m2 bond (16 to 43 lb) for manual feed mode 60 to 165 g/m2 bond (16 to 43lb) for manual feed mode a The printer supports a wide - Dell 1100 | Owner's Manual - Page 27
Load up to 150 sheets of plain paper in the paper tray. 1 Open the paper input tray. Pull on the length and width guides to extend the tray. 2 Flex the sheets back and forth to loosen them, and then fan them out. Do not fold or crease the print - Dell 1100 | Owner's Manual - Page 28
www.dell.com | support.dell.com 3 Load paper in the paper tray with the side to be printed on facing up. Make sure that all four corners are flat in the tray. 4 Be careful not to overload the paper tray. Overloading may cause paper jams. 5 Squeeze the length guide and slide it until it lightly - Dell 1100 | Owner's Manual - Page 29
the print material without bending the paper. 3 To print a document in Manual Feed mode, you must select Manual Feed for Source from the software application, and then select the appropriate paper size and type. For details, see the HTML User's Guide. 4 Press on the printer's operator panel to start - Dell 1100 | Owner's Manual - Page 30
www.dell.com | support.dell.com Loading Special Materials 1 Open the paper input tray. 2 Load the print material in the paper input tray. Do not mix types. 3 Adjust the length and width guides against the print material without bending it. 4 To print on special material, you must select Manual Feed - Dell 1100 | Owner's Manual - Page 31
other, do not let the printed sheets stack up as they are printed out. NOTE: Place transparencies on a flat surface after removing them from the printer. NOTE: Do not use transparencies that are separating from the backing sheet. Loading Print Media 23 - Dell 1100 | Owner's Manual - Page 32
www.dell.com | support.dell.com • Load a sheet of card stock with the side to • Load a letterhead in the tray with the design face up, top edge toward the printer. NOTE: Before you load letterhead, verify that the ink on the paper is dry. During the fusing process, wet ink can come off preprinted - Dell 1100 | Owner's Manual - Page 33
the High Altitude Correction option. 1 Click the Windows Start menu. 2 Click Settings and then Printer, or Printers and Faxes. 3 Select the Dell Laser Printer 1100 icon. 4 Right-click on the printer icon and select Properties. 5 Click the Printer tab and select the High Altitude Correction checkbox - Dell 1100 | Owner's Manual - Page 34
www.dell.com | support.dell.com Sharing Your Printer Locally You can connect the printer directly to a selected computer, called the "host computer," on a network using a USB cable. Your printer can be shared by other users on the network through a Windows 98, Me, 2000, or XP network printer - Dell 1100 | Owner's Manual - Page 35
In Windows 2000/XP Setting Up the Host Computer 1 Start Windows. 2 For Windows 2000, click the Start button → Settings → Printers. For Windows XP, click the Start button and select Printers and Faxes. 3 Double-click your printer icon. 4 Click the Printer menu and select Sharing. 5 For Windows 2000, - Dell 1100 | Owner's Manual - Page 36
www.dell.com | support.dell.com 28 Printing - Dell 1100 | Owner's Manual - Page 37
OR From the Start menu, click Programs → Dell Printers → Dell Laser Printer 1100 → Dell Toner Reorder Program. OR In the Printing Status window, click the Order Supplies button. 2 The Order Toner Cartridges window appears. Click Visit Dell's cartridge ordering web site to order supplies online - Dell 1100 | Owner's Manual - Page 38
this stage, the toner cartridge needs to be replaced. To order more toner, go to www.dell.com/supplies. CAUTION: For best results, use Dell toner cartridges. Print quality and printer reliability are not guaranteed if you do not use Dell supplies. To replace the toner cartridge: 1 Open the front - Dell 1100 | Owner's Manual - Page 39
in cold water. Hot water sets toner into fabric. CAUTION: Do not touch the green underside of the toner cartridge. Use the handle on the cartridge to avoid touching this area. CAUTION: To prevent damage to the toner cartridge, do not expose it to light for more than a few minutes. Maintenance - Dell 1100 | Owner's Manual - Page 40
www.dell.com | support.dell.com 4 Pull the tape to remove the protective paper. 5 Locate the cartridge slot inside the printer, one on each side. 6 Unfold the toner cartridge handle and grasp it. Insert the cartridge into the printer until it snaps into place. 7 Close the front cover. Make sure - Dell 1100 | Owner's Manual - Page 41
To maintain print quality, follow the cleaning procedures below, each time the toner cartridge is replaced or if print quality problems occur. NOTE: Do not touch the transfer roller located under the toner cartridge when cleaning inside the printer. Oil from your fingers may cause print quality - Dell 1100 | Owner's Manual - Page 42
www.dell.com | support.dell.com 3 Gently pull the toner cartridge out, being careful not to scratch against the printer, and lift it up and away from the printer. Set it on a clean flat surface. CAUTION: To prevent damage to the toner cartridge, do not expose the toner cartridge to light for more - Dell 1100 | Owner's Manual - Page 43
Troubleshooting Clearing Jams in the Paper Tray If a paper jam occurs, on the operator panel lights red. Find and remove the jammed paper. If you cannot see it, look inside the printer. To avoid tearing the paper, pull the jammed paper out gently and slowly. Follow the steps below to clear the - Dell 1100 | Owner's Manual - Page 44
www.dell.com | support.dell.com Paper Exit Jam NOTE: Paper jams in this area may result in loose toner on the page. If you get any toner on your clothes, wash them in cold water as hot water will set the toner into the fabric. 1 If the paper jams as it exits to the output tray and a long portion of - Dell 1100 | Owner's Manual - Page 45
: When removing jammed paper, be careful not to touch the heat roller (located underneath the inner cover). It is hot and could cause burns! 4 Close the inner cover and the top cover. Printing resumes automatically. NOTE: Failed pages will not reprint. Reprint the failed pages. Troubleshooting 37 - Dell 1100 | Owner's Manual - Page 46
.dell.com | support.dell.com Fuser Area Jam NOTICE: The fuser area is hot. Take care when removing paper from the printer. 1 Open the front cover. 2 Gently pull the toner cartridge out, being careful not to scratch against the printer, and lift it up and away from the printer. 38 Troubleshooting - Dell 1100 | Owner's Manual - Page 47
that there is no other paper in the printer. 5 Reinstall the toner cartridge and close the front cover. Your printer resumes printing the document from failed pages. Tips for Avoiding Paper Jams By selecting the correct paper types, most paper jams can be avoided. When a paper jam occurs, follow the - Dell 1100 | Owner's Manual - Page 48
service representative. • A paper jam has occurred. To solve the problem, see "Clearing Jams in the Paper Tray" on page 35. • The front cover is open. Close the front cover. • The top cover is open. Close the top cover. • A toner cartridge is not installed. Install a toner cartridge. See "Replacing - Dell 1100 | Owner's Manual - Page 49
) The toner cartridge is nearly empty. Redistribute the toner to temporarily extend the life of the toner cartridge. If this does not improve print quality, install a new toner cartridge. See page 30. More Troubleshooting For more information about printing problems, see your HTML User's Guide - Dell 1100 | Owner's Manual - Page 50
www.dell.com | support.dell.com 42 Troubleshooting - Dell 1100 | Owner's Manual - Page 51
Assistance If you need help with a technical problem, Dell is ready to assist you. 1 Call technical support from a telephone near or at the printer so that technical support can assist you with any necessary procedures. When calling Dell, use your Express Service Code to help expedite the routing of - Dell 1100 | Owner's Manual - Page 52
To check on the status of any Dell™ products that you have ordered, you can go to support.dell.com, or you can call the automated order-status service. A recording prompts you for the information needed to locate and report on your order. See "Contacting Dell" for the telephone number to call for - Dell 1100 | Owner's Manual - Page 53
1-800-695-8133 Printers and Projectors Technical Support toll-free: 1-877-459-7298 Public (government, education, and healthcare) Customer Service and Technical Support toll-free: 1-800-456-3355 Employee Purchase Program (EPP) Customers toll-free: 1-800-234-1490 Dell Sales toll-free: 1-800 - Dell 1100 | Owner's Manual - Page 54
for desktop and portable computers: [email protected] E-mail for servers and EMC: [email protected] Customer Care Tech Support Tech Support Services Sales Aruba General Support Australia (Sydney) E-mail (Australia): [email protected] International Access Code: 0011 E-mail - Dell 1100 | Owner's Manual - Page 55
(City) International Access Code Country Code City Code Department Name or Service Area, Website and E-Mail Address Belgium (Brussels) Website: support.euro.dell.com International Access Code: 00 E-mail: [email protected] Country Code: 32 City Code: 2 E-mail for French Speaking Customers - Dell 1100 | Owner's Manual - Page 56
.com Technical Support Fax Technical Support (Dell™ Dimension™ and Inspiron™) Technical Support (OptiPlex™, Latitude™, and Dell Precision™) Technical Support (servers and storage) Technical Support (projectors, PDAs, switches, printers, routers, and so on) Technical Support (printers) Customer Care - Dell 1100 | Owner's Manual - Page 57
Code Department Name or Service Area, Website and E-Mail Address Colombia General Support Costa Rica General Support Czech Republic (Prague) Website: support.euro.dell.com International Access Code: 00 E-mail: [email protected] Country Code: 420 Technical Support City Code: 2 Customer - Dell 1100 | Owner's Manual - Page 58
Access Code: 00 Country Code: 49 City Code: 6103 Department Name or Service Area, Website and E-Mail Address Website: support.euro.dell.com E-mail: support.euro.dell.com/fr/fr/emaildell/ Home and Small Business Technical Support Customer Care Switchboard Switchboard (calls from outside of France - Dell 1100 | Owner's Manual - Page 59
General Support Guatemala General Support Guyana General Support Hong Kong Website: support.ap.dell.com International Access Code: 001 Technical Support E-mail: [email protected] Country Code: 852 Technical Support (Dimension and Inspiron) Technical Support (OptiPlex, Latitude, and Dell - Dell 1100 | Owner's Manual - Page 60
Code: 00 Country Code: 39 City Code: 02 Jamaica Department Name or Service Area, Website and E-Mail Address Website: support.euro.dell.com E-mail: [email protected] Technical Support U.K. Technical Support (dial within U.K. only) Home User Customer Care Small Business Customer Care - Dell 1100 | Owner's Manual - Page 61
and Inspiron) Technical Support (Dell Precision, OptiPlex, and Latitude) Technical Support outside of Japan (Dell Precision, OptiPlex, and Latitude) Technical Support (PDAs, projectors, printers, routers) Technical Support outside of Japan (PDAs, projectors, printers, routers) Faxbox Service - Dell 1100 | Owner's Manual - Page 62
, Belgium) Switchboard (Brussels, Belgium) Technical Support Customer Service (Xiamen, China) Transaction Sales (Xiamen, China) Website: support.ap.dell.com Technical Support (Dell Precision, OptiPlex, and Latitude) Technical Support (Dimension, Inspiron, and Electronics and Accessories) Technical - Dell 1100 | Owner's Manual - Page 63
Technical Support Sales Customer Service Main Montserrat Netherlands Antilles Netherlands (Amsterdam) International Access Code: 00 Country Code: 31 City Code: 20 New Zealand International Access Code: 00 Country Code: 64 Nicaragua General Support General Support Website: support.euro.dell.com - Dell 1100 | Owner's Manual - Page 64
Fax Switchboard Panama General Support Peru General Support Poland (Warsaw) Website: support.euro.dell.com International Access Code: 011 E-mail: [email protected] Country Code: 48 Customer Service Phone City Code: 22 Customer Care Sales Customer Service Fax Reception Desk Fax - Dell 1100 | Owner's Manual - Page 65
Technical Support (Dimension, Inspiron, and Electronics and Accessories) Technical Support (OptiPlex, Latitude, and Dell Precision) Technical Support (PowerApp, PowerEdge, PowerConnect, and PowerVault) Customer Service (Penang, Malaysia) Sales Slovakia (Prague) Website: support.euro.dell.com - Dell 1100 | Owner's Manual - Page 66
Name or Service Area, Website and E-Mail Address Website: support.euro.dell.com E-mail: support.euro.dell.com/es/es/emaildell/ Home and Small Business Technical Support Customer Care Sales Switchboard Fax Corporate Technical Support Customer Care Switchboard Fax Website: support.euro.dell.com E-mail - Dell 1100 | Owner's Manual - Page 67
Code City Code Department Name or Service Area, Website and E-Mail Address Taiwan Website: support.ap.dell.com International Access Code: 002 E-mail: [email protected] Country Code: 886 Technical Support (OptiPlex, Latitude, Inspiron, Dimension, and Electronics and Accessories) Technical - Dell 1100 | Owner's Manual - Page 68
: 00 Country Code: 44 City Code: 1344 Uruguay Venezuela Department Name or Service Area, Website and E-Mail Address Area Codes, Local Numbers, and Toll-Free Numbers Website: support.euro.dell.com Customer Care website: support.euro.dell.com/uk/en/ECare/Form/Home.asp E-mail: dell_direct_support - Dell 1100 | Owner's Manual - Page 69
("Agreement") apply to your purchase of computer systems and/or related products and/or services and support sold in the United States ("Product") by the Dell entity named on the invoice or acknowledgement ("Dell") provided to you. By accepting delivery of the Product, you accept and are bound - Dell 1100 | Owner's Manual - Page 70
www.dell.com | support.dell.com 4 Warranties. THE LIMITED WARRANTIES APPLICABLE TO DELL-BRANDED HARDWARE PRODUCT CAN BE FOUND AT http://www.dell.com/policy/legal/warranty.htm OR IN THE DOCUMENTATION DELL PROVIDES WITH THE PRODUCT. DELL MAKES NO WARRANTIES FOR SERVICE, SOFTWARE, OR NON-DELL BRANDED - Dell 1100 | Owner's Manual - Page 71
conditions that govern them without prior notice to you. Dell has no obligation to provide service or support until Dell has received full payment for the Product or service/support contract you purchased. Dell is not obligated to provide service or support you purchase through a third party and not - Dell 1100 | Owner's Manual - Page 72
www.dell.com | support.dell.com 13 Binding Arbitration. ANY CLAIM, DISPUTE, OR CONTROVERSY (WHETHER IN CONTRACT, TORT, OR OTHERWISE, WHETHER PREEXISTING, PRESENT OR FUTURE, AND INCLUDING STATUTORY, COMMON LAW, INTENTIONAL TORT AND EQUITABLE CLAIMS) BETWEEN CUSTOMER AND DELL, its agents, employees, - Dell 1100 | Owner's Manual - Page 73
as accident, abuse, misuse, or problems with electrical power - Servicing not authorized by Dell - Usage that is not in accordance with product instructions - Failure to follow the product instructions or failure to perform preventive maintenance - Problems caused by using accessories, parts, or - Dell 1100 | Owner's Manual - Page 74
indicated on your packing slip or invoice, except for the following Dell-branded hardware: • Portable computer batteries carry a 1-year limited warranty. • Projector lamps carry a 90-day limited warranty. • Memory carries a lifetime limited warranty. • Monitors carry the longer of either a 3-year - Dell 1100 | Owner's Manual - Page 75
us. NOTE: Before you replace parts, make sure to back up the data on the hard drive(s) and any other storage device(s) in the product(s). We are not responsible for lost or corrupted data. What if I purchased a service contract? If your service contract is with Dell, service will be provided to you - Dell 1100 | Owner's Manual - Page 76
application software or an operating system). • Nondefective third-party and Dell-branded software, peripheral, electronics and accessory products (for example: televisions, printers, projectors, MP3 players, PDAs, battery chargers, un-preinstalled third-party software, wireless cards/access points - Dell 1100 | Owner's Manual - Page 77
as accident, abuse, misuse, or problems with electrical power - Servicing not authorized by Dell - Usage that is not in accordance with product instructions - Failure to follow the product instructions or failure to perform preventive maintenance - Problems caused by using accessories, parts, or - Dell 1100 | Owner's Manual - Page 78
Home Consumers who purchased through an Employee Purchase Program: Technical Support 1-800-387-5757 Customer Service 1-800-326-9463 (Extension 8221 for Individual Consumers) Dell-Branded Memory 1-888-363-5150 Printers, Wireless, Projection Devices and TVs, Handhelds, and 1-877-335-5767 - Dell 1100 | Owner's Manual - Page 79
us. NOTE: Before you replace parts, make sure to back up the data on the hard drive(s) and any other storage device(s) in the product(s). We are not responsible for lost or corrupted data. What if I purchased a service contract? If your service contract is with Dell, service will be provided to you - Dell 1100 | Owner's Manual - Page 80
subject to the terms and conditions of the original service or limited warranty agreement and Dell's terms and conditions of sale located at www.dell.com. Dell cannot guarantee the authenticity of the products, limited warranties, service or support, or the accuracy of the listings of products you - Dell 1100 | Owner's Manual - Page 81
manufacturer or publisher directly. Dell-Branded Peripheral Products Dell does provide a limited warranty for new Dell-branded peripheral products (products for which Dell is listed as the manufacturer) such as monitors, batteries, memory, docking stations, and projectors. To determine which limited - Dell 1100 | Owner's Manual - Page 82
www.dell.com | support.dell.com Limitation and Statutory Rights Dell makes no other warranty, guarantee end user with Dell and/or any other seller. Dell World Trade LP One Dell Way, Round Rock, TX 78682, USA Dell Computadores do Brasil Ltda (CNPJ No. 72.381.189/0001-10) Avenida Industrial Belgraf - Dell 1100 | Owner's Manual - Page 83
is not available, we will either replace it with a comparable product or reimburse you for the cartridge purchase cost, at Dell's sole option. This limited warranty does not apply to ink or toner cartridges that have been refilled or improperly stored or due to problems resulting from misuse, abuse - Dell 1100 | Owner's Manual - Page 84
been discontinued or the cartridge is not available, Dell reserves the right, at its sole discretion, to choose between replacing it by a similar product or reimbursing you for the purchase cost. This limited warranty does not apply to ink or toner cartridges that have been refilled or to defects - Dell 1100 | Owner's Manual - Page 85
gis kun retur på dersom den er ubrukt, d.v.s. at toner/blekkpatron ikke er åpnet. 9 Angrefristen gjelder ikke ved næ er kvittering fra transportør som viser når jeg mottok forsendelsen samt kopi av fakturaen fra DELL som er angitt med nummer over. Jeg er kjent med betingelsene for returretten og - Dell 1100 | Owner's Manual - Page 86
other safety service or seriously degrades, obstructs, or repeatedly interrupts a licensed radio communications service. Radio communications services include but a Dell Technical Support representative or an experienced radio/television technician for additional suggestions. Dell™ printers are - Dell 1100 | Owner's Manual - Page 87
if not installed and used in accordance with the manufacturer's instruction manual, may cause interference with radio communications. However, there is compliance with FCC regulations: • Model number: Dell Laser Printer 1100 • Company name: Dell Inc. One Dell Way Round Rock, Texas 78682 USA 512-338- - Dell 1100 | Owner's Manual - Page 88
Nagel de México S. de R.L. Avenida Soles No. 55 Col. Peñon de los Baños 15520 México, D.F. Dell Laser Printer 1100 110~127 VAC 50 Hz/60 Hz 4.0 Arms +5 VDC, +24 VDC, 0.8 Arms (+5 materials, or facilities, missiles or the support of missile projects, and chemical or biological weapons. 80 Appendix - Dell 1100 | Owner's Manual - Page 89
on the Software packet(s), installing or downloading the Software, or using the Use" means loading the Software in temporary memory or permanent storage on the computer. Installation or transfer it to a single hard disk provided you keep the part of a sale or transfer of the Dell product if you - Dell 1100 | Owner's Manual - Page 90
www.dell.com | support.dell.com Limited Warranty Dell warrants that the Software disks will be disk damage has resulted from accident, abuse, misapplication, or service or modification by someone other than Dell. Any replacement disk is warranted for the remaining original warranty period or thirty - Dell 1100 | Owner's Manual - Page 91
finding does not affect the enforceability of the remaining provisions, terms, or conditions of this agreement. This agreement is binding on successors and assigns. Dell agrees and you agree to waive, to the maximum extent permitted by law, any right to a jury trial with respect to the Software or - Dell 1100 | Owner's Manual - Page 92
www.dell.com | support.dell.com 84 Appendix - Dell 1100 | Owner's Manual - Page 93
, loading, 24 loading paper in the manual feed mode, 21 in the paper tray, 19 M maintenance, 29 manual feed mode, using, 21 O operator panel, 13 ordering supplies, 29 P paper jams, clearing, 35 paper, loading, 19 R replacing, toner cartridge, 30 S safety information, 1 säkerhetsinformation - Dell 1100 | Owner's Manual - Page 94
support contacting Dell, 44 T toner cartridge, replacing, 30 toner ordering, ii transparencies, loading, 23 troubleshooting, 35 Turvallisuustiedot, 4 U uninstalling, software, 16 V Veiligheidsinformatie, 2 86 Index - Dell 1100 | Owner's Manual - Page 95
Index 87
-
 1
1 -
 2
2 -
 3
3 -
 4
4 -
 5
5 -
 6
6 -
 7
7 -
8
-
9
-
10
-
11
-
12
-
13
-
14
-
15
-
16
-
17
-
18
-
19
-
20
-
21
-
22
-
23
-
24
-
25
-
26
-
27
-
28
-
29
-
30
-
31
-
32
-
33
-
34
-
35
-
36
-
37
-
38
-
39
-
40
-
41
-
42
-
43
-
44
-
45
-
46
-
47
-
48
-
49
-
50
-
51
-
52
-
53
-
54
-
55
-
56
-
57
-
58
-
59
-
60
-
61
-
62
-
63
-
64
-
65
-
66
-
67
-
68
-
69
-
70
-
71
-
72
-
73
-
74
-
75
-
76
-
77
-
78
-
79
-
80
-
81
-
82
-
83
-
84
-
85
-
86
-
87
-
88
-
89
-
90
-
91
-
92
-
93
-
94
-
95
 |
 |
www.dell.com | support.dell.com
Dell™ Laser Printer 1100
Owner’s Manual
Look Inside For:
• Preparing Your Printer
• Understanding Software
• Loading Print Media
• Printing
• Maintenance
• Troubleshooting