Dell 1125 dell Users Guide
Dell 1125 - Multifunction Monochrome Laser Printer B/W Manual
 |
UPC - 043232161187
View all Dell 1125 manuals
Add to My Manuals
Save this manual to your list of manuals |
Dell 1125 manual content summary:
- Dell 1125 | dell Users Guide - Page 1
Dell™ Laser Multi-Function Printer 1125 User's Guide About Your Multi-Funtion Printer Setting Up Your Printer Paper Handling Printing Copying Scanning Model MFP 1125 Faxing Understanding the Software Maintenance Troubleshooting Specifications Order Toner Cartridges Dell™ toner cartridges are - Dell 1125 | dell Users Guide - Page 2
Rico 1-800-805-8035 Trinidad and Tobago 877-INK-2-YOU United States NOTE: If your country is not listed, contact your Dell distributor to order supplies. Toner cartridge Part number 1,000 page toner XP092 2,000 page toner XP407 Drum TU031 NOTE: A NOTE indicates important information that - Dell 1125 | dell Users Guide - Page 3
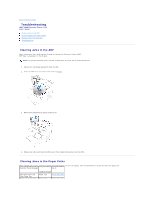
Page Troubleshooting Dell™ Multi-Function Printer 1125 User's Guide Clearing Jams in the ADF Clearing Jams in the Paper Paths Clearing LCD Error Messages Troubleshooting Clearing Jams in the ADF When a document jams while passing through the Automatic Document Feeder (ADF), ADF Paper Jam appears - Dell 1125 | dell Users Guide - Page 4
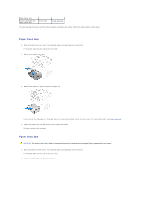
Drum Area Jam To avoid tearing the paper, pull the jammed paper out gently and slowly. Follow the steps below to clear jams. Paper Feed Jam 1. Open and close the front cover. The jammed paper automatically exits the printer. If the paper does not exit, go to the next step. 2. Remove the paper tray - Dell 1125 | dell Users Guide - Page 5
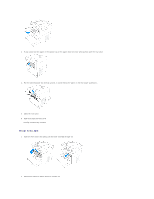
the jammed paper out directly upward, to avoid tearing the paper on the rear paper guide parts. 5. Close the rear cover. 6. Open and close the front cover. Printing automatically resumes. Drum Area Jam 1. Open the front cover and lightly pull the toner cartridge straight out. 2. Remove the paper by - Dell 1125 | dell Users Guide - Page 6
. Remove jam (see Fuser Area Jam). Drum Area Paper Jam Paper jam in feeder area. Remove jam (see Paper Feed Jam). Feeder Area Toner Low Toner 75% depleted. Toner Empty Toner 95% depleted. Invalid Toner/ No Incorrect or empty toner installed. Toner Found Drum Life Exceeded The drum life is - Dell 1125 | dell Users Guide - Page 7
assigned. Troubleshooting The following chart lists some conditions that may occur and the recommended solutions. Follow the suggested solutions until the problem is corrected. If the problem persists, contact Dell. Paper Feeding Problems Condition Suggested solutions Paper in the output tray is - Dell 1125 | dell Users Guide - Page 8
Multi-Function Printer 1125 as your default printer in your Windows. Click Start® Settings® Printers. Right-click the Multi-Function Printer 1125 printer icon and select Set as Default Printer. The front or rear cover is not closed. l Paper is jammed. l No paper is loaded. l The toner cartridge is - Dell 1125 | dell Users Guide - Page 9
print a cleaning sheet several times to clean the cartridge; see Maintaining the Drum Cartridge. After the printout, if you still have the same problems, install a new toner cartridge. See Replacing the Toner Cartridge. l Parts of the printer may have toner on them. If the defects occur on the back - Dell 1125 | dell Users Guide - Page 10
Install a new toner cartridge. See Replacing the Toner Cartridge. l If the problem persists, the printer may require repair. Contact a service representative. Curl If the printed paper is curled or the paper does not feed into the printer: l Turn over the stack of paper in the paper tray. Also try - Dell 1125 | dell Users Guide - Page 11
, check/adjust the paper guides. l Ensure that the paper is the proper paper weight. 75 g/m2 (20 lb) bond paper is recommended. l Check for copy paper or pieces of copy paper remaining in the printer after a paper jam has been cleared. Fewer copies from the toner cartridge than expected print out - Dell 1125 | dell Users Guide - Page 12
connected. Common Windows Problems Condition File in Use message appears during installation. Error Writing to LPTx message appears. Suggested solutions Exit all software applications. Remove all software from the StartUp Group, then restart Windows. Reinstall the printer driver. Ensure that - Dell 1125 | dell Users Guide - Page 13
1125 User's Guide Physical Specifications Printer Specifications Scanner Specifications Copier Specifications Facsimile Specifications Paper Specifications Print Media Guidelines Storing Print Media Identifying Print Media Sources and Specifications Physical Specifications Item Dimensions (tray - Dell 1125 | dell Users Guide - Page 14
Capacity Scan Features Scan Software Scan Support Supported File Types Description CIS 600 dpi Mono, grayscale, Full Color, 256 color 75, 150, 200, 300, 600 dpi 30 page capacity 11 ppm A4, LTR 10 secs 25 to 400% 1 in book capacity Cloning, N-up TWAIN-Dell MFP 1125 Scanner, WIA-Dell MFP 1125 Scanner - Dell 1125 | dell Users Guide - Page 15
result in paper curl or paper jam. CAUTION: Using paper that does not meet these specifications may cause problems, requiring repairs. These repairs are not covered by the Dell warranty or service agreements. Print Media Sizes and Support Print Media Size Dimensions Paper Tray Bypass Tray Duplex - Dell 1125 | dell Users Guide - Page 16
for the Dell MFP 1125. Print Media Guidelines Print media refers to paper, card stock, transparencies, labels, and envelopes. Your printer provides high quality printing on a variety of print media. Selecting the appropriate print media for your printer helps you avoid printing problems. Paper For - Dell 1125 | dell Users Guide - Page 17
its edges. Excessive curl can cause paper feeding problems. Curl usually occurs after the paper passes through the printer, where it is exposed to high temperatures. Storing paper unwrapped in humid conditions, even in the paper tray, can contribute to paper curling prior to printing and can cause - Dell 1125 | dell Users Guide - Page 18
more frequent cleaning and feed reliability may not be as good as that of standard paper. Transparencies Try a sample of any transparencies you are considering using with the printer before buying large quantities: l Use transparencies designed specifically for laser printers. Transparencies must be - Dell 1125 | dell Users Guide - Page 19
using 3M transparencies for the Dell MFP 1125. Envelopes Load one envelope at a time in the bypass tray. Try a sample of any envelopes you are considering using with the printer before buying large quantities. See Using the Bypass Tray for instructions on loading an envelope. When printing - Dell 1125 | dell Users Guide - Page 20
4.49 x 6.38 in. (114 x 162 mm) N Y Custom 3 x 5 in. to 8.5 x 14 in. N Y (76 x 127 mm to 216 x 356 mm) NOTE: Please follow the instructions on the paper packaging for a preferred printing side. Printing on the wrong side may cause some paper misalignment on the paper output tray. Print Media - Dell 1125 | dell Users Guide - Page 21
-140 g/m2 (36-40 lb bond) 75-135 g/m2 (20-36 lb bond) 75-90 g/m2 (20-24 lb) NOTE: Grain short is preferred for papers over 163 g/m2 (43 lb bond). NOTE: Dell Recommends using 3M Transparencies for the Dell Laser MFP 1125. Back to Contents Page - Dell 1125 | dell Users Guide - Page 22
Dell™ Multi-Function Printer 1125 User's Guide Clearing the Memory Cleaning Your Multi-Function Printer Maintaining the Toner Cartridge Maintaining the Drum Cartridge Replacement Parts Order Toner Cartridges resets all of your settings to the factory default. ¡ Paper Setup: Restores all of the Paper - Dell 1125 | dell Users Guide - Page 23
, such as smearing or toner specks. Clean inside the printer to prevent these problems. 1. Power the printer off and unplug the power cord. CAUTION: Allow a reasonable amount of time for the printer to cool down. 2. Open the front cover of the printer. 3. Pull the drum cartridge straight out in the - Dell 1125 | dell Users Guide - Page 24
drum. Slide the drum cartridge into the printer until it clicks into place. 7. Close the printer front cover. Plug in the power cord and power the printer on. Cleaning the Scanner Keeping the scanner and scanner glass clean ensures the highest quality copies, scans, and sent faxes. Dell recommends - Dell 1125 | dell Users Guide - Page 25
time is wasted when the toner is depleted. See Order Toner Cartridges. NOTICE: For best results, use Dell toner cartridge. Print quality and printer reliability are not guaranteed if you do not use Dell supplies. NOTE: The Dell MFP 1125 can print received faxes when the toner is low. Perform the - Dell 1125 | dell Users Guide - Page 26
. 5. Hold the drum cartridge in one hand and push the toner cartridge into the drum cartridge in the direction shown until it clicks into place. 6. Insert the drum cartridge into the printer, using the guiding slots to correctly position the drum. Slide the drum cartridge into the printer until it - Dell 1125 | dell Users Guide - Page 27
a standard life of approximately 20,000 pages. If the print quality appears reduced (e.g. steaks, spots, or fading) the drum cartridge may require cleaning or replacing. Printing a test pattern determines when the drum cartridge is faulty or depleted. To print a test pattern the printer mode must - Dell 1125 | dell Users Guide - Page 28
affixed to the paper. 6. If the problem persists, repeat steps 1 through 4 until toner particles are not affixed to the paper. Replacing the Drum Cartridge When the drum passes 20,000 pages use, the life of the unit is exceeded and the LCD displays Drum Life Exceeded. Cleaning the drum may no longer - Dell 1125 | dell Users Guide - Page 29
toner cartridge. 4. Hold the replacement drum cartridge in one hand and push the toner cartridge into the drum cartridge in the direction shown until it clicks into place. 5. Insert the drum cartridge into the printer, using the guiding slots to correctly position the drum. Slide the drum cartridge - Dell 1125 | dell Users Guide - Page 30
by a trained service professional. To purchase replacement parts, contact Dell™ Replacing the Paper Tray If the paper tray jams constantly, fails to register inserted paper, or feeds multiple pages simultaneously, perform the following steps to replace the unit. 1. Remove the paper tray cover and - Dell 1125 | dell Users Guide - Page 31
of the printer and then with your other hand, pull firmly from the right side of the paper tray in the direction of the arrow. 3. Insert the replacement paper tray in the direction shown until an audible click is heard. 4. Replace the paper and paper tray cover. Order Toner Cartridges Dell™ toner - Dell 1125 | dell Users Guide - Page 32
Toner cartridge Part number 1,000 page toner XP092 2,000 page toner XP407 Drum TU031 Toner cartridges are available through the Dell Toners Reorder Program icon installed on the desktop as part of the initial software installation. Double-click the icon to display the Order Supplies window. - Dell 1125 | dell Users Guide - Page 33
Page Setting Up Your Printer Dell™ Multi-Function Printer 1125 User's Guide Installing the Paper Tray and Paper Output Tray Connecting Your Printer Powering On the Multi-Function Printer 1125 Installing the Paper Tray and Paper Output Tray The Paper Tray and Paper Output Tray are supplied separately - Dell 1125 | dell Users Guide - Page 34
1. Remove all packaging from the paper output tray and discard. 2. Align the tabs on the paper support with the slots on the printer and push at an angle in the direction of the arrow. Lower the support into place. Connecting Your Printer Connecting the Telephone and Fax Lines 1. Plug - Dell 1125 | dell Users Guide - Page 35
; do not connect the other end to a USB port on a USB keyboard. Powering On the Multi-Function Printer 1125 CAUTION: The fusing area at the rear part of the inside of your printer becomes hot once the printer is powered on. CAUTION: Be careful of hot areas when accessing this area. CAUTION: Do not - Dell 1125 | dell Users Guide - Page 36
Back to Contents Page - Dell 1125 | dell Users Guide - Page 37
Back to Contents Page Paper Handling Dell™ Multi-Function Printer 1125 User's Guide Loading Print Media in the Paper Tray Using the Bypass Tray Setting the Paper Size Setting the Paper Type This chapter provides information on how to make print media selections, how to care for the print media, and - Dell 1125 | dell Users Guide - Page 38
with the side to be printed on facing down. 3. Do not exceed the maximum stack height indicated by the paper limit marks on the inside of the tray. NOTE: Overloading the paper tray may cause paper jams. 4. Adjust the paper length guide in the direction of the arrow until it rests lightly against the - Dell 1125 | dell Users Guide - Page 39
to be printed on facing down. 2. Adjust the paper width guide and move it towards the stack of paper until it lightly touches the side of the stack. NOTE: Improper adjustment of paper guides can result in paper jams. 3. Replace the paper tray cover. 4. Set the paper type and size. See Setting the - Dell 1125 | dell Users Guide - Page 40
Print Media Guidelines to avoid paper jams and print quality problems. Flatten any curl on postcards, envelopes, and labels before loading them into the bypass tray. Postcards, 3.5 by 5.83 in. (index) cards, and other custom-sized materials are supported by this printer. The minimum size is 3.0 by - Dell 1125 | dell Users Guide - Page 41
and prints as normal. NOTE: The settings made from the printer driver override the settings on the operator panel. Setting the Paper Size After loading paper in the paper tray or the bypass tray, set the paper size using the operator panel buttons. This setting only applies to the Fax and Copy modes - Dell 1125 | dell Users Guide - Page 42
- Dell 1125 | dell Users Guide - Page 43
Back to Contents Page Printing Dell™ Multi-Function Printer 1125 User's Guide About Sharing the Printer on a Network Setting Up the Locally Shared Printer Printing a Document Printer Settings Printing Multiple Pages on One Sheet of Paper Printing a Reduced or Enlarged Document Printing Posters - Dell 1125 | dell Users Guide - Page 44
Next. 7. The printer appears in the Printers window ready for use. Printing a Document Your printer prints documents using the Graphic Device Interface (GDI) printer driver. When you install the Dell software, your printer automatically installs the GDI printer driver. The driver provided with your - Dell 1125 | dell Users Guide - Page 45
the Printer window. If the icon is not available, follow the steps below to access the Printers window: 1. Click the Start button on the task bar. 2. Point to Settings® Printers and Faxes to open the Printers window and double-click the Dell MFP 1125 Printer icon. The Printers window is displayed - Dell 1125 | dell Users Guide - Page 46
using the printer driver. The settings you change remain in effect only while you are using the current program. See the following guide to make permanent, or default, changes. 1. Click the Start button in the task bar, click Printers and Faxes. 2. Point to the Dell MFP 1125 Printer printer. Right - Dell 1125 | dell Users Guide - Page 47
, and Printing Booklets. Manual Duplex Printing enables you to print on both sides of the paper. For more information, see Printing on Both Sides of Paper. Paper Tab Use the following options to set the paper handling needs when you access the printer properties. Click the Paper tab to access the - Dell 1125 | dell Users Guide - Page 48
following graphic options to adjust the print quality for your specific printing needs. Click the Graphics tab to display the darkness of printer output. Select a value between -50 (darkest) and 50 (lightest). Toner Save Mode Click the On radio button to allow the printer to use less toner on each - Dell 1125 | dell Users Guide - Page 49
Undo feature for the Reset to Factory Defaults button. Using Help Your printer has a help screen that can be activated by the Help button in the printer's Properties window. These help screens give detailed information about the printer features provided by the printer driver. Clicking Help on the - Dell 1125 | dell Users Guide - Page 50
number greater than one. 3. Click the Paper tab and select the paper source, size, and type. 4. Click OK to return to the software print screen. Printing a Reduced or Enlarged Document The print driver can reduce or enlarge a document on a page to match user requirements. Documents can be reduced up - Dell 1125 | dell Users Guide - Page 51
You can print a single page document onto 4, 9, 16, or 25 sheets of paper, for the purpose of pasting the sheets together to form one poster size document. 1. From your software application, access the printer properties. 2. From the Layout tab, select Poster Printing from the Layout Type drop-down - Dell 1125 | dell Users Guide - Page 52
in paper jamming and/or damage to the printer. NOTE: To use the double-sided printing, you must use the N-UP layout type. To perform duplex printing: 1. From your software application, access the printer properties. 2. From the Layout tab, select Long Edge or Short Edge from the Manually Duplex - Dell 1125 | dell Users Guide - Page 53
size, and type. 4. Click OK to return to the software print screen. 5. Click OK to print the document. 6. Your printer prints the odd pages of the document then the LCD shows Put Papers Back Press Select. 7. Replace the printed pages in the paper tray (printed side down) and press Select (P) on the - Dell 1125 | dell Users Guide - Page 54
the available Text String watermark options. Property Description Watermark Text Enter the text to appear as the watermark. Example is used in the window above, although any text string up to 62 characters is acceptable. Font Select the watermark font from the drop down menu Style Select - Dell 1125 | dell Users Guide - Page 55
forms and letterhead paper. Rather than From your software application, access the printer properties. 3. From the Overlays tab, select Create New Overlay from the Overlay Function drop down list. Click OK. The Create Overlay dialogue box is displayed. In the Create Overlay window - Dell 1125 | dell Users Guide - Page 56
overlay. Deleting a Page Overlay Overlays that are no longer used should be deleted to minimize the Overlay Select window size. To delete an overlay: 1. From your software application, access the printer properties. 2. From the Overlays tab, select the overlay to be deleted from the Overlay Select - Dell 1125 | dell Users Guide - Page 57
-Function Printer 1125 User's Guide Loading Paper for Copying Selecting a Paper Tray Preparing a Document Loading an Original Document Making Copies Setting Copy Options Using Special Copy Features Changing the Default Settings Using Dell MFP Center Loading Paper for Copying The instructions for - Dell 1125 | dell Users Guide - Page 58
. 2. Adjust the document width guide to the correct document size. Ensure that the bottom of the document stack matches the paper size marked on the document input tray. For detailed guidelines for preparing an original document, see Preparing a Document. Using the Scanner Glass To load the document - Dell 1125 | dell Users Guide - Page 59
open. NOTE: Leaving the cover open while copying may affect the copy quality and toner consumption. Making Copies NOTE: A computer connection is not required for copying. NOTE: Contaminates in the ADF or on the scanner glass may cause black vertical lines or black spots on the printout. For best - Dell 1125 | dell Users Guide - Page 60
with photo or gray tones. Using Special Copy Features NOTE: Some features may not be available depending on whether you loaded the document on the scanner glass or in the ADF. You can use the following copy features using the Layout menu: l Off: Prints in normal mode. l ID Copy: Prints a 2-sided - Dell 1125 | dell Users Guide - Page 61
copies, and contrast by using the Copy menus, see Setting Copy Options. 6. Press Start (u) to begin copying. Your printer begins scanning the front side. When ID Copy Flip Card Over is displayed on the LCD, open the scanner cover and flip the document over with the second side facing down. Close the - Dell 1125 | dell Users Guide - Page 62
enables you to copy items from your computer. Dell MFP Center runs as a separate application from: l Windows XP: Click Start® All Programs® DELL® DELL Printers® DELL MFP 1125® Utilities® DELL MFP Center. l Windows Vista: Click Start® All Programs® DELL® DELL MFP 1125® Utilities® DELL MFP Center. - Dell 1125 | dell Users Guide - Page 63
on the scanner glass. For more information on loading a document, see Loading an Original Document. 2. Open Dell MFP Center: l In Windows XP: Click Start® All Programs® DELL® DELL Printers® DELL MFP 1125® Utilities® DELL MFP Center. l In Windows Vista: Click Start® All Programs® DELL® DELL MFP 1125 - Dell 1125 | dell Users Guide - Page 64
Scanning Dell™ Multi-Function Printer 1125 User's Guide Scanning Overview Using Dell MFP Center Scanning From the Operator Panel Scanning Using the Windows Image Acquisition (WIA) Driver Scanning Using the TWAIN-Dell MFP 1125 Scanner Changing Default Settings Scanning Overview Use your Dell™ MFP - Dell 1125 | dell Users Guide - Page 65
(WIA) Driver Your printer also supports the WIA-Dell MFP 1125 Scanner for scanning images. WIA is one of the standard components provided by Microsoft® Windows® and works with digital cameras and scanners. Unlike the TWAIN-DELL MFP 1125 Scanner, the WIA-Dell MFP 1125 Scanner enables you to scan an - Dell 1125 | dell Users Guide - Page 66
the TWAIN-Dell MFP 1125 Scanner Use the TWAIN-Dell MFP 1125 Scanner dialog box to select scan settings before scanning an item, select an image area to scan, or preview an image you want to scan from scanning enabled software such as Adobe™ Photoshop®. Using the TWAIN-Dell MFP 1125 Scanner 1. Launch - Dell 1125 | dell Users Guide - Page 67
General Settings This section of the dialog window provides a description of the scanner source settings. Paper Select the scan media source from the drop-down list. l Scanner Glass: source is media placed on scanner glass. l Automatic Document Feeder: source is media placed in ADF. The options in - Dell 1125 | dell Users Guide - Page 68
settings. The user defined name is displayed in the scan settings window. Selecting the Automatic Document Feeder The following options are available when you select the ADF as the scanner source. l ADF - Faster: Used to scan pages with many graphics, or mixed graphics and text, line art, or color - Dell 1125 | dell Users Guide - Page 69
light spectrum, resulting in differences in color perception. It is used by software to imitate color as closely as possible to the original. Select Gamma . Contrast Settings Changes to Contrast will alter the appearance of a scanned image, altering the difference between light and dark areas of an - Dell 1125 | dell Users Guide - Page 70
than the available space, the TWAIN-Dell MFP 1125 Scanner will display an error message and cancel scanning. Enter a user-defined resolution in the text box. The drop-down list will display User defined. Paper Size Select a paper size from the first drop-down list: Paper Size 3x5 4x6 5x7 Letter - Dell 1125 | dell Users Guide - Page 71
select the area to scan. Drag the scan areas to change the size of the scan area. Place the mouse cursor inside the rectangle to move the scan area. Exit Click Exit to close the dialog box. Scan Click Scan to scan the item that is loaded in the ADF or on the scanner glass. Preview Click Preview - Dell 1125 | dell Users Guide - Page 72
color default: ¡ Black ¡ Color ¡ Gray 8. Press Select (P) to select the scan color default. 9. Press Scroll () to select Quality and press Select (P). 10. Press Scroll () to select the quality default: ¡ 1200 ¡ 600 ¡ 300 ¡ 150 ¡ 75 11. Press - Dell 1125 | dell Users Guide - Page 73
Back to Contents Page Faxing Dell™ Multi-Function Printer 1125 User's Guide Setting the Printer ID Using the Number Keypad to on settings up the DELL MFP 1125 for operation, sending, and receiving faxes, and sending faxes from a PC (local and shared network). Setting the Printer ID In most countries - Dell 1125 | dell Users Guide - Page 74
in the operator panel menu defines how all faxes are sent and received unless temporary changes are made using other menus. See the following guide to make changes to Fax Default settings. Setting Fax Default Options 1. Press Scroll () to select Fax and press Select (P). 2. Press Scroll () to - Dell 1125 | dell Users Guide - Page 75
(manual receive mode): Manual receive mode is enabled when automatic fax reception is turned off. 1-15 Set the redial interval. The printer automatically than the paper size in the paper tray, the printer can reduce the size of the document to fit the size of the paper loaded in the printer. On - Dell 1125 | dell Users Guide - Page 76
printer also supports the Super Fine resolution. Faxes scanned in Super Fine resolution transmit at the highest resolution supported by the receiving device. See the following guide normal (see Sending a Fax Automatically and Sending a Fax Manually). 6. Press Cancel (V) to return to the Standby mode - Dell 1125 | dell Users Guide - Page 77
Setting Fax Default Options. Sending a PC-Fax It is possible to send a fax by using software applications. The Fax driver is automatically installed in the computer and is available as a printer option. To send a PC-Fax, perform the following procedures. 1. Select Print from your application. The - Dell 1125 | dell Users Guide - Page 78
2. In the Printer Name field, select Dell MFP 1125 Fax. 3. Click the Properties button. The Properties screen appears. 4. Select Paper Size, Resolution, and Orientation. 5. Click OK to continue. 6. Enter the recipient's name. The Recipient's Information screen displays. 7. In the Recipient's Name - Dell 1125 | dell Users Guide - Page 79
The Scheduled Fax screen displays. 13. Specify a time to send or select Now (default). 14. Click Finish to send. Receiving a Fax NOTE: The Dell MFP 1125 Printer cannot receive color faxes. About Receiving Modes NOTE: To use the Ans/Fax mode, remove the blue socket from the extension telephone socket - Dell 1125 | dell Users Guide - Page 80
printer can no longer receive any incoming faxes. Secure free memory to resume by removing data stored in the memory. Loading Paper for Receiving Faxes The instructions for loading paper in the paper tray insure all calls are answered. Receiving Manually Using an Extension Telephone This feature - Dell 1125 | dell Users Guide - Page 81
through 6. OR To return to Standby mode, press Cancel (V). Editing Speed Dial Numbers 1. You can edit a specific speed dial number. Press Directory (&) on the operator panel. OR Press Scroll () to select Fax and press first into the ADF. OR Place a single document face down on the scanner glass. - Dell 1125 | dell Users Guide - Page 82
The corresponding entry's name is displayed and the document scans into the memory. 7. If the document is loaded on the scanner glass, the LCD display asks if you want to send Dial Numbers You can delete a specific speed dial number from a selected group or add a new number to the selected group. - Dell 1125 | dell Users Guide - Page 83
number for one operation. 3. Then continue the procedure to complete the desired operation. 4. Your printer automatically scans the document loaded in the ADF or on the scanner glass into the memory. The printer dials each of the numbers included in the group and begins transmission. Searching for - Dell 1125 | dell Users Guide - Page 84
entire memory in alphabetical order, from A to Z. While searching through the printer's memory, you can see that each entry is preceded by one of first into the ADF. OR Place a single document face down on the scanner glass. For more information on loading a document, see Loading an Original Document - Dell 1125 | dell Users Guide - Page 85
document is loaded in the ADF, the printer automatically begins to send. 2. For the document loaded on the scanner glass, the display asks if you want you finish entering fax numbers, press Start (u). The document is scanned into the memory before transmission. The display shows the memory capacity - Dell 1125 | dell Users Guide - Page 86
. Data Entry Ok is displayed. 13. For documents loaded on the scanner glass, the display asks if you want to load another page. Select Yes to add. Otherwise, select No. 14. The document is scanned into the memory. 15. The printer returns to Standby mode and the fax is transmitted from memory at - Dell 1125 | dell Users Guide - Page 87
if Secure Receive is set to On first. When a fax is received in the secure receiving mode, your printer stores it into memory and displays Memory Received to let you know that there is a fax stored. To print Report Shows all incoming and out going fax activity recorded by the MFP. Printing a Report - Dell 1125 | dell Users Guide - Page 88
The selected information is printed. Broadcast Report Additionally, the MFP has a broadcast confirmation setting. The default for this setting of failure or success. Using Advanced Fax Settings Your printer has various user-selectable setting options for sending or receiving faxes. These - Dell 1125 | dell Users Guide - Page 89
fax application with the computer modem. NOTE: Dell ScanDirect is available on select Dell printers only. Sending Fax from a PC You can send a fax from your PC without using the operator panel using the DELL MFP Center. The Fax software is installed as part of the installation procedure. For more - Dell 1125 | dell Users Guide - Page 90
the scanner glass. For more information on loading a document, see Loading an Original Document. 2. Open the Dell MFP Center. l In Windows XP: Click Start® All Programs® DELL® DELL Printers® DELL MFP 1125® Utilities® DELL MFP Center. l In Windows Vista: Click Start® All Programs® DELL® DELL MFP 1125 - Dell 1125 | dell Users Guide - Page 91
Page Understanding the Software Dell™ Multi-Function Printer 1125 User's Guide Software Overview Installing Software in Windows Configuring the Fax Setup Wizard Using the Dell MFP 1125 Status Monitor Printer Settings Utility Directory Fax Settings Scan Software Overview Use the Drivers and Utilities - Dell 1125 | dell Users Guide - Page 92
: Internet Explorer® 5.0 Installing Dell Software A printer driver is software that lets your computer communicate with your printer. The procedure to install drivers depends on the operating system you are using. The following guide shows the Windows XP installation procedure. 1. Power on your - Dell 1125 | dell Users Guide - Page 93
needed for the DELL MFP 1125 (default). Advanced Install: allows for the selection of specific software to install. See the following. 7. Select a type of installation method to use, and click Next. The Installation Progress screen is displayed. The Connect Your Printer screen displays as follows - Dell 1125 | dell Users Guide - Page 94
to the computer's USB port. The Found New Hardware Wizard displays. 9. Select Install software automatically (Recommended) and Click Next. The Scanner, Fax, Status Monitor, MFP Utility, Paper Port, and Printer drivers are installed at this time. Installation continues and the Congratulations, Setup - Dell 1125 | dell Users Guide - Page 95
the DELL MFP 1125 is installed successfully. 11. Click Finish. 12. Remove the Drivers and Dell Fax Setup Wizard. l In Windows XP: Start® All Programs® DELL® DELL Printers® DELL MFP 1125® Utilities® Dell Fax Setup Wizard. l In Windows Vista: Start® All Programs® DELL® DELL MFP 1125® Utilities® Dell - Dell 1125 | dell Users Guide - Page 96
to enter a pause after the prefix digit, when dialing overseas for example. 6. Click Next to continue. The Connections Setting screen is displayed. 7. If the MFP has a dedicated line, check the Yes radio button (default: No). 8. Select the appropriate connection settings and click Next to continue. - Dell 1125 | dell Users Guide - Page 97
NOTE: The preview window shows a different setup diagram depending on the selection(s) made. If all line. Check No (Manually answer...) if the MFP shares a line with other devices. NOTE: If No is selected, any incoming faxes must be answered manually by pressing the user defined Receive Code on the - Dell 1125 | dell Users Guide - Page 98
using the Drivers and Utilities CD or Windows uninstall. NOTE: Close all programs before uninstalling software, and restart your computer after completing the uninstall process. 1. Select Uninstall: l In Windows XP: Click Start® All Programs® DELL® DELL Printers® DELL MFP 1125® Uninstall. l In - Dell 1125 | dell Users Guide - Page 99
as part of the initial software installation from the Drivers and Utilities CD. After the installation, an icon is placed in the task bar. NOTE: If the icon is not present, the Status Monitor is accessible through Start® All Programs® DELL® DELL Printers® DELL MFP 1125® DELL MFP 1125 Status - Dell 1125 | dell Users Guide - Page 100
and Drum count has exceeded life. See Clearing LCD Error Messages Shows the current toner level Displays the Service Tag number for use in correspondence with Dell support Displays HTML help for the Status Monitor Minimizes the Status Monitor to the task bar Displays the Order Toner Cartridge window - Dell 1125 | dell Users Guide - Page 101
exit, click the Exit button at the bottom of the window. Directory Click New Contact to add a name and number to The fax cover page contains the date, the sender's fax number and printer ID, the recipient's fax number and printer ID stored in the sender's Directory and the total number of pages you - Dell 1125 | dell Users Guide - Page 102
, click Save Settings and Close to exit the Fax Settings dialog. Click Reset to fax defaults to restore settings to the factory default values. Scan The scan option provides access to the destination field, where the scanned image is placed locally. Click the Browse button to enter or browse to - Dell 1125 | dell Users Guide - Page 103
Click OK, and Apply to save any changes. Back to Contents Page - Dell 1125 | dell Users Guide - Page 104
Contents Page About Your Multi-Function Printer Dell™ Multi-Function Printer 1125 User's Guide Unpacking Your Multi-Function Printer Multi-Function Printer 1125 Menu Functions Changing the Display Language Select Country Setting the Time and Date Setting Sounds Toner Save Mode Unpacking Your Multi - Dell 1125 | dell Users Guide - Page 105
Paper Tray a. The appearance of the power cord and the telephone line cord may differ according to your country's specifications. b. The Drivers and Utilities CD contains Dell printer drivers, Scan drivers, Printer Settings Utility, Dell Status Monitor, Dell MFP Center, and an HTML User's Guide - Dell 1125 | dell Users Guide - Page 106
USB cable to the printer until you have installed the software and drivers. See Installing Software in Windows. Connect the wall telephone line to the FAX connector. Phone Connector 3. Enables you to connect a telephone or answering machine (Optional) to the Dell Laser MFP 1125. Power Cord - Dell 1125 | dell Users Guide - Page 107
is located at the front of the printer, adjacent to the scanner glass and appears. The operator panel number in edit mode. Multi-Function Printer 1125 Menu Functions Navigate the printer menus using the operator panel buttons 1. Scan Submenu options Microsoft Paint E-mail My Documents Paper Port - Dell 1125 | dell Users Guide - Page 108
Recognition (OCR) Scan Color Color cm 8x10 in 10x15 cm Hagaki 13x18 cm Exec 20x25 cm A4 Scan Default to PC Quality Scan Color Original Size # of copies 1~99 Original Type 2. Copy Paper Setup Paper Size 4. Setup Device Setup Paper Type My Phone No Time Out Date & Time Toner - Dell 1125 | dell Users Guide - Page 109
Reset Drum Cnt need to set the correct time and date if the power supply to the printer is lost. To set the time and date, perform the following steps. Device Setup menu. If Enter Again is displayed, the selection is invalid. Make any necessary corrections and press Select (P). 6. Press Cancel (V) - Dell 1125 | dell Users Guide - Page 110
printer supports Ringer Sounds See the following guide to enable or disable printer functionality. 6. Press Cancel (V) to return to the Standby mode. Toner Save Mode The Toner Save mode enables your printer to use less toner on each page. Activating this mode extends the life of the toner cartridge - Dell 1125 | dell Users Guide - Page 111
2. Press Scroll () to select Device Setup and press Select (P). 3. Press Scroll () to select Toner Save and press Select (P). 4. Press Scroll () to select On or Off and press Select (P). 5. Press Cancel (V) to return to Standby mode. Back to Contents Page
-
 1
1 -
 2
2 -
 3
3 -
 4
4 -
 5
5 -
 6
6 -
 7
7 -
8
-
9
-
10
-
11
-
12
-
13
-
14
-
15
-
16
-
17
-
18
-
19
-
20
-
21
-
22
-
23
-
24
-
25
-
26
-
27
-
28
-
29
-
30
-
31
-
32
-
33
-
34
-
35
-
36
-
37
-
38
-
39
-
40
-
41
-
42
-
43
-
44
-
45
-
46
-
47
-
48
-
49
-
50
-
51
-
52
-
53
-
54
-
55
-
56
-
57
-
58
-
59
-
60
-
61
-
62
-
63
-
64
-
65
-
66
-
67
-
68
-
69
-
70
-
71
-
72
-
73
-
74
-
75
-
76
-
77
-
78
-
79
-
80
-
81
-
82
-
83
-
84
-
85
-
86
-
87
-
88
-
89
-
90
-
91
-
92
-
93
-
94
-
95
-
96
-
97
-
98
-
99
-
100
-
101
-
102
-
103
-
104
-
105
-
106
-
107
-
108
-
109
-
110
-
111
 |
 |

Dell™ Laser Multi
-Function Printer 1125 User's Guide
About Your Multi
-
Funtion Printer
Faxing
Setting Up Your Printer
Understanding the Software
Paper Handling
Maintenance
Printing
Troubleshooting
Copying
Specifications
Scanning
Model MFP 1125
Order Toner Cartridges
Dell™ toner cartridges are available only through Dell. You can order toner cartridges online at
www.dell.com/supplies
or by phone.
Notes, Notices, and Cautions
Information in this document is subject to change without notice.
© 2007 Dell Inc. All rights reserved.
Reproduction in any manner whatsoever without the written permission of Dell Inc.
is strictly forbidden.
Trademarks used in this text:
Dell
, the
DELL
logo, and
Dell Toner Management System
are trademarks of Dell Inc.;
Pentium
is a registered trademark of Intel Corporation;
Microsoft,
Windows, Windows Server, MS-DOS, Internet Explorer,
and
Windows Vista
are either trademarks or registered trademarks of Microsoft Corporation in the United States and/or other
countries.
ENERGY STAR
is a registered trademark of the U.S. Environmental Protection Agency. As an ENERGY STAR Partner, Dell Inc. has determined that this product meets the ENERGY
STAR guidelines for energy efficiency.
Other trademarks and trade names may be used in this document to refer to either the entities claiming the marks and names or their products. Dell Inc. disclaims any
proprietary interest in trademarks and trade names other than its own.
UNITED STATES GOVERNMENT RESTRICTED RIGHTS
This software and documentation are provided with RESTRICTED RIGHTS. Use, duplication or disclosure by the Government is subject to restrictions as set forth in subparagraph (c)
(1)(ii) of the Rights in Technical Data and Computer Software clause at DFARS.
252.227-7013 and in applicable FAR provisions: Dell Inc., One Dell Way, Round Rock, Texas, 78682, USA.
July 2007 Rev. A00
Canada
877-501-4803
Colombia
01800-9-155676
Mexico
866-851-1754
Puerto Rico
866-851-1760
Trinidad and Tobago
1-800-805-8035
United States
877-INK-2-YOU
NOTE:
If your country is not listed, contact your Dell distributor to order supplies.
Toner cartridge
Part number
1,000 page toner
XP092
2,000 page toner
XP407
Drum
TU031
NOTE:
A NOTE indicates important information that helps you make better use of your computer.
NOTICE:
A NOTICE indicates either potential damage to hardware or loss of data and tells you how to avoid the problem.
CAUTION:
A CAUTION indicates a potential for property damage, personal injury, or death.