Dell 2130cn Color Laser Printer User Guide - Page 168
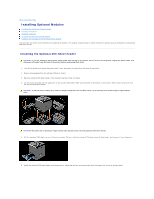
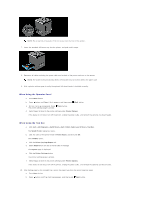
Installing Optional Modules
 |
View all Dell 2130cn Color Laser Printer manuals
Add to My Manuals
Save this manual to your list of manuals |
Page 168 highlights
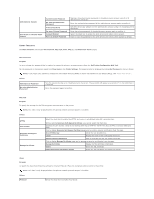
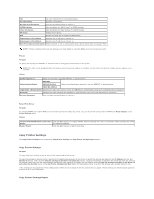
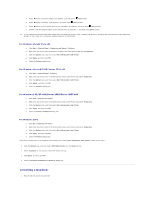
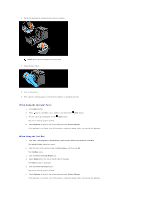
Back to Contents Page Installing Optional Modules Installing the Optional 250-Sheet Feeder Installing a Duplexer Installing a Memory Installing the Network Protocol Adapter Installing and Configuring the Wireless Printer Adapter You can make the printer more functional by installing the options. This chapter describes how to install the printer's options such as the duplexer and optional 250-sheet feeder. Installing the Optional 250-Sheet Feeder CAUTION: If you are adding an optional 250-sheet feeder after setting up the printer, be sure to turn off the printer, unplug the power cable, and disconnect all cables from the back of the printer before completing these tasks. 1. Turn off the printer and unplug the power cable. Then, disconnect all cables from the back of the printer. 2. Remove all packaging from the optional 250-sheet feeder. 3. Place the optional 250-sheet feeder in the location that the printer is located. 4. Lift the printer and align the five guide pins of the optional 250-sheet feeder with the holes at the bottom of the printer. Gently lower the printer onto the optional 250-sheet feeder. CAUTION: To lift the printer safely, lift it with two people facing the front and back. Never try to lift the printer while facing its right and left sides. CAUTION: Be careful not to pinch your fingers when lowering the printer onto the optional 250-sheet feeder. 5. Pull the standard 250-sheet tray out of the printer about 200 mm. Hold the standard 250-sheet tray with both hands, and remove it from the printer. 6. Attach the optional 250-sheet feeder and the printer by tightening the two screws provided with the feeder with a coin or similar object.
-
 1
1 -
2
-
3
-
4
-
5
-
6
-
7
-
8
-
9
-
10
-
11
-
12
-
13
-
14
-
15
-
16
-
17
-
18
-
19
-
20
-
21
-
22
-
23
-
24
-
25
-
26
-
27
-
28
-
29
-
30
-
31
-
32
-
33
-
34
-
35
-
36
-
37
-
38
-
39
-
40
-
41
-
42
-
43
-
44
-
45
-
46
-
47
-
48
-
49
-
50
-
51
-
52
-
53
-
54
-
55
-
56
-
57
-
58
-
59
-
60
-
61
-
62
-
63
-
64
-
65
-
66
-
67
-
68
-
69
-
70
-
71
-
72
-
73
-
74
-
75
-
76
-
77
-
78
-
79
-
80
-
81
-
82
-
83
-
84
-
85
-
86
-
87
-
88
-
89
-
90
-
91
-
92
-
93
-
94
-
95
-
96
-
97
-
98
-
99
-
100
-
101
-
102
-
103
-
104
-
105
-
106
-
107
-
108
-
109
-
110
-
111
-
112
-
113
-
114
-
115
-
116
-
117
-
118
-
119
-
120
-
121
-
122
-
123
-
124
-
125
-
126
-
127
-
128
-
129
-
130
-
131
-
132
-
133
-
134
-
135
-
136
-
137
-
138
-
139
-
140
-
141
-
142
-
143
-
144
-
145
-
146
-
147
-
148
-
149
-
150
-
151
-
152
-
153
-
154
-
155
-
156
-
157
-
158
-
159
-
160
-
161
-
162
-
 163
163 -
 164
164 -
 165
165 -
 166
166 -
 167
167 -
 168
168 -
 169
169 -
 170
170 -
 171
171 -
 172
172 -
 173
173 -
174
-
175
-
176
-
177
-
178
-
179
-
180
-
181
-
182
-
183
-
184
-
185
-
186
-
187
-
188
-
189
-
190
-
191
-
192
-
193
-
194
-
195
-
196
-
197
-
198
-
199
-
200
-
201
-
202
-
203
-
204
 |
 |