Dell A960 All In One Personal Printer User's Guide
Dell A960 All In One Personal Printer Manual
 |
View all Dell A960 All In One Personal Printer manuals
Add to My Manuals
Save this manual to your list of manuals |
Dell A960 All In One Personal Printer manual content summary:
- Dell A960 All In One Personal Printer | User's Guide - Page 1
Dell™ Personal All-In-One Printer A960 User's Guide Click the links to the left for information on the features and operation of your printer. For information on other documentation included with your printer, see Finding Information. To order ink or supplies from Dell: 1. Double-click the icon on - Dell A960 All In One Personal Printer | User's Guide - Page 2
its own. UNITED STATES GOVERNMENT RESTRICTED RIGHTS This software and documentation are provided with RESTRICTED RIGHTS. Use, of the Rights in Technical Data and Computer Software clause at DFARS 252.227-7013 and in applicable FAR provisions: Dell Inc., One Dell Way, Round Rock, Texas, 78682, USA - Dell A960 All In One Personal Printer | User's Guide - Page 3
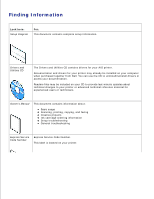
's Manual This document contains information about: Basic usage Scanning, printing, copying, and faxing Creative projects Ink cartridge ordering information Setup troubleshooting General troubleshooting Express Service Code Number Express Service Code Number. This label is located on your printer. - Dell A960 All In One Personal Printer | User's Guide - Page 4
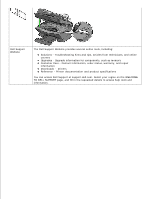
Dell Support Website The Dell Support Website provides several online tools, including: Solutions - Troubleshooting Downloads - Drivers Reference - Printer documentation and product specifications You can access Dell Support at support.dell.com. Select your region on the WELCOME TO DELL SUPPORT - Dell A960 All In One Personal Printer | User's Guide - Page 5
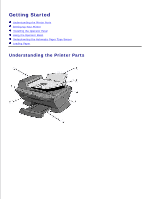
Getting Started Understanding the Printer Parts Setting Up Your Printer Installing the Operator Panel Using the Operator Panel Understanding the Automatic Paper Type Sensor Loading Paper Understanding the Printer Parts - Dell A960 All In One Personal Printer | User's Guide - Page 6
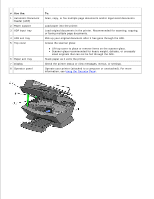
Feeder (ADF) 2 Paper support 3 ADF input tray 4 ADF exit tray 5 Top cover 6 Paper exit tray 7 Display 8 Operator panel To: Scan, copy, or fax multiple page documents and/or legal sized documents. Load paper into the printer. Load original documents in the printer. Recommended for scanning, copying - Dell A960 All In One Personal Printer | User's Guide - Page 7
scanner before use. Keep the printer (scanner unit) open when changing ink cartridges or toggling the scanner lock. 4 Express Service Code NOTE: To close the printer (scanner unit) for normal operation: lift the (printer) scanner unit slightly, press the scanner support to the right, then lower - Dell A960 All In One Personal Printer | User's Guide - Page 8
Your Printer NOTE: The Dell Personal All-In-One Printer A960 supports the Windows XP and Windows 2000 operating systems. Follow the instructions on your printer Setup Diagram to install the hardware and software. For setup troubleshooting, see Setup Problems. You can use the Dell™ AIO Printer A960 - Dell A960 All In One Personal Printer | User's Guide - Page 9
operator panel (if one is installed). 2. Choose the correct operator panel for your language. 3. Position the clips on the printer, and then press down. Using the Operator Panel The operator panel buttons help you scan, copy, fax, and customize documents. When Power is lit, the printer is on. You - Dell A960 All In One Personal Printer | User's Guide - Page 10
number (1-99) of photocopies. Select from the following copy qualities: Quick, Normal, Better, or Best. Select a fax resolution: Standard, Fine, Superfine, or Ultrafine. Select a scan resolution when the printer is attached to a computer. Lighten or darken a photocopy or fax. Choose the option that - Dell A960 All In One Personal Printer | User's Guide - Page 11
Type numbers to enter or edit the date and time shown on the printer display. In copy mode: Select the number of photocopies you want to NOTE: In the Mode area, make sure the mode you want is lit. View printer status, messages, and menus. Customize the size of your original document by a percentage, - Dell A960 All In One Personal Printer | User's Guide - Page 12
: Letter Legal B5 A4 A5 A6 3x5 4x6 L 2L NOTE: For other specialty sizes, see the All-In-One Center. BLANK PAPER TYPE Specify the type of paper loaded in the paper support: Auto Detect (default) Plain Coated Photo Transparency Auto Detect optimizes the setting according to the type of paper loaded - Dell A960 All In One Personal Printer | User's Guide - Page 13
: You can collate color photocopies from the All-In-One software. Turn on or off the sound that is made when you press an operator panel button. The options are: Off Low (default) High Check ink levels. Change cartridges. Align cartridges. Clean cartridges. Print a test page. Select a time to begin - Dell A960 All In One Personal Printer | User's Guide - Page 14
) After 60 min Never Select when you want your All-In-One to return to the default settings: SET DEFAULTS After two minutes Never faxing to function properly: The printer must be connected to an active phone line. If you are using the printer software to fax, the printer must be connected to a - Dell A960 All In One Personal Printer | User's Guide - Page 15
) ANSWER FAX WHEN Select how a fax is received. Automatically: After 1 ring After 2 rings After 3 rings (default) After 5 rings Manually: Press # on the external phone connected to the All-In-One. Fax tone heard: When an answering machine is connected to the external phone jack on the AllIn - Dell A960 All In One Personal Printer | User's Guide - Page 16
One speaker volume (affects All-In-One For example, 01:00 for 1:00. PERSONALIZE FAX Enter your name or the name of see Print Media Guidelines for the Paper Support. Turn this feature off (default). Enter . Check ink levels. Change cartridges. Align cartridges. Clean cartridges. Print a test page. - Dell A960 All In One Personal Printer | User's Guide - Page 17
CLEAR SETTINGS Select when you want your All-In-One to return to the default settings: After two Any Language NOTE: You can choose distinctive rings, if they are available from your local telephone service. Your language. Select Advanced Fax Mode Menu Items 1. Press Fax to enter the Fax mode. - Dell A960 All In One Personal Printer | User's Guide - Page 18
12000 14400 16800 19200 21600 24000 26400 28800 31200 33600 On (default) Off NOTE: Usually, error correction should be on. However, if you are having trouble sending an overseas fax, for example, turn error correction off. Argentina Australia Austria Belgium Brazil - Dell A960 All In One Personal Printer | User's Guide - Page 19
Bulgaria Canada Chile Columbia Croatia Czech Republic Denmark Egypt Estonia Ecuador Finland France Germany Greece Guam Hong Kong Hungary India Indonesia Ireland Israel Italy Japan Latvia Lithuania Luxembourg Malaysia Mexico Netherlands New Zealand Norway Peoples Republic of China Peru Philippines - Dell A960 All In One Personal Printer | User's Guide - Page 20
these paper types: Plain paper Coated paper Glossy/photo paper Transparencies If you load one of these paper types, the printer detects the paper type and automatically adjusts the paper type settings. NOTE: Your printer cannot detect the paper size. To choose the paper size on which you want - Dell A960 All In One Personal Printer | User's Guide - Page 21
the print, copy, scan, and fax functions. First, learn how to load paper into your printer with the following instructions. Continue with Using the Printer to learn how to print, copy, scan, and fax. Loading Paper 1. Place the paper against the guide on the right-hand side of the paper support. 2. - Dell A960 All In One Personal Printer | User's Guide - Page 22
10 envelopes Make sure: The paper is loaded vertically against the right-hand side of the paper support. The paper guide is against the left edge of the paper. NOTE: Load letterhead paper into the printer upside down with the letterhead facing you. The print side of the envelopes faces you. The - Dell A960 All In One Personal Printer | User's Guide - Page 23
of the paper support. The paper guide rests against the instructions on the iron-on transfer packaging. The blank side of the transfers faces you. The paper guide is against the left edge of the iron-on transfers. The banner paper is designed for use with inkjet printers. You adjust the printer - Dell A960 All In One Personal Printer | User's Guide - Page 24
2. Place the item you want to copy face down on the scanner glass in the upper left corner. 3. Close the top cover. - Dell A960 All In One Personal Printer | User's Guide - Page 25
Using the Printer Using the ADF Printing Copying Scanning Faxing Using the ADF Load Your Document Into the ADF You can load up to 50 sheets of your - Dell A960 All In One Personal Printer | User's Guide - Page 26
. The paper guide is against the edge of the paper. Your paper size fits within the dimensions allowable. You choose a media that absorbs ink well. You and your printer are on. 2. Load paper. For help, see Loading Paper. 3. With your document open, click File Print. 4. To change the printer settings, - Dell A960 All In One Personal Printer | User's Guide - Page 27
photocopies: 1. Make sure you have paper loaded in the paper support. 2. Click Start All Programs (or Programs) Dell Printers In-One Center. The All-In-One Main Page appears on your computer screen. Dell AIO Printer A960 Dell All- 3. Click See More Copy Settings. 4. Select the Collate Copies - Dell A960 All In One Personal Printer | User's Guide - Page 28
1. Load A4 or letter size paper in the paper support. For help, see Loading Paper. 2. Click Start All Programs (or Programs) Dell Printers In-One Center. The All-In-One Main Page appears on your computer screen. Dell AIO Printer A960 Dell All- 3. From the Productivity Tools menu, click Repeat an - Dell A960 All In One Personal Printer | User's Guide - Page 29
support. 2. Click Start All Programs (or Programs) Dell Printers In-One Center. The All-In-One Main Page appears on your computer screen. Dell AIO Printer A960 3. From the Productivity Tools area, click More than one page on a sheet of paper. 4. Follow the instructions on your screen. Dell - Dell A960 All In One Personal Printer | User's Guide - Page 30
open, click File Print. 3. Click Preferences or Properties. 4. From the I Want To menu, click Print a banner. 5. Follow the instructions on your screen. 6. Click OK, OK, and then OK again. NOTE: Once the printer begins printing, wait until you can see the leading edge of the banner exiting the - Dell A960 All In One Personal Printer | User's Guide - Page 31
Copying appears on the display. Copy Using the Printer Software 1. Make sure your computer and your printer are on. 2. Load paper. For help, see (or Programs) Dell Printers In-One Center. The All-In-One Main Page appears on your computer screen. Dell AIO Printer A960 Dell All- 5. Click - Dell A960 All In One Personal Printer | User's Guide - Page 32
(or Programs) Dell Printers In-One Center. The All-In-One Main Page appears on your computer screen. 4. Click Preview Now. Dell AIO Printer A960 Dell All- NOTE: printer to scan using the printer operator panel or the printer software. Using the Operator Panel 1. Make sure your computer and printer - Dell A960 All In One Personal Printer | User's Guide - Page 33
support multiple page scanning. 1. Make sure your computer and printer Programs) Dell Printers In-One Center. The All-In-One Main Page appears on your computer screen. Dell AIO Printer A960 Dell All- or size you have selected. To correct this problem, either reduce your resolution or the size of - Dell A960 All In One Personal Printer | User's Guide - Page 34
scanner. 1. Put the first sheet on the scanner glass. 2. Click Start All Programs (or Programs) Dell Printers In-One Center. The All-In-One Main Page appears on your computer screen. Dell AIO Printer A960 3. Select your scan destination from the drop-down box. 4. In the Scan section, click See - Dell A960 All In One Personal Printer | User's Guide - Page 35
Start All Programs (or Programs) Dell Printers In-One Center. The All-In-One Main Page appears on your computer screen. Dell AIO Printer A960 Dell All- 3. From the Productivity Tools section, click Edit text found in a scanned document (OCR). 4. Follow the instructions on your computer screen - Dell A960 All In One Personal Printer | User's Guide - Page 36
paper support. Dell Printers In-One Center. The All-In-One Main Page appears on your computer screen. Dell AIO Printer A960 Dell problem, either reduce your resolution or the size of your scan area. 5. From the Productivity Tools area, select Enlarge or reduce an image. 6. Follow the instructions - Dell A960 All In One Personal Printer | User's Guide - Page 37
services digital network) and cable modems are not fax modems and are not supported. Additional devices must be connected to the line-out connector for proper fax operation. Your printer must be connected to the computer with a USB cable. Using Dell Printer Fax Tools Fax Software Install Dell - Dell A960 All In One Personal Printer | User's Guide - Page 38
Dell Printer Fax Tools Fax Software." 3. Click on the desktop. The All Programs window closes. 4. Insert the Dell Personal All-In-One Printer A960 Drivers Follow the instructions on your computer screen to complete the installation. Configure Dell Printer Fax Tools Fax Software NOTE: Fax service is - Dell A960 All In One Personal Printer | User's Guide - Page 39
Next, and click Next again. 9. Click Finish. Dell Printer Fax Tools fax software launches. 10. Select your country, enter your area or Remove Programs. 3. Click Add/Remove Windows Components. 4. Click to select Fax Services. 5. Click Next. If prompted, insert the Microsoft Windows XP CD, and then - Dell A960 All In One Personal Printer | User's Guide - Page 40
. 11. Click Next, confirm your settings, and click Finish. Access the Fax Setup Utility Click Start All Programs (or Programs) Dell Printers Dell AIO Printer A960 Fax Setup Utility From the Dell All-In-One Center, click the Maintain/Troubleshoot tab, and then click Display the Fax Setup Utility. - Dell A960 All In One Personal Printer | User's Guide - Page 41
The following table describes what you can do from each of the Fax Setup Utility tabs. - Dell A960 All In One Personal Printer | User's Guide - Page 42
Pulse, Touch-tone, Behind a PBX). Enter a dialing prefix. Choose how (manually, if fax tones are detected, or after a certain amount of rings) you also support color faxes. You can send faxes using the printer operator panel or the printer software. Using the Operator Panel You can use your printer - Dell A960 All In One Personal Printer | User's Guide - Page 43
to an active telephone line. 4. Click Start All Programs (or Programs) All-In-One Center. Dell Printers Dell AIO Printer A960 Dell 5. Place the document you want to fax face down under the lid of the printer. 6. From the Productivity Tools section, select Fax an image or document. 7. Select No - Dell A960 All In One Personal Printer | User's Guide - Page 44
support color faxes. Using Dell Printer Fax Tools Fax Software 1. Click Start All Programs (or Programs) Dell Printers All-In-One Center. Dell AIO Printer A960 scan at the resolution or size you have selected. To correct this problem, either reduce your resolution or the size of your scan area. - Dell A960 All In One Personal Printer | User's Guide - Page 45
When the number of rings that you set is detected, the printer automatically receives your fax. NOTE: For your printer to receive a color fax, the machine from which you are receiving must also support color faxes. Receive Faxes Manually 1. From the operator panel, press Fax. 2. Press Options until - Dell A960 All In One Personal Printer | User's Guide - Page 46
answering machine completes the call. Print Faxes Using Dell Printer Fax Tools Fax Software 1. From the main Fax Tools screen, printer: 1. With your document open, click File Print. 2. In the printer list, select Dell Printer Fax Tools. 3. Click Print. 4. To Print to fax, follow the instructions - Dell A960 All In One Personal Printer | User's Guide - Page 47
the General tab and view the Status line. 6. Click Close when you are finished. Using Special Fax Features There are several fax features on your Dell A960 that make sending faxes more efficient. Speed Dial To make sending faxes easier, you can enter up to 100 speed dial numbers. You can enter - Dell A960 All In One Personal Printer | User's Guide - Page 48
or use the keypad to enter the two-digit speed dial number. Using the Printer Software 1. Click Start All Programs (or Programs) Dell Printers Dell AIO Printer A960 Fax Setup Utility. 2. Click the Speed Dial tab. 3. Follow the instructions on the Speed Dial tab to add a new number to your speed dial - Dell A960 All In One Personal Printer | User's Guide - Page 49
to five numbers) have been entered. To Delay Sending a Broadcast Fax Manually entering a fax number: 1. On the operator panel, press Fax. 2. Enter the time you want your fax to send. 6. Press Select. 7. If your printer is in 24-hour mode, the screen will return to the default display. If the machine - Dell A960 All In One Personal Printer | User's Guide - Page 50
the Printer Software The printer software includes the: Dell All-In-One Center-helps you perform various scan, copy, and fax operations and manage your saved images. Print Properties-helps you adjust printing settings. Dell Printer Solution Center-provides maintenance and troubleshooting help - Dell A960 All In One Personal Printer | User's Guide - Page 51
Center Click Start All Programs (or Programs) Dell Printers Dell AIO Printer A960 Dell AllIn-One Center. The All-In-One Main Page The All-In-One Main Page consists of four main sections. The following table describes each of the sections. From this section: You can: Scan Select a program to send - Dell A960 All In One Personal Printer | User's Guide - Page 52
All-In-One Main Page) provides you with direct links to the Dell Printer Solution Center. Choose from these topics: Maintain or fix quality problems Troubleshoot printer problems Device status and ink levels More printing ideas and how to's Contact information Advanced View the software version and - Dell A960 All In One Personal Printer | User's Guide - Page 53
menu . To access Print Properties when a document is not open: 1. Click Start Printers. 2. Right-click, and then choose Printer Preferences. The I Want To Menu The I Want To menu displays when you the three main tabs of the Print Properties software. The following table describes each of the tabs. - Dell A960 All In One Personal Printer | User's Guide - Page 54
the Dell Printer Solution Center The Dell Printer Solution Center is a guide you can refer to for printer help and to check the current printer status. Access the Dell Printer Solution Center Click Start All Programs (or Programs) Dell Printers Dell AIO Printer A960 Dell Printer Solution Center - Dell A960 All In One Personal Printer | User's Guide - Page 55
paper is in the printer. View ink levels. How To Receive information about basic features. Receive scan, copy, fax, and print instructions. Receive project information. Search the electronic guide. Go online to view more ideas. Troubleshooting Check the current printer status. View recommended - Dell A960 All In One Personal Printer | User's Guide - Page 56
page. Clean the ink cartridge nozzles. Align the ink cartridges. Solve other problems. Visit the supplies area online. NOTE: Some links will not work while a job is in progress. View information about ordering ink or supplies. View information about contacting Dell Customer Support. View a list of - Dell A960 All In One Personal Printer | User's Guide - Page 57
NOTE: Your language may not be supported. If your language is not supported, use the photo editing software in your Windows operating system. - Dell A960 All In One Personal Printer | User's Guide - Page 58
is connected to a network. Using Windows XP First, follow these instructions while you are at your own computer. 1. Click Start Control Panel Printers and Other Hardware Printers and Faxes. 2. Right-click the Dell AIO Printer A960 printer icon, and then click Sharing. 3. From the Sharing tab, click - Dell A960 All In One Personal Printer | User's Guide - Page 59
Using Windows 2000 1. Click Start Settings Printers and Faxes or Printers. 2. Select the Dell AIO Printer A960 printer icon. 3. Click File Sharing. 4. Check the Shared as check box, and then type a name in the Shared Name text box. 5. Click Additional Drivers and select the operating systems of all - Dell A960 All In One Personal Printer | User's Guide - Page 60
, follow these instructions while you are at the other person's computer: 1. Click Start Settings Printers and Faxes or Printers. 2. Click Add Printer to launch the Add Printer wizard. 3. Click Network Print Server. 4. Select the network printer from the Shared printers list. If the printer is not - Dell A960 All In One Personal Printer | User's Guide - Page 61
the Safety Instructions on Notes, Notices, and Cautions. Dell ink cartridges are available only through Dell. You can order more ink at www.dell.com/supplies. 1. Make sure the printer is on. 2. Lift the printer (scanner unit) until the scanner support keeps it open. The ink cartridge carrier moves - Dell A960 All In One Personal Printer | User's Guide - Page 62
or Programs) Dell Printers Dell AIO Printer A960 Dell Printer Solution Center. 3. From the Maintenance tab, click Align to fix blurry edges. 4. Click Print. An alignment page prints. Using the Printer Software to Manually Align Ink Cartridges When manually aligning your ink cartridges, a page prints - Dell A960 All In One Personal Printer | User's Guide - Page 63
Dell AIO Printer A960 Dell Printer Solution Center. 3. From the Maintenance tab, click Align to fix blurry edges. 4. Click Manual Alignment, and then click Print. An alignment page prints. 5. Find the number under the darkest arrow for each alignment group. 6. Use the arrows in the Align Cartridges - Dell A960 All In One Personal Printer | User's Guide - Page 64
Are Incorrect. You only have one Dell AIO Printer A960 attached to your computer. Your operating system is compatible with your printer. The Dell AIO Printer A960 supports Windows XP and Windows 2000. General Problems Try to troubleshoot your problem before contacting Dell by checking the following - Dell A960 All In One Personal Printer | User's Guide - Page 65
are on. The Dell AIO Printer A960 is set as your default printer. Anytime your printer has a problem, make sure: Your printer is on. The scanner is unlocked. For help locating the scanner lock, see Scanner lock. You removed the stickers and tape from the bottom of the ink cartridges. For help, see - Dell A960 All In One Personal Printer | User's Guide - Page 66
quality resolution (Quick and Normal print more quickly than Better and Best). NOTE: Photos or documents containing graphics may take longer to graphs: Test the cartridge alignment. For help, see Aligning Ink Cartridges. Clean the nozzles. For help, see Clean the Ink Cartridge Nozzles. Characters - Dell A960 All In One Personal Printer | User's Guide - Page 67
, or from the All-In-One Center. Clean the cartridge nozzles. For help, see Clean the Ink Cartridge Nozzles. Printed Pages Have Alternating 3. Select Best on the Quality/Copies tab. Print Quality Is Poor at the Edges of the Page Like other printers, the Dell Personal AIO Printer A960 cannot print - Dell A960 All In One Personal Printer | User's Guide - Page 68
source and see a checkerboard pattern on your document, follow the instructions below to eliminate the pattern. For scanning: 1. Click Start All Programs (or Programs) Dell Printers In-One Center. The All-In-One Main Page appears on your computer screen. 2. 3. Dell AIO Printer A960 Dell All- - Dell A960 All In One Personal Printer | User's Guide - Page 69
for What is being scanned?, select Magazine. 4. Click Scan Now. For copying: 1. Click Start All Programs (or Programs) Dell Printers Dell AIO Printer A960 Dell AllIn-One Center. 2. Click See More Copy Settings. 3. Click Display Advanced Copy Settings. 4. Select the Image Patterns tab. 5. Make sure - Dell A960 All In One Personal Printer | User's Guide - Page 70
Click OK. To Adjust How The Image Is Cropped: 1. Click Start All Programs (or Programs) Dell Printers In-One Center. The All-In-One Main Page appears on your computer screen. Dell AIO Printer A960 2. Click See More Scan Settings. 3. Click Display Advanced Scan Settings. 4. Click the Scan tab - Dell A960 All In One Personal Printer | User's Guide - Page 71
(integrated signature digital network), or cable modem. 5. For more information, see Faxing. Printer is Not Sending or Receiving Faxes If you are having trouble sending or receiving a fax through the printer software, ensure that: Your computer is connected to a working data/fax modem. An active - Dell A960 All In One Personal Printer | User's Guide - Page 72
-In-One Center. The All-In-One Main Page appears on your computer screen. 2. In the upper left corner, click Maintain/Troubleshoot. 3. Under Fax Setup Utility, click Display the Fax Setup Utility. 4. Adjust the settings you want to change. 5. Click Save Settings. Dell AIO Printer A960 Dell Date - Dell A960 All In One Personal Printer | User's Guide - Page 73
you want your printer to display. d. Use the keypad buttons to enter the time you want your printer to display. d. Press Select. e. Press 1 for AM, printers. Do not force the paper into the printer. Do not load too much paper into the printer. For help, see Loading Paper. Make sure the paper guide - Dell A960 All In One Personal Printer | User's Guide - Page 74
correct paper type and size. Paper Jams If a paper jam occurs in the paper support, remove the paper from the printer. If the paper is lodged too far into the printer and cannot be removed: 1. Press Power to turn the printer off. 2. Pull slowly and firmly on the paper to remove it. If you - Dell A960 All In One Personal Printer | User's Guide - Page 75
b. Lower the scanner unit to close it. 3. Press Power to turn the printer on, and then print your document. Document Misfeeds or Jams 1. Turn the printer off. 2. Open the ADF. - Dell A960 All In One Personal Printer | User's Guide - Page 76
For help installing a new cartridge, see Replacing Ink Cartridges. Paper Jam Message If your printer has a paper jam: 1. Click Start All Programs (or Programs) Dell Printers Printer Solution Center. 2. Click the Troubleshooting tab on the left side of the screen. 3. 4. Dell AIO Printer A960 Dell - Dell A960 All In One Personal Printer | User's Guide - Page 77
Make sure the scanner is unlocked. 4. Plug in your printer. 5. Press Power to turn your printer on. Cartridge Error: 50C Your ink cartridge has a short. 1. Press Power to turn your printer off. 2. Unplug your printer. 3. Plug in your printer. 4. Turn your printer on. 5. Uninstall and reinstall the - Dell A960 All In One Personal Printer | User's Guide - Page 78
5. NOTE: If this does not resolve the problem, see More Troubleshooting Options or replace your cartridges. Hardware Error: 502 The printer is stalled. 1. Press Power to turn your printer off. 2. Unplug your printer. 3. Check for paper jams. 4. Plug in your printer. 5. Press Power to turn your - Dell A960 All In One Personal Printer | User's Guide - Page 79
with Wipe the Ink Cartridge Nozzles and Contacts, and then print your document again. To Clean the Nozzles Using the Printer Software 1. Load paper. For help, see Loading Paper. 2. Click Start All Programs (or Programs) Printer Solution Center. 3. 4. Dell Printers Dell AIO Printer A960 Dell - Dell A960 All In One Personal Printer | User's Guide - Page 80
6. If you are not satisfied with the print quality, continue with Wipe the Ink Cartridge Nozzles and Contacts, and then print your document again. Wipe the Ink Cartridge Nozzles and Contacts 1. Remove the ink cartridges. 2. Dampen a clean, lint-free cloth with water. 3. Gently hold the cloth against - Dell A960 All In One Personal Printer | User's Guide - Page 81
the printer software. 4. Insert the Driver and Utilities CD, and then follow the instructions on your screen to install the software. More Troubleshooting Options If the preceding solutions do not solve the problem you are having with your printer: See the Dell Printer Solution Center software for - Dell A960 All In One Personal Printer | User's Guide - Page 82
Support Memory Specifications and Requirements Paper Cables Overview Base memory Maximum memory Emulation Connectivity Duty cycle (average) Duty cycle (maximum) Printer life 16 MB 17 MB Host based data stream printing USB 3000 pages/month 5000 pages/month 36000 pages or one year ( - Dell A960 All In One Personal Printer | User's Guide - Page 83
pages. For help, see Send Multiple Page Faxes. In order for faxing to function properly: The printer must be connected to an active phone line. If you are using the printer software to fax, the printer must be connected to a computer with a USB cable. NOTE: You cannot fax with a DSL (digital - Dell A960 All In One Personal Printer | User's Guide - Page 84
. Print and scan resolution Quick Normal Better Best dpi Equivalent print resolution 150 x 150 600 x 300 dpi 300 x 300 600 x 600 dpi 600 x 600 1200 x 1200 dpi 600 x 600 4800 x 1200 dpi Operating System Support The Dell AIO Printer A960 supports: Windows XP Windows 2000 Memory Specifications - Dell A960 All In One Personal Printer | User's Guide - Page 85
Cables Your Dell AIO Printer A960 uses a Universal Serial Bus (USB) cable (sold separately). - Dell A960 All In One Personal Printer | User's Guide - Page 86
Contacting Dell Warranty and Return Policy Dell Technical Support Policy Technician-assisted technical support requires the cooperation and participation of the customer in the troubleshooting process and provides for restoration of the Operating System, application software and hardware drivers to - Dell A960 All In One Personal Printer | User's Guide - Page 87
Service [email protected] Warranty and Return Policy Dell Inc. ("Dell") manufactures its hardware products from parts and components that are new or equivalent to new in accordance with industry-standard practices. For information about the Dell warranty for your printer, refer to your Owner's Manual - Dell A960 All In One Personal Printer | User's Guide - Page 88
Dell A960 in Germany Using the Dell A960 services, radar, air-traffic control, pager, and Personal Communication Services (PCS). These licensed services encouraged to try to correct the interference by one or more of the following measures: · , consult a Dell Technical Support representative or an - Dell A960 All In One Personal Printer | User's Guide - Page 89
in accordance with the manufacturer's instruction manual, may cause interference with radio : · Model number: · Company name: Dell Inc. One Dell Way Round Rock, Texas 78682 USA 512 telephone line should be less than five to ensure proper service from the telephone company. To be certain of the number - Dell A960 All In One Personal Printer | User's Guide - Page 90
necessary modifications to maintain uninterrupted service. If you experience trouble with this telephone equipment, see "Getting Help" in your computer's troubleshooting documentation or, for some computers, the section titled "Contacting Dell" in your computer's online guide to find the appropriate - Dell A960 All In One Personal Printer | User's Guide - Page 91
as stated on the IC regulatory label located on the bottom of the computer is 0.6 B. The following information is provided in compliance with IC regulations: Dell Inc. One Dell Way Round Rock, TX 78682 USA 512-338-4400 CE Notice (European Union) Marking by the symbol indicates compliance of this - Dell A960 All In One Personal Printer | User's Guide - Page 92
Mexican standards (NOM): Exporter: Importer: Ship to: Model number: Supply voltage: Frequency: Current Consumption: Output voltage: Output current: Dell Inc. One Dell Way Round Rock, TX 78682 Dell Computer de México, S.A. de C.V. Paseo de la Reforma 2620 - 11° Piso Col. Lomas Altas 11950 México - Dell A960 All In One Personal Printer | User's Guide - Page 93
to AC power sources. This has been identified as a major nationwide problem. It is recommended that the customer install an AC surge arrestor in the . This equipment uses CA11A telephone jacks. Using the Dell A960 in Germany The Dell A960 printer requires a German billing tone filter to be installed - Dell A960 All In One Personal Printer | User's Guide - Page 94
Dell A960 in Switzerland The Dell A960 printer requires a Swiss billing tone filter to be installed on any line which receives metering pulses in Switzerland. The filter must be used, as metering pulses are present on all analog telephone lines in Switzerland. The Dell A960 instructions service Support - Dell A960 All In One Personal Printer | User's Guide - Page 95
The United Kingdom Telecommunications Act 1984 This apparatus is approved under the approval number NS/G/1234/J/100003 for the indirect connections to the public telecommunications systems in the United Kingdom. Mercury Statement This product contains mercury in the lamp (
-
 1
1 -
 2
2 -
 3
3 -
 4
4 -
 5
5 -
 6
6 -
 7
7 -
8
-
9
-
10
-
11
-
12
-
13
-
14
-
15
-
16
-
17
-
18
-
19
-
20
-
21
-
22
-
23
-
24
-
25
-
26
-
27
-
28
-
29
-
30
-
31
-
32
-
33
-
34
-
35
-
36
-
37
-
38
-
39
-
40
-
41
-
42
-
43
-
44
-
45
-
46
-
47
-
48
-
49
-
50
-
51
-
52
-
53
-
54
-
55
-
56
-
57
-
58
-
59
-
60
-
61
-
62
-
63
-
64
-
65
-
66
-
67
-
68
-
69
-
70
-
71
-
72
-
73
-
74
-
75
-
76
-
77
-
78
-
79
-
80
-
81
-
82
-
83
-
84
-
85
-
86
-
87
-
88
-
89
-
90
-
91
-
92
-
93
-
94
-
95
 |
 |

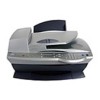
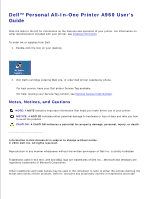
Dell™ Personal All-In-One Printer A960 User's
Guide
Click the links to the left for information on the features and operation of your printer. For information on
other documentation included with your printer, see
Finding Information
.
To order ink or supplies from Dell:
Double-click the icon on your desktop.
1.
Visit Dell's cartridge ordering Web site, or order Dell printer supplies by phone.
2.
For best service, have your Dell printer Service Tag available.
For help, locating your Service Tag number, see
Express Service Code Number
.
Notes, Notices, and Cautions
NOTE:
A
NOTE
indicates important information that helps you make better use of your printer.
NOTICE:
A
NOTICE
indicates either potential damage to hardware or loss of data and tells you how
to avoid the problem.
CAUTION:
A CAUTION indicates a potential for property damage, personal, injury, or death.
____________________
Information in this document is subject to change without notice.
© 2003 Dell Inc. All rights reserved.
Reproduction in any manner whatsoever without the written permission of Dell Inc. is strictly forbidden.
Trademarks used in this text:
Dell
and
DELL
logo are trademarks of Dell Inc.;
Microsoft
and
Windows
are
registered trademarks of Microsoft Corporation.
Other trademarks and trade names may be used in this document to refer to either the entities claiming the
marks and names of their products. Dell Inc. disclaims any proprietary interest in trademarks and trade