Dell DR4300e EMC Networker - Setting Up the DR Series System as a CIFS or VTL
Dell DR4300e Manual
 |
View all Dell DR4300e manuals
Add to My Manuals
Save this manual to your list of manuals |
Dell DR4300e manual content summary:
- Dell DR4300e | EMC Networker - Setting Up the DR Series System as a CIFS or VTL - Page 1
Setting Up the Dell™ DR Series System as a CIFS or VTL Backup Target on EMC® Networker® Dell Engineering June 2015 A Dell Technical White Paper - Dell DR4300e | EMC Networker - Setting Up the DR Series System as a CIFS or VTL - Page 2
PURPOSES ONLY, AND MAY CONTAIN TYPOGRAPHICAL ERRORS AND TECHNICAL INACCURACIES. THE CONTENT IS PROVIDED AS IS, WITHOUT EXPRESS OR IMPLIED WARRANTIES OF ANY KIND. © 2015 Dell Inc. All rights reserved. Reproduction of this material in any manner whatsoever without the express written permission of - Dell DR4300e | EMC Networker - Setting Up the DR Series System as a CIFS or VTL - Page 3
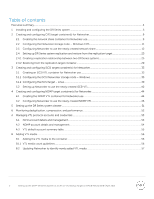
B.1 Adding the VTL media to the container...56 B.1.1 VTL media count guidelines ...56 B.2 Updating Networker to identify newly added VTL media 57 3 Setting Up the Dell™ DR Series System as a CIFS or VTL Backup Target on EMC® Networker® | April 2015 - Dell DR4300e | EMC Networker - Setting Up the DR Series System as a CIFS or VTL - Page 4
Executive summary This paper provides information about how to set up the Dell DR Series system as a backup target for EMC Networker software. This whitepaper is a quick reference guide and does not include all DR Series system deployment best practices. For additional information, see the DR Series - Dell DR4300e | EMC Networker - Setting Up the DR Series System as a CIFS or VTL - Page 5
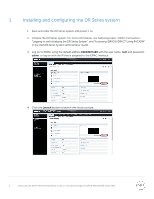
, see following topics "iDRAC Connection", "Logging in and Initializing the DR Series System", and "Accessing iDRAC6/iDRAC7 Using RACADM" in the Dell DR Series System Administrator Guide. 3. Log on to iDRAC using the default address 192.168.0.120 with the user name: root and password: calvin, or log - Dell DR4300e | EMC Networker - Setting Up the DR Series System as a CIFS or VTL - Page 6
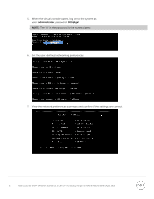
is the numeral zero. 6. Set the user-defined networking preferences. 7. View the network preferences summary and confirm if the settings are correct. 6 Setting Up the Dell™ DR Series System as a CIFS or VTL Backup Target on EMC® Networker® | April 2015 - Dell DR4300e | EMC Networker - Setting Up the DR Series System as a CIFS or VTL - Page 7
do not want to add the DR Series system to Active Directory, see the DR Series System Owner's Manual for guest login instructions. a. Select Active Directory from the navigation area of the GUI. 7 Setting Up the Dell™ DR Series System as a CIFS or VTL Backup Target on EMC® Networker® | April 2015 - Dell DR4300e | EMC Networker - Setting Up the DR Series System as a CIFS or VTL - Page 8
b. Enter your Active Directory credentials to join the DR Series system to a domain. 8 Setting Up the Dell™ DR Series System as a CIFS or VTL Backup Target on EMC® Networker® | April 2015 - Dell DR4300e | EMC Networker - Setting Up the DR Series System as a CIFS or VTL - Page 9
the container by selecting Containers in the navigation area of the GUI, and then clicking Create at the top of the page. 9 Setting Up the Dell™ DR Series System as a CIFS or VTL Backup Target on EMC® Networker® | April 2015 - Dell DR4300e | EMC Networker - Setting Up the DR Series System as a CIFS or VTL - Page 10
will be used in configuring the device on the Networker server), and select Enable CIFS. For the Client Access section, select either Open Access or manually add clients to the Clients list. 10 Setting Up the Dell™ DR Series System as a CIFS or VTL Backup Target on EMC® Networker® | April 2015 - Dell DR4300e | EMC Networker - Setting Up the DR Series System as a CIFS or VTL - Page 11
2.2 Note: For improved security, Dell recommends adding IP addresses for the backup console (Networker Server), Networker storage nodes, and the path to the container on the DR Series system. 11 Setting Up the Dell™ DR Series System as a CIFS or VTL Backup Target on EMC® Networker® | April 2015 - Dell DR4300e | EMC Networker - Setting Up the DR Series System as a CIFS or VTL - Page 12
the DR Series system share will be configured as a backup device, right-click the host, and then click New > Managed Application. 12 Setting Up the Dell™ DR Series System as a CIFS or VTL Backup Target on EMC® Networker® | April 2015 - Dell DR4300e | EMC Networker - Setting Up the DR Series System as a CIFS or VTL - Page 13
3. Select Networker and click Next. 13 Setting Up the Dell™ DR Series System as a CIFS or VTL Backup Target on EMC® Networker® | April 2015 - Dell DR4300e | EMC Networker - Setting Up the DR Series System as a CIFS or VTL - Page 14
4. Click Finish. 5. Right-click and select the newly created Networker application and click Launch Application. 14 Setting Up the Dell™ DR Series System as a CIFS or VTL Backup Target on EMC® Networker® | April 2015 - Dell DR4300e | EMC Networker - Setting Up the DR Series System as a CIFS or VTL - Page 15
6. In the Devices window, right-click Device in the left panel and click New Device Wizard. 7. Select Advanced File Type Device (AFTD). 15 Setting Up the Dell™ DR Series System as a CIFS or VTL Backup Target on EMC® Networker® | April 2015 - Dell DR4300e | EMC Networker - Setting Up the DR Series System as a CIFS or VTL - Page 16
the DR Series system share. Click Next. 9. Click New Folder, type an appropriate folder name, select the folder, and click Next. 16 Setting Up the Dell™ DR Series System as a CIFS or VTL Backup Target on EMC® Networker® | April 2015 - Dell DR4300e | EMC Networker - Setting Up the DR Series System as a CIFS or VTL - Page 17
access the DR Series system container share using the direct path, there is no need to enter extra client direct paths. 17 Setting Up the Dell™ DR Series System as a CIFS or VTL Backup Target on EMC® Networker® | April 2015 - Dell DR4300e | EMC Networker - Setting Up the DR Series System as a CIFS or VTL - Page 18
11. The new Networker device should have Pool Type set to Backup. Click Next. 12. Review the configuration and then click Configure. 18 Setting Up the Dell™ DR Series System as a CIFS or VTL Backup Target on EMC® Networker® | April 2015 - Dell DR4300e | EMC Networker - Setting Up the DR Series System as a CIFS or VTL - Page 19
13. Click Finish. 14. On the Configuration tab, select Clients, right-click the client that will be backed up, select Client Backup Configuration and click New. 19 Setting Up the Dell™ DR Series System as a CIFS or VTL Backup Target on EMC® Networker® | April 2015 - Dell DR4300e | EMC Networker - Setting Up the DR Series System as a CIFS or VTL - Page 20
DR container share. Refer to step 6 in the last section Configure the Networker Storage Node, and step 10 in this section. 20 Setting Up the Dell™ DR Series System as a CIFS or VTL Backup Target on EMC® Networker® | April 2015 - Dell DR4300e | EMC Networker - Setting Up the DR Series System as a CIFS or VTL - Page 21
21 Setting Up the Dell™ DR Series System as a CIFS or VTL Backup Target on EMC® Networker® | April 2015 - Dell DR4300e | EMC Networker - Setting Up the DR Series System as a CIFS or VTL - Page 22
22 Setting Up the Dell™ DR Series System as a CIFS or VTL Backup Target on EMC® Networker® | April 2015 - Dell DR4300e | EMC Networker - Setting Up the DR Series System as a CIFS or VTL - Page 23
23 Setting Up the Dell™ DR Series System as a CIFS or VTL Backup Target on EMC® Networker® | April 2015 - Dell DR4300e | EMC Networker - Setting Up the DR Series System as a CIFS or VTL - Page 24
17. After the backup group is successfully created, click Start to start the backup. 18. Monitor the job status in the Monitoring tab. 24 Setting Up the Dell™ DR Series System as a CIFS or VTL Backup Target on EMC® Networker® | April 2015 - Dell DR4300e | EMC Networker - Setting Up the DR Series System as a CIFS or VTL - Page 25
DR Series systems 1. Create a source container on the source DR Series system. 2. Create a target container on the target DR Series system. 25 Setting Up the Dell™ DR Series System as a CIFS or VTL Backup Target on EMC® Networker® | April 2015 - Dell DR4300e | EMC Networker - Setting Up the DR Series System as a CIFS or VTL - Page 26
then click Create. 4. Select the newly created container as the source container, and then enter the target DR Series system information. 26 Setting Up the Dell™ DR Series System as a CIFS or VTL Backup Target on EMC® Networker® | April 2015 - Dell DR4300e | EMC Networker - Setting Up the DR Series System as a CIFS or VTL - Page 27
5. Click Retrieve Container(s), and then select the newly created target container from the list. 6. Click Create Replication. 27 Setting Up the Dell™ DR Series System as a CIFS or VTL Backup Target on EMC® Networker® | April 2015 - Dell DR4300e | EMC Networker - Setting Up the DR Series System as a CIFS or VTL - Page 28
7. Verify that the replication relationship between the DR Series systems has been created and that the Peer Status is Online. 28 Setting Up the Dell™ DR Series System as a CIFS or VTL Backup Target on EMC® Networker® | April 2015 - Dell DR4300e | EMC Networker - Setting Up the DR Series System as a CIFS or VTL - Page 29
information for the target device. When complete, mount the device. NOTE: Do not label the target device. 2. Unmount the source container. 29 Setting Up the Dell™ DR Series System as a CIFS or VTL Backup Target on EMC® Networker® | April 2015 - Dell DR4300e | EMC Networker - Setting Up the DR Series System as a CIFS or VTL - Page 30
OK. 5. Select the Recovery Options, choose Original path, or enter a new destination path to which to recover data, and click Next. 30 Setting Up the Dell™ DR Series System as a CIFS or VTL Backup Target on EMC® Networker® | April 2015 - Dell DR4300e | EMC Networker - Setting Up the DR Series System as a CIFS or VTL - Page 31
6. Enter a Recover name, and click Run Recovery. 31 Setting Up the Dell™ DR Series System as a CIFS or VTL Backup Target on EMC® Networker® | April 2015 - Dell DR4300e | EMC Networker - Setting Up the DR Series System as a CIFS or VTL - Page 32
7. Check the Recovery Results. 32 Setting Up the Dell™ DR Series System as a CIFS or VTL Backup Target on EMC® Networker® | April 2015 - Dell DR4300e | EMC Networker - Setting Up the DR Series System as a CIFS or VTL - Page 33
Create at the top of the page. 2. Enter a container name and select the Virtual Tape Library (VTL) container option. Click Next. 33 Setting Up the Dell™ DR Series System as a CIFS or VTL Backup Target on EMC® Networker® | April 2015 - Dell DR4300e | EMC Networker - Setting Up the DR Series System as a CIFS or VTL - Page 34
the storage node / media node IP Address, IQN or FQDN. For Marker Type, select Networker. Click Next. 4. Click Create a New Container. 34 Setting Up the Dell™ DR Series System as a CIFS or VTL Backup Target on EMC® Networker® | April 2015 - Dell DR4300e | EMC Networker - Setting Up the DR Series System as a CIFS or VTL - Page 35
targets on the DR Series system. At this point, the status will be Inactive. Click Done and close the dialog box. 35 Setting Up the Dell™ DR Series System as a CIFS or VTL Backup Target on EMC® Networker® | April 2015 - Dell DR4300e | EMC Networker - Setting Up the DR Series System as a CIFS or VTL - Page 36
Target from the list, click the Connect button, and then in the Connect to Target dialog box select the Advanced button. 36 Setting Up the Dell™ DR Series System as a CIFS or VTL Backup Target on EMC® Networker® | April 2015 - Dell DR4300e | EMC Networker - Setting Up the DR Series System as a CIFS or VTL - Page 37
Name and Target Secret / Password. Select OK to save the settings. Refer to Appendix A for further details about accounts and credentials. 37 Setting Up the Dell™ DR Series System as a CIFS or VTL Backup Target on EMC® Networker® | April 2015 - Dell DR4300e | EMC Networker - Setting Up the DR Series System as a CIFS or VTL - Page 38
The iSCSI target should now appear as connected and the device discovery can now proceed. 38 Setting Up the Dell™ DR Series System as a CIFS or VTL Backup Target on EMC® Networker® | April 2015 - Dell DR4300e | EMC Networker - Setting Up the DR Series System as a CIFS or VTL - Page 39
.password = St0r@ge!iscsi 2. Set the Discovery Target Node(s) by using this command: iscsiadm -m discovery -t st -p 39 Setting Up the Dell™ DR Series System as a CIFS or VTL Backup Target on EMC® Networker® | April 2015 - Dell DR4300e | EMC Networker - Setting Up the DR Series System as a CIFS or VTL - Page 40
with DR VTL(s) by using the following command: iscsiadm -m session For example: iscsiadm -m session = tcp: [8] 10.8.230.108:3260,1 iqn.198405.com.dell:dr4000.3071067.interoprhel52n1.30 5. Review dmesg or /var/log/messages for details about the tape devices created upon adding the DR Series system - Dell DR4300e | EMC Networker - Setting Up the DR Series System as a CIFS or VTL - Page 41
tree and proceed with the Configure Library option. In the Configure Library dialog box, Check All drives and click Start Configuration. 41 Setting Up the Dell™ DR Series System as a CIFS or VTL Backup Target on EMC® Networker® | April 2015 - Dell DR4300e | EMC Networker - Setting Up the DR Series System as a CIFS or VTL - Page 42
dialog box, disable the Auto-clean option, and omit the default slot and cleanings settings. Click OK to save the changes. 42 Setting Up the Dell™ DR Series System as a CIFS or VTL Backup Target on EMC® Networker® | April 2015 - Dell DR4300e | EMC Networker - Setting Up the DR Series System as a CIFS or VTL - Page 43
been configured, the individual tape drives must be configured so that they service only one target session at any given time. Multiplexing to virtual tape their respective media pools for use. 43 Setting Up the Dell™ DR Series System as a CIFS or VTL Backup Target on EMC® Networker® | April 2015 - Dell DR4300e | EMC Networker - Setting Up the DR Series System as a CIFS or VTL - Page 44
. 2. In the Create New Container wizard, enter the container name, select the Virtual Tape Library (VTL) container option, and click Next. 44 Setting Up the Dell™ DR Series System as a CIFS or VTL Backup Target on EMC® Networker® | April 2015 - Dell DR4300e | EMC Networker - Setting Up the DR Series System as a CIFS or VTL - Page 45
FQDN. Select the Marker Type as Unix Dump and click Next. 4. Finalize the VTL creation request by clicking Create a New Container. 45 Setting Up the Dell™ DR Series System as a CIFS or VTL Backup Target on EMC® Networker® | April 2015 - Dell DR4300e | EMC Networker - Setting Up the DR Series System as a CIFS or VTL - Page 46
the Networker Administration interface. Select the Storage Node that has the NDMP VTL configured for access. Select to Scan for Devices. 46 Setting Up the Dell™ DR Series System as a CIFS or VTL Backup Target on EMC® Networker® | April 2015 - Dell DR4300e | EMC Networker - Setting Up the DR Series System as a CIFS or VTL - Page 47
3. In the Scan for Device dialog box select the appropriate storage node with the settings to Search all LUNs, Use Persistent Names and Device Scan Type of ndmp. 47 Setting Up the Dell™ DR Series System as a CIFS or VTL Backup Target on EMC® Networker® | April 2015 - Dell DR4300e | EMC Networker - Setting Up the DR Series System as a CIFS or VTL - Page 48
dialog box, disable the Auto-clean option and omit the default slot and cleanings settings. Click OK to save the changes. 48 Setting Up the Dell™ DR Series System as a CIFS or VTL Backup Target on EMC® Networker® | April 2015 - Dell DR4300e | EMC Networker - Setting Up the DR Series System as a CIFS or VTL - Page 49
has been configured, the individual tape drives must be configured so that they service only one target session at any given time. Multiplexing to virtual tape handle a single target session. 49 Setting Up the Dell™ DR Series System as a CIFS or VTL Backup Target on EMC® Networker® | April 2015 - Dell DR4300e | EMC Networker - Setting Up the DR Series System as a CIFS or VTL - Page 50
7. Proceed by conducting a full inventory of the library. 8. Label all the media and place them in their respective media pools for use. 50 Setting Up the Dell™ DR Series System as a CIFS or VTL Backup Target on EMC® Networker® | April 2015 - Dell DR4300e | EMC Networker - Setting Up the DR Series System as a CIFS or VTL - Page 51
should run at least 40 hours per week when backups are not taking place, and generally after a backup job has completed. 51 Setting Up the Dell™ DR Series System as a CIFS or VTL Backup Target on EMC® Networker® | April 2015 - Dell DR4300e | EMC Networker - Setting Up the DR Series System as a CIFS or VTL - Page 52
backup jobs are completed, the ratios will increase. Backup jobs with a 12-week retention will average a 15x ratio, in most cases. 52 Setting Up the Dell™ DR Series System as a CIFS or VTL Backup Target on EMC® Networker® | April 2015 - Dell DR4300e | EMC Networker - Setting Up the DR Series System as a CIFS or VTL - Page 53
existing iSCSI sessions will be terminated! Do you want to continue? (Yes/no) [n]? Enter new CHAP password Re-type CHAP password 53 Setting Up the Dell™ DR Series System as a CIFS or VTL Backup Target on EMC® Networker® | April 2015 - Dell DR4300e | EMC Networker - Setting Up the DR Series System as a CIFS or VTL - Page 54
NDMP account details and management The default username for the NDMP service is "backup_user" and can be confirmed using the web UI type NDMP password:######### NDMP password successfully updated. 54 Setting Up the Dell™ DR Series System as a CIFS or VTL Backup Target on EMC® Networker® | - Dell DR4300e | EMC Networker - Setting Up the DR Series System as a CIFS or VTL - Page 55
A.3 VTL default account summary table Service NDMP iSCSI Account backup_user Default Credentials St0r@ge! St0r@ge!iscsi CLI Modifier ndmp --setpassword iscsi -setpassword 55 Setting Up the Dell™ DR Series System as a CIFS or VTL Backup Target on EMC® Networker® | April - Dell DR4300e | EMC Networker - Setting Up the DR Series System as a CIFS or VTL - Page 56
operation: > vtl --create_carts --name TEST_VTL_LALA --tapes 10 Created 10 cartridges B.1.1 VTL media count guidelines Type Capacity Max number of Tapes supported LTO-4 800GiB 2000 LTO-3 400GiB 4000 LTO-2 200GiB 8000 LTO-1 100Gib 10000 LTO-1 50Gib 10000 LTO-1 10GiB 10000 56 Setting - Dell DR4300e | EMC Networker - Setting Up the DR Series System as a CIFS or VTL - Page 57
. Input the new range created (e.g. 10 new tapes would result in 20 Slots) and select the option to reinitialize the library. 57 Setting Up the Dell™ DR Series System as a CIFS or VTL Backup Target on EMC® Networker® | April 2015
-
 1
1 -
 2
2 -
 3
3 -
 4
4 -
 5
5 -
 6
6 -
 7
7 -
8
-
9
-
10
-
11
-
12
-
13
-
14
-
15
-
16
-
17
-
18
-
19
-
20
-
21
-
22
-
23
-
24
-
25
-
26
-
27
-
28
-
29
-
30
-
31
-
32
-
33
-
34
-
35
-
36
-
37
-
38
-
39
-
40
-
41
-
42
-
43
-
44
-
45
-
46
-
47
-
48
-
49
-
50
-
51
-
52
-
53
-
54
-
55
-
56
-
57
 |
 |

A Dell Technical White Paper
Setting Up the Dell
™
DR Series System as a
CIFS or VTL Backup Target on EMC
®
Networker
®
Dell Engineering
June 2015