Dell DR4300e EMC Networker - Setting Up the DR Series System as a CIFS or VTL - Page 5
Installing and configuring the DR Series system, Dell DR Series System Administrator Guide
 |
View all Dell DR4300e manuals
Add to My Manuals
Save this manual to your list of manuals |
Page 5 highlights
1 Installing and configuring the DR Series system 1. Rack and cable the DR Series system and power it on. 2. Initialize the DR Series system. For more information, see following topics "iDRAC Connection", "Logging in and Initializing the DR Series System", and "Accessing iDRAC6/iDRAC7 Using RACADM" in the Dell DR Series System Administrator Guide. 3. Log on to iDRAC using the default address 192.168.0.120 with the user name: root and password: calvin, or log on with the IP that is assigned to the iDRAC interface. 4. Click the Launch button to launch the virtual console. 5 Setting Up the Dell™ DR Series System as a CIFS or VTL Backup Target on EMC® Networker® | April 2015
-
 1
1 -
 2
2 -
 3
3 -
 4
4 -
 5
5 -
 6
6 -
 7
7 -
 8
8 -
 9
9 -
 10
10 -
 11
11 -
12
-
13
-
14
-
15
-
16
-
17
-
18
-
19
-
20
-
21
-
22
-
23
-
24
-
25
-
26
-
27
-
28
-
29
-
30
-
31
-
32
-
33
-
34
-
35
-
36
-
37
-
38
-
39
-
40
-
41
-
42
-
43
-
44
-
45
-
46
-
47
-
48
-
49
-
50
-
51
-
52
-
53
-
54
-
55
-
56
-
57
 |
 |

5
Setting Up the Dell™ DR Series System as a CIFS or VTL Backup Target on EMC® Networker® | April 2015
1
Installing and configuring the DR Series system
1.
Rack and cable the DR Series system and power it on.
2.
Initialize the DR Series system. For more information, see following topics “iDRAC Connection”,
“Logging in and Initializing the DR Series System”, and “Accessing iDRAC6/iDRAC7 Using RACADM”
in the
Dell DR Series System Administrator Guide
.
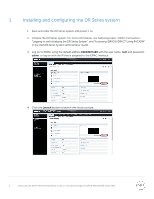
3.
Log on to iDRAC using the default address
192.168.0.120
with the user name:
root
and password:
calvin
, or log on with the IP that is assigned to the iDRAC interface.
4.
Click the
Launch
button to launch the virtual console.