Dell Force10 S25N-S50N Installing S25N and S25V Systems - Page 22
Four-Post Rack-mounting with Threaded Rails,
 |
View all Dell Force10 S25N-S50N manuals
Add to My Manuals
Save this manual to your list of manuals |
Page 22 highlights
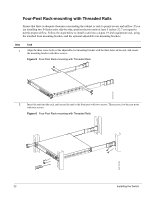
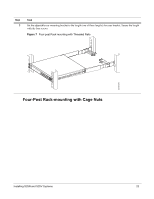
Four-Post Rack-mounting with Threaded Rails Ensure that there is adequate clearance surrounding the cabinet or rack to permit access and airflow. If you are installing two S-Series units side-by-side, position the two units at least 5 inches (12.7 cm) apart to permit proper airflow. Follow the steps below to install a unit into a 4-post 19-inch equipment rack, using the attached front mounting brackets and the optional adjustable rear-mounting brackets. Step 1 Task Align the three screw holes of the adjustable rear mounting bracket with the three holes in the unit, and secure the mounting bracket with three screws. Figure 5 Four-Post Rack-mounting with Threaded Rails AC STACK ID XFP25 XFP26 Alarm DC 27 P28 S50-01-GE-24V fn00146s25N 2 Insert the unit into the rack, and secure the unit to the front post with two screws. Then secure it to the rear posts with two screws. Figure 6 Four-Post Rack-mounting with Threaded Rails AC STACK ID XFP25 XFP26 Alarm DC 27 P28 S50-01-GE-24V 22 fn00147_S25N Installing the Switch
-
 1
1 -
2
-
3
-
4
-
5
-
6
-
7
-
8
-
9
-
10
-
11
-
12
-
13
-
14
-
15
-
16
-
 17
17 -
 18
18 -
 19
19 -
 20
20 -
 21
21 -
 22
22 -
 23
23 -
 24
24 -
 25
25 -
 26
26 -
 27
27 -
28
-
29
-
30
-
31
-
32
-
33
-
34
-
35
-
36
-
37
-
38
-
39
-
40
-
41
-
42
-
43
-
44
-
45
-
46
-
47
-
48
-
49
-
50
-
51
-
52
-
53
-
54
 |
 |
