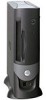
Dell OptiPlex GX260N Service Manual - Page 16
Battery: Dell OptiPlex GX260 Service Manual, Replacing the Battery
 |
View all Dell OptiPlex GX260N manuals
Add to My Manuals
Save this manual to your list of manuals |
Page 16 highlights
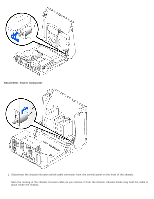
Back to Contents Page Battery Dell™ OptiPlex™ GX260 Service Manual Replacing the Battery CAUTION: A new battery can explode if it is incorrectly installed. Replace the battery only with the same or equivalent type recommended by the manufacturer. Discard used batteries according to the manufacturer's instructions. 1. If you have not already done so, make a copy of your configuration information, found in system setup. 2. Open the computer cover. 3. Locate the battery socket labeled BATTERY (see "System Board"). NOTICE: If you pry the battery out of its socket with a blunt object, be careful not to touch the system board with the object. Ensure that the object is inserted between the battery and the socket before you attempt to pry out the battery. Otherwise, you may damage the system board by prying off the socket or by breaking circuit traces on the system board. 4. Remove the battery by carefully prying it out of its socket with your fingers or with a blunt, nonconducting object such as a plastic screwdriver. 5. Insert the new battery into the socket with the side labeled "+" facing up, and snap the battery into place. NOTICE: To connect a network cable, first plug the cable into the network wall jack, and then plug it into the computer. 6. Close the computer cover, and plug your computer and devices into electrical outlets. 7. Replace the padlock, if required. 8. Properly dispose of the old battery. Back to Contents Page
-
 1
1 -
2
-
3
-
4
-
5
-
6
-
7
-
8
-
9
-
10
-
 11
11 -
 12
12 -
 13
13 -
 14
14 -
 15
15 -
 16
16 -
 17
17 -
 18
18 -
 19
19 -
 20
20 -
 21
21 -
22
-
23
-
24
-
25
-
26
-
27
-
28
-
29
-
30
-
31
-
32
-
33
-
34
-
35
-
36
-
37
-
38
-
39
-
40
-
41
-
42
-
43
-
44
-
45
-
46
-
47
-
48
-
49
-
50
-
51
-
52
-
53
-
54
-
55
-
56
-
57
-
58
-
59
-
60
-
61
-
62
-
63
-
64
-
65
-
66
-
67
-
68
-
69
-
70
-
71
-
72
-
73
-
74
-
75
-
76
-
77
-
78
-
79
-
80
-
81
-
82
-
83
-
84
-
85
-
86
-
87
-
88
-
89
-
90
-
91
-
92
-
93
-
94
-
95
-
96
-
97
-
98
-
99
-
100
 |
 |
