Dell PowerEdge 2850 Activating the Integrated RAID Controller - Page 7
Installation and Troubleshooting Guide - memory
 |
View all Dell PowerEdge 2850 manuals
Add to My Manuals
Save this manual to your list of manuals |
Page 7 highlights
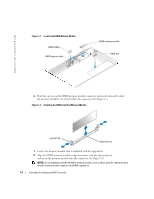
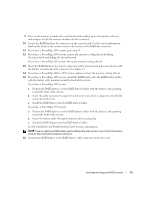
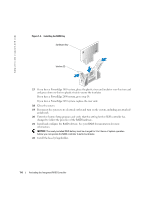
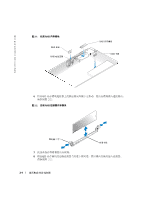
9 Press on the memory module with your thumbs while pulling up on the ejectors with your index fingers to lock the memory module into the connector. 10 Locate the RAID hardware key connector on the system board. See the system information label on the inside of the system cover for the location of the RAID key connector. 11 If you have a PowerEdge 1850 system, go to step 13. 12 If you have a PowerEdge 2800 system, remove the memory cooling shroud by lifting the release latch and sliding the shroud forward. If you have a PowerEdge 2850 system, lift up the memory cooling shroud. 13 Insert the RAID hardware key into its connector on the system board and secure the key with the latches on each end of the connector. See Figure 1-3. 14 If you have a PowerEdge 2800 or 2850 system, replace or lower the memory cooling shroud. 15 If you have a PowerEdge 1850 system, install the RAID battery into the RAID battery holder with the battery cable pointing toward the back of the system. If you have a PowerEdge 2800 system: a Position the RAID battery over the RAID battery holder with the battery cable pointing toward the front of the system. b Insert the cable connector through the notch in the riser, which is adjacent to the SCSIA connector on the riser. c Install the RAID battery into the RAID battery holder. If you have a PowerEdge 2850 system: a Position the RAID battery over the RAID battery holder with the battery cable pointing toward the front of the system. b Route the battery cable through the battery cable securing clip. c Install the RAID battery into the RAID battery holder. See the Installation and Troubleshooting Guide for more information. NOTE: If you are replacing a RAID battery, see the "Battery Disposal" section in your Product Information Guide for important battery disposal instructions. 16 Connect the RAID battery to the RAID battery cable connector on the riser card. Activating the Integrated RAID Controller 1-5
-
 1
1 -
 2
2 -
 3
3 -
 4
4 -
 5
5 -
 6
6 -
 7
7 -
 8
8 -
 9
9 -
 10
10 -
 11
11 -
 12
12 -
13
-
14
-
15
-
16
-
17
-
18
-
19
-
20
-
21
-
22
-
23
-
24
-
25
-
26
-
27
-
28
-
29
-
30
-
31
-
32
-
33
-
34
-
35
-
36
-
37
-
38
-
39
-
40
-
41
-
42
-
43
-
44
 |
 |