Dell PowerEdge 2970 Rack Installation Guide - Page 17
Installing the System in the Rack
 |
View all Dell PowerEdge 2970 manuals
Add to My Manuals
Save this manual to your list of manuals |
Page 17 highlights
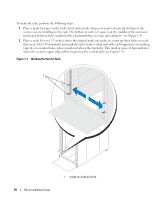
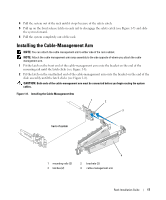
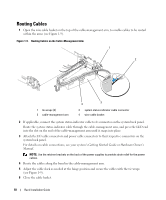
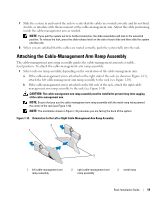
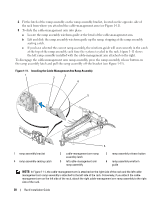
Installing the System in the Rack CAUTION: If you are installing more than one system, install the first system in the lowest available position in the rack. CAUTION: Because of the size and weight of the system, never attempt to install the system in the mounting rails by yourself. 1 Pull the two inner slide rails out of the rack until they lock in the fully extended position. 2 Lift the system into position above the extended slides. The three shoulder screws on the sides of the system fit into the corresponding J-slots (see detail on Figure 1-7) on the inner slide assemblies. 3 Lower the back of the system while aligning the back shoulder screws on the sides of the system with the back J-slots on the slide assemblies. 4 Engage the back shoulder screws into their respective J-slots. 5 Lower the front of the system and fit the middle and front shoulder screws into the J-slots in the slide assemblies. The system release latch at the front of the inner slide rail will snap back as the shoulder screw passes into the front slot. Use this system release latch when you wish to remove the system from the slide assemblies. 6 Press the slide-release latch on the outside of each inner slide, then push the system into the rack. 7 Install the cable-management arm. See "Installing the Cable-Management Arm" on page 17. 8 Tighten the thumbscrews on the rack front panel to secure the slide assemblies to the rack. Rack Installation Guide 15
-
 1
1 -
2
-
3
-
4
-
5
-
6
-
7
-
8
-
9
-
10
-
11
-
 12
12 -
 13
13 -
 14
14 -
 15
15 -
 16
16 -
 17
17 -
 18
18 -
 19
19 -
 20
20 -
 21
21 -
 22
22 -
23
-
24
-
25
-
26
-
27
-
28
-
29
-
30
-
31
-
32
-
33
-
34
-
35
-
36
-
37
-
38
-
39
-
40
-
41
-
42
-
43
-
44
-
45
-
46
-
47
-
48
-
49
-
50
-
51
-
52
-
53
-
54
-
55
-
56
-
57
-
58
-
59
-
60
-
61
-
62
-
63
-
64
-
65
-
66
-
67
-
68
-
69
-
70
-
71
-
72
-
73
-
74
-
75
-
76
-
77
-
78
-
79
-
80
-
81
-
82
-
83
-
84
-
85
-
86
-
87
-
88
-
89
-
90
-
91
-
92
-
93
-
94
-
95
-
96
-
97
-
98
-
99
-
100
-
101
-
102
-
103
-
104
-
105
-
106
-
107
-
108
-
109
-
110
-
111
-
112
 |
 |