Dell PowerEdge T710 Tower-to-Rack Conversion Guide - Page 4
Preparing the System for Conversion, Removing the Stabilizer Feet, Removing the System Cover - rack chassis
 |
View all Dell PowerEdge T710 manuals
Add to My Manuals
Save this manual to your list of manuals |
Page 4 highlights
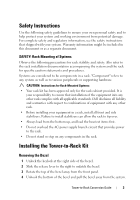
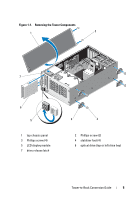
Preparing the System for Conversion 1 Turn off the system and attached peripherals, and disconnect the system from the electrical outlet and peripherals. 2 If present, unlock and remove the cable lock on the back of the system chassis. 3 Rotate the system feet inward. WARNING: The system may weigh up to 38 kilograms (84 pounds) when fully loaded. To prevent personal injury, do not attempt to move the system by yourself. 4 Place the system on its side on a flat, level work surface. Removing the Stabilizer Feet Using a #2 Phillips screwdriver, remove the screws that hold the stabilizer feet to the chassis and remove the stabilizer feet. See Figure 1-1. Removing the System Cover 1 Turn the lock on the cover release latch counterclockwise to the unlocked position. 2 Pull the cover release latch, and rotate the latch end of the cover away from the system. 3 Grasp the cover on both sides and lift the cover away from the system. Removing the Top Chassis Panel 1 Using a #2 Phillips screwdriver, remove the two screws at the back of the system that secure the top chassis panel to the system chassis. See Figure 1-1. 2 Slide the top panel toward the back of the system until the panel hooks clear the chassis slots. 3 Rotate the free side of the panel outward about 15 degrees and pull the panel clear of the system. See Figure 1-1. 4 Tower-to-Rack Conversion Guide
-
 1
1 -
 2
2 -
 3
3 -
 4
4 -
 5
5 -
 6
6 -
 7
7
 |
 |
