Dell V105 All In One Inkjet Printer User Guide
Dell V105 All In One Inkjet Printer Manual
 |
View all Dell V105 All In One Inkjet Printer manuals
Add to My Manuals
Save this manual to your list of manuals |
Dell V105 All In One Inkjet Printer manual content summary:
- Dell V105 All In One Inkjet Printer | User Guide - Page 1
Dell™ V105 All-In-One Printer User's Guide To order ink or supplies from Dell: 1. Double-click the icon on your desktop. 2. Visit the Dell website, or order Dell printer supplies by phone. www.dell.com/supplies For the best service, ensure that you have the Dell printer Service Tag available. - Dell V105 All In One Inkjet Printer | User Guide - Page 2
Supported paper type and sizes How to select and store print media How to load printable media into my printer How to configure printer settings How to set up and use printer software How to care for and maintain my printer How to troubleshoot and solve problems User's Guide Software and Drivers - Dell V105 All In One Inkjet Printer | User Guide - Page 3
when contacting support Service Tag and Express Code Stickers These labels are located on your printer. For more information about their location, see Understanding the Printer Parts. Solutions-Troubleshooting hints and tips, frequently asked questions, documentation, driver downloads, and product - Dell V105 All In One Inkjet Printer | User Guide - Page 4
Understanding the Software Using the Dell Imaging Toolbox Using Printing Preferences Dell Ink Management System Using the Dell Service Center Installing the Optional XPS Driver Removing and Reinstalling Software The printer software includes: Dell Imaging Toolbox- Allows you to perform - Dell V105 All In One Inkjet Printer | User Guide - Page 5
ink levels. Order supplies online. To access the Dell Imaging Toolbox: 1. In Windows Vista™: a. Click ® Programs. b. Click Dell Printers. c. Click Dell V105. In Windows® XP and Windows 2000: Click Start® Programs or All Programs® Dell Printers® Dell V105. 2. Select Dell Imaging Toolbox. The Dell - Dell V105 All In One Inkjet Printer | User Guide - Page 6
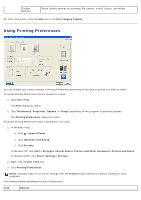
click Start® Settings® Control Panel® Printers and Other Hardware® Printers and Faxes. In Windows 2000, click Start® Settings® Printers. 2. Right-click the Dell V105 icon. 3. Click Printing Preferences. NOTE: Changes made to the printer settings from the Printers folder become the default settings - Dell V105 All In One Inkjet Printer | User Guide - Page 7
Mode and Complete-A-Print settings. You can also view the paper type that the printer detects. Maintenance Install Ink Cartridges Clean Ink Cartridges Align Ink Cartridges Print a Test Page Network Support Dell Ink Management System Each time you print a job, a printing progress screen - Dell V105 All In One Inkjet Printer | User Guide - Page 8
Click OK. Using the Dell Service Center The Dell Service Center is a diagnostic tool that provides step-by-step troubleshooting help with problems encountered while using the printer. It also contains links to printer maintenance tasks and customer support. To access the Dell Service Center, you can - Dell V105 All In One Inkjet Printer | User Guide - Page 9
Windows 2000: Click Start® Programs or All Programs® Dell Printers® Dell V105. 2. Click Dell Service Center. The Dell Service Center dialog box opens. Installing the Optional XPS Driver The XML Paper Specification (XPS) driver is an optional printer driver designed to make use of the advanced XPS - Dell V105 All In One Inkjet Printer | User Guide - Page 10
can remove and reinstall the printer software. 1. In Windows Vista: a. Click ® Programs. b. Click Dell Printers. c. Click Dell V105. In Windows XP and WIndows 2000: Click Start® Programs or All Programs® Dell Printers® Dell V105. 2. Click Uninstall Dell V105. 3. Follow the instructions on the screen - Dell V105 All In One Inkjet Printer | User Guide - Page 11
Panel. 4 Foreign Part that prevents small foreign objects from falling into the paper path. object guard 5 Paper Part that supports loaded paper. support 6 Paper guides Guides that help the paper feed into the printer properly. 7 Scanner Surface on which you place your document or photo - Dell V105 All In One Inkjet Printer | User Guide - Page 12
of the printer. 10 Supplies To order ink cartridges or paper, visit www.dell.com/supplies. Reorder Label 11 Ink Part that holds two ink cartridges, one color ink and the other black or photo. cartridge carrier 12 Express Service Identify your printer when you use support.dell.com or - Dell V105 All In One Inkjet Printer | User Guide - Page 13
scan job in progress. Reset the printer. 6 Mono or photo cartridge error LED 7 Color cartridge error LED 8 Paper feed button 9 4 x 6 Copy button 10 Mono Copy button Check if the black or photo ink cartridge needs to be replaced. Check if the color ink cartridge needs to be replaced. Load - Dell V105 All In One Inkjet Printer | User Guide - Page 14
in your Owner's Manual. Dell™ ink cartridges are available only through Dell. You can order more ink online at www.dell.com/supplies or by phone. CAUTION: It is recommended that Dell ink cartridges be used for your printer. Dell does not provide warranty coverage for problems caused by using - Dell V105 All In One Inkjet Printer | User Guide - Page 15
the right ink cartridge carrier. NOTE: For normal printing, use a black cartridge and a color cartridge. For photo printing, replace the black cartridge with a photo cartridge. 8. Snap each lid closed. 9. Close the printer. Lift the scanner base unit, and then push the scanner support back towards - Dell V105 All In One Inkjet Printer | User Guide - Page 16
Start® Settings® Printers. 3. Right-click the Dell V105 icon. 4. Click Printing Preferences. The Printing Preferences dialog box opens. 5. Click the Maintenance tab. 6. Click Align Ink Cartridges. 7. Click Print. 8. Follow the instructions on the computer screen. The ink cartridges align when the - Dell V105 All In One Inkjet Printer | User Guide - Page 17
and Faxes. In Windows 2000, click Start® Settings® Printers. 3. Right-click the Dell V105 icon. 4. Click Printing Preferences. The Printing Preferences dialog box opens. 5. Click the Maintenance tab. 6. Click Clean Ink Cartridges. The cleaning page prints. 7. If the print quality has not improved - Dell V105 All In One Inkjet Printer | User Guide - Page 18
2. Center the paper on the paper support. 3. Adjust the paper guides so that they rest against the edges of the paper. NOTE: Do not pull on both paper guides simultaneously. When one paper guide is moved, the other adjusts accordingly. NOTE: Do not force paper into the printer. The paper should be - Dell V105 All In One Inkjet Printer | User Guide - Page 19
of the banner paper You remove all paper from the paper support before inserting banner paper. You use banner paper designed for inkjet printers. You place a stack of banner paper on or behind the printer, and feed in the first sheet. The paper guides rest against the edges of the paper. You select - Dell V105 All In One Inkjet Printer | User Guide - Page 20
paper guides rest against the edges of the transparencies. Loading Original Documents on the Scanner Glass 1. Open the top cover. 2. Place the document face down on the scanner glass. NOTE: Ensure that the upper left corner of the front of the item aligns with the arrow on the printer - Dell V105 All In One Inkjet Printer | User Guide - Page 21
- Dell V105 All In One Inkjet Printer | User Guide - Page 22
on troubleshooting cartridge problems, see Error Codes and Flashing Lights on the Operator Panel. For help on maintaining your printer, see Maintenance. For more help and to check the latest information on troubleshooting your printer, please visit http://support.dell.com/support. Setup Problems - Dell V105 All In One Inkjet Printer | User Guide - Page 23
or All Programs® Dell Printers® Dell V105. If the printer does not appear in the list of printers, the printer software is not installed. Install the printer software. For more information, see Removing and Reinstalling Software. Correct communication problems between the printer and the computer - Dell V105 All In One Inkjet Printer | User Guide - Page 24
each cartridge. Ensure that you have loaded the paper correctly. For more information, see Loading Paper. Error Codes and Flashing Lights on the Operator Panel For more help and to check the latest information on troubleshooting your printer, please visit http://support.dell.com/support. What - Dell V105 All In One Inkjet Printer | User Guide - Page 25
If there is a paper jam, clear the paper jam. For more information, see Check for a paper jam.. None flashes rapidly. The color ink cartridge is running Order new ink cartridges. To order supplies, visit the Dell low on ink. It needs to be web site at www.dell.com/support. replaced soon. None - Dell V105 All In One Inkjet Printer | User Guide - Page 26
. Do not use creased, damp, or curled paper. Orient the media according to the instructions for the printer. Printing Problems Check the ink levels, and install new print cartridges if necessary. For more information, see Replacing Ink Cartridges. Ensure that you remove individual sheets from the - Dell V105 All In One Inkjet Printer | User Guide - Page 27
Uninstall the printer software, and then reinstall it. For more information, see Removing and Reinstalling Software. Select a lower print quality from the Printing Preferences dialog box. Ensure that you have loaded the paper correctly. For more information, see Loading Paper. Copying Problems Check - Dell V105 All In One Inkjet Printer | User Guide - Page 28
Original Documents on the Scanner Glass. Check paper sizes. Make sure the paper size being used matches the size you selected on the operator panel or the Dell Imaging Toolbox. Scanning Problems Check for blinking lights and error messages on the printer. For more information, see Error Codes and - Dell V105 All In One Inkjet Printer | User Guide - Page 29
or All Programs® Dell Printers® Dell V105. If the printer does not appear in the list of printers, the printer software is not installed. Install the printer software. For more information, see Removing and Reinstalling Software. Correct communication problems between the printer and the computer - Dell V105 All In One Inkjet Printer | User Guide - Page 30
or newspapers. 1. In Windows Vista: a. Click ® Programs. b. Click Dell Printers. c. Click Dell V105. In Windows XP or Windows 2000: Click Start® Programs or All Programs® Dell Printers® Dell V105. 2. Select Dell Imaging Toolbox. The Dell Imaging Toolbox dialog box opens. 3. From the Home screen - Dell V105 All In One Inkjet Printer | User Guide - Page 31
scanned documents. 1. In Windows Vista: a. Click ® Programs. b. Click Dell Printers. c. Click Dell V105. In Windows XP or Windows 2000: Click Start® Programs or All Programs® Dell Printers® Dell V105. 2. Select Dell Imaging Toolbox. The Dell Imaging Toolbox dialog box opens. 3. From the Home screen - Dell V105 All In One Inkjet Printer | User Guide - Page 32
information, see Aligning Ink Cartridges and Cleaning the Ink Cartridge Nozzles. For additional solutions, go to http://support.dell.com/support. General Guidelines for Selecting or Loading Print Media Attempting to print on damp, curled, wrinkled, or torn paper can cause paper jams and poor print - Dell V105 All In One Inkjet Printer | User Guide - Page 33
Documents Printing Photos Printing Envelopes Printing More Than One Page on a Sheet of Paper Printing an Image as a Multi-Page Dell recommends you use a color cartridge and a photo cartridge for printing photos. 1. Turn on your computer and printer, and make sure they are connected. 2. Load paper - Dell V105 All In One Inkjet Printer | User Guide - Page 34
For more information, see Loading Paper. 3. In Windows Vista™: a. Click ® Programs. b. Click Dell Printers. c. Click Dell V105. In Windows® XP and Windows 2000: Click Start® Programs or All Programs® Dell Printers® Dell V105. 4. Select Dell Imaging Toolbox. The Dell Imaging Toolbox dialog box opens - Dell V105 All In One Inkjet Printer | User Guide - Page 35
. For more information, see Loading Paper. 3. In Windows Vista: a. Click ® Programs. b. Click Dell Printers. c. Click Dell V105. In Windows XP and Windows 2000: Click Start® Programs or All Programs® Dell Printers® Dell V105. 4. Select Dell Imaging Toolbox. The Dell Imaging Toolbox dialog box opens - Dell V105 All In One Inkjet Printer | User Guide - Page 36
Photo Greeting Card from the Share tab. 14. Select the copy quality, paper size, paper type, and the number of copies to print. 15. Click Print Now photo greeting card attached. Printing Envelopes 1. Turn on your computer and printer, and ensure that they are connected. 2. Load the envelope with the - Dell V105 All In One Inkjet Printer | User Guide - Page 37
One Page on a Sheet of Paper 1. Turn on your computer and printer, and ensure that they are connected. 2. Load the paper. For more information, see Loading Paper drop-down list, select how many pages you want to be printed on one sheet. 7. Select the Print Page Borders check box if you want borders - Dell V105 All In One Inkjet Printer | User Guide - Page 38
OK or Print. Printing an Image as a Multi-Page Poster 1. Turn on your computer and printer, and make sure they are connected. 2. Load the paper. For more information, see Loading Paper. 3. With your document open, click File® Print. 4. Click Preferences, Properties, Options, or Setup (depending on - Dell V105 All In One Inkjet Printer | User Guide - Page 39
. The printed bundles are stacked, one on top of the other, keeping the correct page order. The stacked bundles can be bound to make a booklet. When printing with a heavier paper stock, select a smaller number of Sheets per bundle. 7. Click OK to close any printer software dialog boxes that are open - Dell V105 All In One Inkjet Printer | User Guide - Page 40
one on top of the other, until the booklet is complete. 5. Bind the bundles together to complete the booklet. Duplexing a Print Job (Two-Sided Printing) Manual duplex allows you to print your document on both sides of the paper. The printer exited the printer, follow the instructions on your - Dell V105 All In One Inkjet Printer | User Guide - Page 41
various settings such as print on both sides of the paper, print in higher or lower quality, print only in Printers. In Windows XP, click Start® Settings® Control Panel® Printers and Other Hardware® Printers and Faxes. In Windows 2000, click Start® Settings® Printers. 2. Right-click the Dell V105 - Dell V105 All In One Inkjet Printer | User Guide - Page 42
. From the Maintenance tab: There are no print settings to set as default from the Maintenance tab. From here, you can: Install, clean, and align ink cartridges. Print a test page. Get information on sharing your printer on a network. - Dell V105 All In One Inkjet Printer | User Guide - Page 43
Power Consumption and Requirements Print and Scan Mode Capabilities Operating System Support Memory Specifications and Requirements Media Types and Sizes Cables Overview Memory Connectivity Duty cycle (average) Printer life 8 MB SDRAM 8 MB FLASH USB 2.0 high-speed 3,000 pages per - Dell V105 All In One Inkjet Printer | User Guide - Page 44
Mode Capabilities Your printer can scan from 72 to 19,200 dpi. Although your printer has this capability, Dell™ recommends using the paper All other media 600 x 600 dpi 300 x 600 dpi 1200 x 1200 dpi 600 x 600 dpi 4800 x 1200 dpi 1200 x 1200 dpi Operating System Support The printer supports - Dell V105 All In One Inkjet Printer | User Guide - Page 45
Banner Letter Banner First sheet of the banner paper Envelopes 9 Envelopes: 3 7/8 x 8 100 x 148 mm 25 cards Heavyweight matte or photo/glossy paper 8.5 x 11 inches (216 x 279 mm) A4: 8. x 297 mm) 50 transparencies Custom size paper The paper must fit the following dimensions: 100 sheets - Dell V105 All In One Inkjet Printer | User Guide - Page 46
- Dell V105 All In One Inkjet Printer | User Guide - Page 47
Paper. 3. Load your original document. For more information, see Loading Original Documents on the Scanner Glass. 4. In Windows Vista™: a. Click ® Programs. b. Click Dell Printers. c. Click Dell V105. In Windows® XP or Windows 2000: Click Start® Programs or All Programs® Dell Printers® Dell V105 - Dell V105 All In One Inkjet Printer | User Guide - Page 48
4. If you want to print more than one copy, press the Copies button appears on the Paper. 3. Load your original photo on the scanner glass. For more information, see Loading Original Documents on the Scanner Glass. 4. In Windows Vista: a. Click ® Programs. b. Click Dell Printers. c. Click Dell V105 - Dell V105 All In One Inkjet Printer | User Guide - Page 49
. 9. Click Start. The photo appears in the right pane of the Copy dialog box. 10. From the drop-down lists, select the print quality, paper size, and paper type settings that you want. 11. To select multiple prints of a photo, or to select photo sizes other than 10 x 15 cm (4 x 6 in.), select - Dell V105 All In One Inkjet Printer | User Guide - Page 50
Warranty and Return Policy Dell Technical Support Policy Technician-assisted technical support requires the cooperation and participation of the customer in the troubleshooting process and provides for restoration of the Operating System, application software and hardware drivers to the original - Dell V105 All In One Inkjet Printer | User Guide - Page 51
(Canada only) Warranty and Return Policy Dell Inc. ("Dell") manufactures its hardware products from parts and components that are new or equivalent to new in accordance with industry-standard practices. For information about the Dell warranty for your printer, refer to the Product Information Guide. - Dell V105 All In One Inkjet Printer | User Guide - Page 52
Scanner Glass. 3. In Windows Vista™: a. Click ® Programs. b. Click Dell Printers. c. Click Dell V105. In Windows® XP or Windows 2000: Click Start® Programs or All Programs® Dell Printers® Dell V105. 4. Select Dell Imaging Toolbox. The Dell Imaging Toolbox dialog box opens. 5. From the Home screen - Dell V105 All In One Inkjet Printer | User Guide - Page 53
see Loading Original Documents on the Scanner Glass. NOTE: For best results, leave the most space possible between the photos and the edges of the scan area. 3. In Windows Vista: a. Click ® Programs. b. Click Dell Printers. c. Click Dell V105. In Windows XP and Windows 2000: Click Start® Programs or - Dell V105 All In One Inkjet Printer | User Guide - Page 54
Dell Printers. c. Click Dell V105. In Windows XP and Windows 2000: Click Start® Programs or All Programs® Dell Printers® Dell V105. 4. Select Dell Imaging Toolbox. The Dell Documents on the Scanner Glass. NOTE: For best results, leave the most space possible between the photos and the edges of - Dell V105 All In One Inkjet Printer | User Guide - Page 55
they are connected. 2. In Windows Vista: a. Click ® Programs. b. Click Dell Printers. c. Click Dell V105. In Windows XP and Windows 2000: Click Start® Programs or All Programs® Dell Printers® Dell V105. 3. Select Dell Imaging Toolbox. The Dell Imaging Toolbox opens. 4. From the Home screen, click - Dell V105 All In One Inkjet Printer | User Guide - Page 56
Scanner Glass. 3. In Windows Vista: a. Click ® Programs. b. Click Dell Printers. c. Click Dell V105. In Windows XP and Windows 2000: Click Start® Programs or All Programs® Dell Printers® Dell V105. 4. Select Dell Imaging Toolbox. The Dell Imaging Toolbox opens. 5. From the Home screen, click Scan - Dell V105 All In One Inkjet Printer | User Guide - Page 57
Dell Printers. c. Click Dell V105. In Windows XP and Windows 2000: Click Start® Programs or All Programs® Dell Printers® Dell V105. 2. Select Dell Imaging Toolbox. The Dell want to add, and then click E-mail. 6. If you are sending one or more photos, select a photo size. 7. Click Create E-mail to - Dell V105 All In One Inkjet Printer | User Guide - Page 58
scan another image: a. Do one of the following: Select Add software prepares your PDF and opens a Save dialog box. 13. Type a file name for your PDF, and select a storage location. 14. Click Save. From a Saved Item 1. In Windows Vista: a. Click ® Programs. b. Click Dell Printers. c. Click Dell V105 - Dell V105 All In One Inkjet Printer | User Guide - Page 59
image: a. Do one of the following software prepares your PDF and opens a Save dialog box. 10. Enter a file name for your PDF, and select a storage location. 11. Click Save. Customizing Scan Settings 1. In Windows Vista: a. Click ® Programs. b. Click Dell Printers. c. Click Dell V105 a paper size - Dell V105 All In One Inkjet Printer | User Guide - Page 60
Scan Settings Preferences 1. In Windows Vista: a. Click ® Programs. b. Click Dell Printers. c. Click Dell V105. In Windows XP and Windows 2000: Click Start® Programs or All Programs® Dell Printers® Dell V105. 2. Select Dell Imaging Toolbox. The Dell Imaging Toolbox dialog box opens. 3. From the Home - Dell V105 All In One Inkjet Printer | User Guide - Page 61
any rights to the Dell- or third-party-copyrighted software in this printer. Since the GNU licensed software that the Dell modifications are based upon (INCLUDING, BUT NOT LIMITED TO, PROCUREMENT OF SUBSTITUTE GOODS OR SERVICES; LOSS OF USE, DATA, OR PROFITS; OR BUSINESS INTERRUPTION) HOWEVER - Dell V105 All In One Inkjet Printer | User Guide - Page 62
that you have the freedom to distribute copies of free software (and charge for this service if you wish), that you receive source code or can any problems introduced by others will not reflect on the original authors' reputations. Finally, any free program is threatened constantly by software - Dell V105 All In One Inkjet Printer | User Guide - Page 63
the terms of Sections 1 and 2 above provided that you also do one of the following: a. Accompany it with the complete corresponding machine-readable source the author/donor to decide if he or she is willing to distribute software through any other system and a licensee cannot impose that choice. This - Dell V105 All In One Inkjet Printer | User Guide - Page 64
software which is copyrighted by the Free Software Foundation, write to the Free Software Foundation; we sometimes make exceptions for this. Our decision will be guided THE COST OF ALL NECESSARY SERVICING, REPAIR OR CORRECTION. 12. the best way to achieve this is to make it free software which - Dell V105 All In One Inkjet Printer | User Guide - Page 65
software (and charge for this service if you wish); that you receive source code or can get it if you want it; that you can change the software author's reputation will not be affected by problems that might be introduced by others. Finally, software patents pose a constant threat to the existence - Dell V105 All In One Inkjet Printer | User Guide - Page 66
modifications or work under the terms of Section 1 above, provided that you also meet all of these conditions: a. The modified work must itself be a software library. b. You must cause the files modified to carry prominent notices stating that you changed the files and the date of any change. c. You - Dell V105 All In One Inkjet Printer | User Guide - Page 67
copyright notice for the Library among them, as well as a reference directing the user to the copy of this License. Also, you must do one of these things: a. Accompany the work with the complete corresponding machine-readable source code for the Library including whatever changes were used in the - Dell V105 All In One Inkjet Printer | User Guide - Page 68
differ in detail to address new problems or concerns. Each version is software which is copyrighted by the Free Software Foundation, write to the Free Software Foundation; we sometimes make exceptions for this. Our decision will be guided THE COST OF ALL NECESSARY SERVICING, REPAIR OR CORRECTION. 16.
-
 1
1 -
 2
2 -
 3
3 -
 4
4 -
 5
5 -
 6
6 -
 7
7 -
8
-
9
-
10
-
11
-
12
-
13
-
14
-
15
-
16
-
17
-
18
-
19
-
20
-
21
-
22
-
23
-
24
-
25
-
26
-
27
-
28
-
29
-
30
-
31
-
32
-
33
-
34
-
35
-
36
-
37
-
38
-
39
-
40
-
41
-
42
-
43
-
44
-
45
-
46
-
47
-
48
-
49
-
50
-
51
-
52
-
53
-
54
-
55
-
56
-
57
-
58
-
59
-
60
-
61
-
62
-
63
-
64
-
65
-
66
-
67
-
68
 |
 |
Dell™ V105 All-In-One Printer User's Guide
To order ink or supplies from Dell:
1. Double-click the icon on your desktop.
2. Visit the Dell website, or order Dell printer supplies by phone.
www.dell.com/supplies
For the best service, ensure that you have the Dell printer Service Tag available.
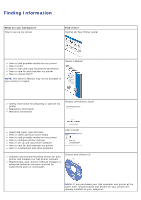
Finding Information
Understanding the Software
About Your Printer
Maintenance
Loading Paper and Originals
Troubleshooting
Printing
Specifications
Copying
Appendix
Scanning
Licensing Notice
Notes, Notices, and Cautions
Information in this document is subject to change without notice.
© 2008 Dell Inc. All rights reserved.
Reproduction in any manner whatsoever without the written permission of Dell Inc. is strictly forbidden.
Trademarks used in this text:
Dell
, the
DELL
logo, and
Dell Ink Management System
are trademarks of Dell Inc.;
Microsoft
and
Windows
are
registered trademarks of Microsoft Corporation in the United States and/or other countries.
Windows Vista
is either a trademark or a registered
trademark of Microsoft Corporation in the United States and/or other countries.
Adobe
and
Photoshop
are either registered trademarks or
trademarks of Adobe Systems Incorporated in the United States and/or other countries.
Other trademarks and trade names may be used in this document to refer to either the entities claiming the marks and names or their
products. Dell Inc. disclaims any proprietary interest in trademarks and trade names other than its own.
UNITED STATES GOVERNMENT RESTRICTED RIGHTS
This software and documentation are provided with RESTRICTED RIGHTS. Use, duplication or disclosure by the Government is subject to
restrictions as set forth in subparagraph (c)(1)(ii) of the Rights in Technical Data and Computer Software clause at DFARS 252.227-7013 and
in applicable FAR provisions: Dell Inc., One Dell Way, Round Rock, Texas, 78682, USA.
Model V105
February 2008
SRV FX703
Rev. A00
NOTE:
A
NOTE
indicates important information that helps you make better use of your printer.
NOTICE:
A
NOTICE
indicates either potential damage to hardware or loss of data and tells you how to avoid the
problem.
CAUTION:
A CAUTION indicates a potential for property damage, personal injury, or death.