Dell V105 All In One Inkjet Printer User Guide - Page 36
Printing Envelopes
 |
View all Dell V105 All In One Inkjet Printer manuals
Add to My Manuals
Save this manual to your list of manuals |
Page 36 highlights
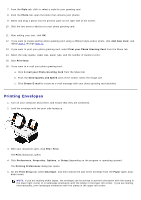
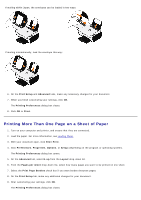
7. From the Style tab, click to select a style for your greeting card. 8. From the Photo tab, open the folder that contains your photos. 9. Select and drag a photo into the preview pane on the right side of the screen. 10. Click the text area to add text to your photo greeting card. 11. After editing your text, click OK. 12. If you want to create another photo greeting card using a different style and/or photo, click Add New Card, and repeat step 7 through step 11. 13. If you want to print your photo greeting card, select Print your Photo Greeting Card from the Share tab. 14. Select the copy quality, paper size, paper type, and the number of copies to print. 15. Click Print Now. 16. If you want to e-mail your photo greeting card: a. Click E-mail your Photo Greeting Card from the Share tab. b. From the Send Quality and Speed area of the screen, select the image size. c. Click Create E-mail to create an e-mail message with your photo greeting card attached. Printing Envelopes 1. Turn on your computer and printer, and ensure that they are connected. 2. Load the envelope with the print side facing up. 3. With your document open, click File® Print. The Print dialog box opens. 4. Click Preferences, Properties, Options, or Setup (depending on the program or operating system). The Printing Preferences dialog box opens. 5. On the Print Setup tab, select Envelope, and then choose the size of the envelope from the Paper size: dropdown menu. NOTE: If you are mailing within Japan, the envelope can be printed in portrait orientation with the stamp in the lower right corner or in landscape orientation with the stamp in the lower left corner. If you are mailing internationally, print landscape orientation with the stamp in the upper left corner.
-
 1
1 -
2
-
3
-
4
-
5
-
6
-
7
-
8
-
9
-
10
-
11
-
12
-
13
-
14
-
15
-
16
-
17
-
18
-
19
-
20
-
21
-
22
-
23
-
24
-
25
-
26
-
27
-
28
-
29
-
30
-
 31
31 -
 32
32 -
 33
33 -
 34
34 -
 35
35 -
 36
36 -
 37
37 -
 38
38 -
 39
39 -
 40
40 -
 41
41 -
42
-
43
-
44
-
45
-
46
-
47
-
48
-
49
-
50
-
51
-
52
-
53
-
54
-
55
-
56
-
57
-
58
-
59
-
60
-
61
-
62
-
63
-
64
-
65
-
66
-
67
-
68
 |
 |
