Denon AVR 1507 Owners Manual - English - Page 28
Basic Operation - pictures
 |
UPC - 081757507134
View all Denon AVR 1507 manuals
Add to My Manuals
Save this manual to your list of manuals |
Page 28 highlights
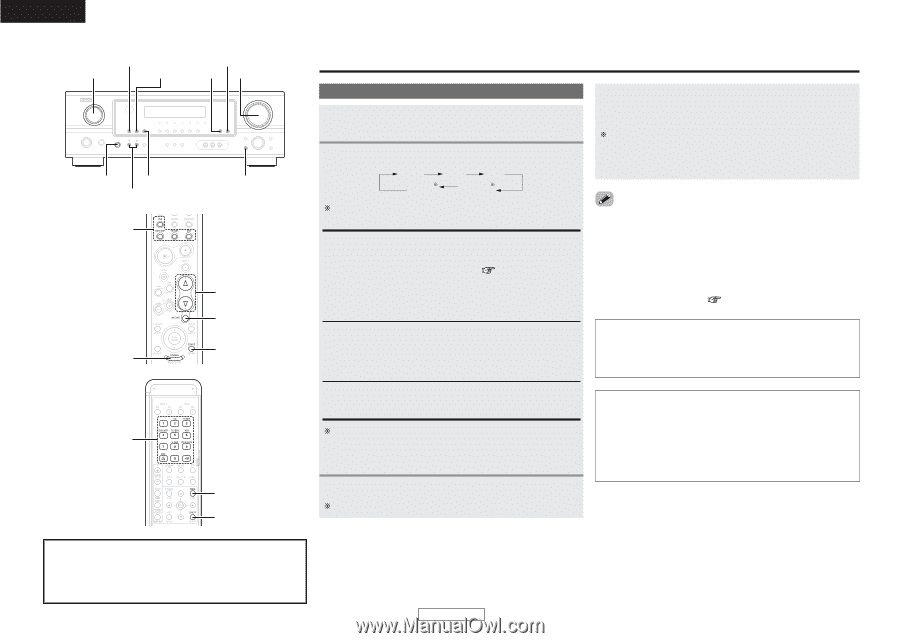
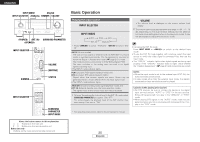
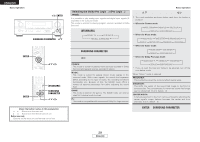
ENGLISH INPUT MODE STATUS INPUT SELECTOR DIMMER VOLUME SURROUND PARAMETER INPUT SELECTOR DIMMER VOLUME [MUTING] STATUS INPUT SELECTOR SURROUND PARAMETER INPUT MODE Basic Operation Playing the input source 1 Use INPUT SELECTOR to select the input source you want to play. 2 Press INPUT MODE. AUTO PCM DTS EXT. IN ANALOG Press to select "ANALOG", to select "EXT. IN". AUTO (All auto mode): The type of input signal is detected and the AVR-1507's surround mode is switched automatically. Can be selected for sources for which the Digital In Assignment mode ( page 21) is made. The mode switches automatically to DTS/ Dolby Digital/ PCM. The input switches to the analog input terminals is no digital signals are being input. • The INPUT mode indicator lights. PCM (exclusive PCM signal playback mode) and DTS (exclusive DTS signal playback mode): Played when the various signals are input. Noise may be generated when a mode different from the input signal is set. • The INPUT mode indicator lights. ANALOG (exclusive analog audio signal playback mode) and EXT. IN (External decoder input terminal selection mode): The signals input to the various input terminals are played. To lower the subwoofer channel level in the EXT. IN mode, press SURROUND PARAMETER and select "SW. ATT". For some players the playback level of the SW channel may seen strong. If so, set to "ON". 3 Start playback on the selected component. For operating instructions, refer to the component's manual. 4 Use VOLUME to adjust the volume. • The volume level is displayed on the master volume level display. The volume can be adjusted between the range of -80 ~ 0 ~ 18 dB. Depending on the channel level settings and the different surround mode settings and when in the down-mix mode, it may not be possible to adjust the volume to 18 dB. • Canceling the EXT. IN mode: Press INPUT MODE or to switch to the desired input mode. • To use the EXT. IN mode together with a picture, select the input source to which the video signal is connected first, then set the input mode. • The "DIGITAL" indicator lights when digital signals are being input properly. If the "DIGITAL" indicator does not light, check whether the "Digital In Assignment" ( page 21) and connections are correct. NOTE: • When the input mode is set to the external input (EXT. IN), the surround mode cannot be set. • In play modes other than the external input mode, the signals connected to these terminals cannot be played. Cautions when playing DTS sources: • For DTS sources, be sure to connect the device to the digital input terminal and set "AUTO" or "DTS" for the input source. Noise will be generated if you play in the "ANALOG" or "PCM" mode. • When playing DTS signals in the "AUTO" mode, noise may be generated when you first start playing and during searching. If so, play in the "DTS" mode. About the button names in this explanation < > : Buttons on the main unit [ ] : Buttons on the remote control unit Button name only : Buttons on the main unit and remote control unit 25 ENGLISH
-
 1
1 -
2
-
3
-
4
-
5
-
6
-
7
-
8
-
9
-
10
-
11
-
12
-
13
-
14
-
15
-
16
-
17
-
18
-
19
-
20
-
21
-
22
-
 23
23 -
 24
24 -
 25
25 -
 26
26 -
 27
27 -
 28
28 -
 29
29 -
 30
30 -
 31
31 -
 32
32 -
 33
33 -
34
-
35
-
36
-
37
-
38
-
39
-
40
-
41
-
42
-
43
-
44
-
45
-
46
-
47
-
48
-
49
-
50
-
51
-
52
-
53
-
54
-
55
-
56
-
57
-
58
-
59
-
60
 |
 |