Dewalt D25300DH Instruction Manual - Page 2
Emptying the Dust Extraction System - tools
 |
View all Dewalt D25300DH manuals
Add to My Manuals
Save this manual to your list of manuals |
Page 2 highlights
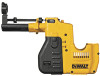
INTENDED USE This dust extraction system has been designed for use in hammerdrilling applications in masonry or concrete, and with solid drill bits mounted to the power tool at various work sites (i.e., construction sites). This attachment is suitable for use the models D25313 and D25314 only. This attachment not suitable for removal of hazardous substances (i.e., asbestos). Do not use the attachement for drilling applications in wood, steel or plastic. Do not use the attachment in core drilling applications. Do not use the attachment for chipping applications. Do not use under humid conditions or in presence of flammable liquids or gases. These heavy-duty rotary hammers are professional power tools. Do not let children come into contact with the tool. Supervision is required for those under 16 years of age. ASSEMBLY WARNING: ALWAYS turn off tool and disconnect the tool from the power source before making any adjustments or removing or installing attachments or accessories. Such preventative safety measures reduce the risk of starting the tool accidentally. 1. Before installing the D25300DH: a. Remove the drill bit. b. Remove the depth stop from the hammer side handle. Do not remove the side handle. c. Set the mode selector switch (H) to the hammerdrilling postion. 2. Align the D25300DH with the tool as shown. 3. Slide the dust extraction system onto the tool, taking care that the contacts enter the connection slots in the bottom of the tool. 4. Push the D25300DH into place until the locking device engages. 5. To remove the D25300DH, press the release button (E) and pull the dust extractor off. CAUTION: Do not install or remove the dust extractor while the tool is running. Adjusting the Drill Length 1. Insert the desired drill bit. 2. Press the depth stop and move it toward the head; release the stop. 3. Press the length stop and move it away from the head; release the stop. 4. Hold the tool and dust extractor with the drill against the drilling surface. 5. Apply pressure to bring the drill bit in contact with the surface. 6. Press the length stop and move it toward the head as far as it will go; release the stop. 7. Slowly withdraw the tool from the drilling surface, taking care that the spring-loaded mechanism is not released at once. Setting Drilling Depth Press the depth stop and move it to the required drilling depth; release the stop. OPERATION Switch Switch on the tool: the dust extraction system will switch on automatically. Switch off the tool: the dust extraction system will switch off automatically. Automatic Switch Off Delay After switching the tool off, the tool and dust extractor system will run for a few seconds to vacuum the dust particles remaining in the internal parts and collect the dust in the compartment. Emptying the Dust Extraction System WARNING: Use of this tool can generate and/or disburse dust, which may cause serious and permanent respiratory or other injury. Always use NIOSH/OSHA approved respiratory protection appropriate for the dust exposure. The dust extractor should be emptied after 10 minutes of use. • Remove the collector as described above. • Empty the collector. Gently shake or knock the collector to help the dust come off the filter. • Reinstall the collector as decribed above. MAINTENANCE WARNING: ALWAYS turn off tool and disconnect the tool from the power source before making any adjustments or removing or installing attachments or accessories. Such preventative safety measures reduce the risk of starting the tool accidentally. Your dust collector has been designed to operate over a long period of time with a minimum of maintenance. Continuous satisfactory operation depends on proper tool care and regular cleaning. Empty the Dust Extractor periodically or when the performance has noticeably decreased. NOTE: Have the filter replaced after every 100 to 120 cycles of use. Replacing the Dust Brush After 40 hours of use the dust brush may be worn and in need of replacement. 1. Remove the circlip using a pair of pliers. 2. Replace the dust brush. 3. Reinstall the circlip. Lubrication The dust extraction system has been lubricated at the factory. No further lubrication is necessary. Cleaning CAUTION: Never use solvents or other harsh chemicals for cleaning the non-metallic parts of the tool. These chemicals may weaken the plastic materials used in these parts. Use a cloth dampened only with water and mild soap. Never let any liquid get inside the tool; never immerse any part of the tool into a liquid. Clean ventilation openings periodically. Purchasing Accessories WARNING: Since accessories, other than those offered by DEWALT, have not been tested with this product, use of such accessories with this tool could be hazardous. To reduce the risk of injury, only DEWALT recommended accessories should be used with this product. Recommended accessories for use with your tool are available at extra cost from your local dealer or authorized service center. If you need assistance in locating any accessory, please contact DEWALT Industrial Tool Co., 701 East Joppa Road, Baltimore, MD 21286, call 1-8004-DEWALT (1-800-433-9258) or visit our website www.dewalt.com. Repairs To assure product SAFETY and RELIABILITY, repairs, maintenance and adjustments should be performed by a DEWALT factory service center, a DEWALT authorized service center or other qualified service personnel. Always use identical replacement parts. Three Year Limited Warranty DEWALT will repair, without charge, any defects due to faulty materials or workmanship for three years from the date of purchase. This warranty does not cover part failure due to normal wear or tool abuse. For further detail of warranty coverage and warranty repair information, visit www.dewalt.com or call 1-800-4-DEWALT (1-800-433-9258). This warranty does not apply to accessories or damage caused where repairs have been made or attempted by others. This warranty gives you specific legal rights and you may have other rights which vary in certain states or provinces. In addition to the warranty, DEWALT tools are covered by our: 1 YEAR FREE SERVICE DEWALT will maintain the tool and replace worn parts caused by normal use, for free, any time during the first year after purchase. 90 DAY MONEY BACK GUARANTEE If you are not completely satisfied with the performance of your DEWALT Power Tool, Laser, or Nailer for any reason, you can return it within 90 days from the date of purchase with a receipt for a full refund - no questions asked. FIG. 1 B A C D E F G FIG. 2 H LATIN AMERICA: This warranty does not apply to products sold in Latin America. For products sold in Latin America, see country specific warranty information contained either in the packaging, call the local company or see website for warranty information. FREE WARNING LABEL REPLACEMENT: If your warning labels become illegible or are missing, call 1-800-4-DEWALT for a free replacement. Définitions : lignes directrices en matière de sécurité Les définitions ci-dessous décrivent le niveau de danger pour chaque mot-indicateur employé. Veuillez lire le mode d'emploi et porter une attention particulière à ces symboles. DANGER : indique une situation dangereuse imminente qui, si elle n'est pas évitée, causera la mort ou des blessures graves. AVERTISSEMENT : indique une situation potentiellement dangereuse qui, si elle n'est pas évitée, pourrait se solder par un décès ou des blessures graves. MISE EN GARDE : indique une situation potentiellement dangereuse qui, si elle n'est pas évitée pourrait se solder par des blessures mineures ou modérées. MISE EN GARDE : utilisé sans le symbole d'alerte à la sécurité, indique une situation potentiellement dangereuse qui, si elle n'est pas évitée pourrait se solder par des dommages à la propriété. POUR TOUTE QUESTION OU REMARQUE AU SUJET DE CET OUTIL OU DE TOUT AUTRE OUTIL DEWALT, COMPOSER LE NUMÉRO SANS FRAIS : 1 800 4-DEWALT (1 800 433-9258) Directives de sécurité d'ordre général AVERTISSEMENT! S'assurer de lire et de bien comprendre toutes les directives. Le non-respect des directives décrites ci-après pourrait être la cause de chocs électriques, d'incendies et/ou de blessures graves. CONSERVER CES DIRECTIVES AIRE DE TRAVAIL • L'aire de travail doit être propre et bien éclairée. Les établis encombrés et le manque de lumière peuvent entraîner des accidents. • Ne pas faire fonctionner des outils électriques dans des atmosphères explosives, comme en présence de liquides, de gaz et de poussières inflammables. Les outils électriques produisent des étincelles qui peuvent enflammer la poussière ou les vapeurs. • Tenir les spectateurs, les enfants et les visiteurs à l'écart lorsqu'on utilise l'outil. Les distractions peuvent entraîner une perte de maîtrise. RÈGLES DE SÉCURITÉ RELATIVES À L'ÉLECTRICITÉ • Les outils mis à la terre doivent être branchés dans une prise correctement installée et mise à la terre tel que l'indiquent les codes et règlements en vigueur. Ne
-
 1
1 -
 2
2 -
 3
3 -
 4
4 -
 5
5 -
 6
6
 |
 |
