Dymo 69100 Quick Start Guide - Page 6
Connecting your LabelWriter Printer, To connect the power - software
 |
View all Dymo 69100 manuals
Add to My Manuals
Save this manual to your list of manuals |
Page 6 highlights
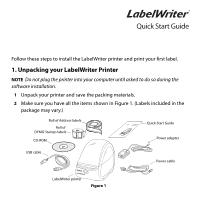
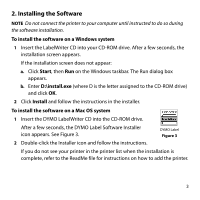
3. Connecting your LabelWriter Printer NOTE Do not connect the printer to your computer until instructed to do so during the software installation. E1988N50109O2IIU.6TTN.1E5PPE. LWuUUPIrUMTTSO::o.T21pWSE.M40EeDoR0VP-Pd/S-/2e-lUN-4N::P00NP9-9LVo-0.1Y2:.5840T018/CA9E86S30AH2z-2M4a0x100.0604A Switching Adapter UL UL OFFFIOwiCRtThEeHsFtUOeCSMdCEtEsotOacRnodmaprldys MEAN FDEOAIRSNNTOUCFDNS-HROEISYRNCEWLAIRKATOVOIUHCNCITATIETTIOAEOORBOLNSNNEMULAPSY.ASEKRIOTNNSELIRYRN..ISSISKDHEO.OFCEKLHEACZTARIRCD SHOCK Power adapter To connect the power 1 Plug the power cord into the power adapter. See Figure 4. Power cord Figure 4 2 Plug the power adapter into the power connector on the bottom of the printer. See Figure 5. USB 3 Plug the other end of the power cord into a power outlet. USB 24VDC Power 4 Plug the USB cable into the USB port on the bottom of the printer. See Figure 5. 5 Insert the power and USB cables through the cable channel and set the printer down. Cable channel Figure 5 NOTE DO NOT CONNECT the other end of the USB cable to your computer until asked to do so during the software installation. 6 When prompted by the software installer, plug the USB cable into a USB port. Figure 6 4
-
 1
1 -
 2
2 -
 3
3 -
 4
4 -
 5
5 -
 6
6 -
 7
7 -
 8
8 -
 9
9 -
 10
10 -
 11
11 -
 12
12 -
13
-
14
 |
 |
