Electrolux C2132B Owners Guide - Page 7
Electrolux C2132B - Home Care Commercial Upright Vacuum Manual
 |
UPC - 023169112681
View all Electrolux C2132B manuals
Add to My Manuals
Save this manual to your list of manuals |
Page 7 highlights
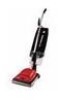
Attach Lower Handle Raise the dust cup support. Push the lower handle (largest end down) through the tube of the dust cup support and into the handle socket at the back of the cleaner. Make sure the notches on the lower handle face the rear of the cleaner (Fig. 1). Align the holes, insert a 2-part bolt (A), and tighten. Toward Rear of Cleaner Fig. 1 A Tube A Handle Socket Dust Cup Support Lower Handle Assemble Upper Handle Hold the upper handle so it curves away from the cleaner. Then push it down over the lower handle. Secure with the other 2part handle bolt (A). A A Upper Handle Lower Handle Handle Socket Secure Cord Clamp Secure the electrical cord to the dust cup support with the cord clamp and screw (D). Place the cord clamp over the electrical cord. Screw the clamp to the tab below the left latch; start the screw by hand, then tighten. 7
-
 1
1 -
 2
2 -
 3
3 -
 4
4 -
 5
5 -
 6
6 -
 7
7 -
 8
8 -
 9
9 -
 10
10 -
 11
11 -
 12
12 -
13
-
14
-
15
-
16
 |
 |
