Electrolux E36EC75HSS Installation Instructions
Electrolux E36EC75HSS - 36" Pro-Style Slide-In Electric Rangetop Manual
 |
View all Electrolux E36EC75HSS manuals
Add to My Manuals
Save this manual to your list of manuals |
Electrolux E36EC75HSS manual content summary:
- Electrolux E36EC75HSS | Installation Instructions - Page 1
to the proper installation of the cooktop. Please make sure to respect those dimensions. D reflects a finished dimension it is recommended to undercut this dimension and adjust upon installation of the appliance due to the variation in countertop materials. Model 36 (91.4) Product dimensions - Electrolux E36EC75HSS | Installation Instructions - Page 2
of the cooktop. Please make sure to respect those dimensions. D reflects a finished dimension it is recommended to undercut this dimension and adjust upon installation of the appliance due to the variation in countertop materials. Product dimensions Cutout dimensions Model A. Width B. depth - Electrolux E36EC75HSS | Installation Instructions - Page 3
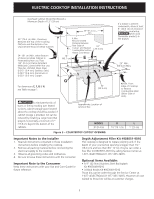
. Approximate Location of Junction Box Model 36'' (91.4 cm) Figure 3 - COUNTERTOP CUTOUT OPENING K 7½'' (19.1 cm) L 1'' (2.5 cm) Important Notes to the Installer 1. Read all instructions contained in these installation instructions before installing the cooktop. 2. Remove all packing material - Electrolux E36EC75HSS | Installation Instructions - Page 4
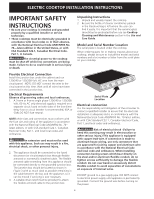
ELECTRIC COOKTOP INSTALLATION INSTRUCTIONS IMPORTANT SAFETY INSTRUCTIONS • Be sure your cooktop is installed and grounded properly by a qualified installer or service technician. • These cooktops must be electrically grounded in accordance with local codes or, in their absence, with the National - Electrolux E36EC75HSS | Installation Instructions - Page 5
the instructions attached. Go to step 3, If you are not installing the Optional Stainless Steel backsplash. 3. Set the cooktop into the countertop cutout. NOTE: Do not use caulking compound; cooktop should be removable for service when needed. Checking Operation Refer to the Use and Care Guide for - Electrolux E36EC75HSS | Installation Instructions - Page 6
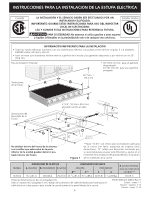
al cable. H*** E G 1" (2.5 cm) D 35 1/8" (89.2 cm) 7¼" (18.4 cm) No deslizar dentro del hueco de la alacena. Los tornillos que sobresalen de la parte inferior de la unidad pueden dañar el aca- bado inferior del frente. Figura 1 **Nota: "D & E" son críticos para la instalación adecuada de la - Electrolux E36EC75HSS | Installation Instructions - Page 7
de la Estufa F H*** E D 1" (2.5 cm) 351/8" G (89.2 cm) 7¼" (18.4 cm) No deslizar dentro del hueco de la alacena. Los tornillos que sobresalen de la parte inferior de la unidad pueden dañar el aca- bado inferior del frente. **Nota: "D & E" son críticos para la instalación adecuada de la - Electrolux E36EC75HSS | Installation Instructions - Page 8
la página 6. Modelo 36'' (91.4 cm) K 7½'' (19.1 cm) L 1'' (2.5 cm) Figura 3 - EL CORTE DE LA PARTE SUPERIOR DEL ARMARIO Notas importantes para el instalador 1. Lea todas las instrucciones contenidas en este manual antes de instalar la estufa. 2. Saque todo el material usado en el embalaje de la - Electrolux E36EC75HSS | Installation Instructions - Page 9
harcelo podría resultar en daños serios o la muerte. Provea conexión eléctrica Instale la caja de empalmes debajo del armario y provea un cable de 120/240 o 120 de cerámico antes de utilizar. Ve la parte sobre Limpieza y Mantenimiento de la Cubierta en este Manual del usuario. La placa de serie está - Electrolux E36EC75HSS | Installation Instructions - Page 10
instalar el Panel Protector Opcional de Acero Inoxidable, primero colóquelo en la parte posterior de la tapa de la cocina usando los tornillos provistos con el juego al servicio Lea la sección Lista de Control de Averías en su Manual del Usuario. Esto le podrá ahorrar tiempo y gastos. Esta lista - Electrolux E36EC75HSS | Installation Instructions - Page 11
POUR PLAQUE DE CUISSON ÉLECTRIQUE Canada UN INSTALLATEUR QUALIFIÉ DOIT EFFECTUER L'INSTALLATION ET LE SERVICE. IMPORTANT: CONSERVEZ CES INSTRUCTIONS POUR LES INSPECTEURS LOCAUX. LISEZ CES INSTRUCTIONS ET CONSERVEZ‑LES POUR RÉFÉRENCES ULTÉRIEURES. POUR VOTRE SÉCURITÉ: N'entreposez et n'utilisez - Electrolux E36EC75HSS | Installation Instructions - Page 12
INSTRUCTIONS D'INSTALLATION POUR PLAQUE DE CUISSON ÉLECTRIQUE Pour l'installation avec un dosseret optionnel en acier inoxydable * de tailler un peu plus petit que cette dimension et l'ajuster lors de l'installation de l'appareil. ModÈle dimensions de l'appareil A. largeur B. profondeur C. - Electrolux E36EC75HSS | Installation Instructions - Page 13
INSTRUCTIONS D'INSTALLATION POUR PLAQUE DE CUISSON ÉLECTRIQUE L'armoire supérieure ne doit pas excéder le bras au‑dessus des surfaces de cuisson chaudes, évitez d'installer des armoires au‑dessus de la plaque de cuisson. Si vous devez en installer, il est possible de réduire le risque en plaçant une - Electrolux E36EC75HSS | Installation Instructions - Page 14
l'installation de la plaque de cuisson. 2. Enlevez tout le matériel d'emballage avant de procéder au raccordement électrique. 3. Observez tous les codes et règlements applicables. 4. Assurez‑vous de laisser ces instructions au consommateur. Consommateur Conservez ces instructions avec votre Guide de - Electrolux E36EC75HSS | Installation Instructions - Page 15
INSTRUCTIONS D'INSTALLATION POUR PLAQUE DE CUISSON ÉLECTRIQUE Connexions électriques Le consommateur est responsable et doit communiquer avec un installateur qualifié pour s'assurer que l'installation électrique est adéquate et conforme avec le National Electrical Code ANSI/NFPA No. 70-dernière é - Electrolux E36EC75HSS | Installation Instructions - Page 16
des vis fournies et suivez les instructions fournies avec le dosseret. Allez à l'étape 3 si vous procédez à une installation standard, c'est-à-dire sans dosseret phone référez‑vous à la garantie et aux renseignements sur les services d'entretien dans votre Manuel d'utilisation. Prière de nous télé
-
 1
1 -
 2
2 -
 3
3 -
 4
4 -
 5
5 -
 6
6 -
 7
7 -
8
-
9
-
10
-
11
-
12
-
13
-
14
-
15
-
16
 |
 |

1
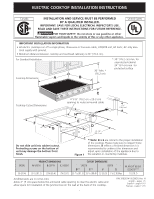
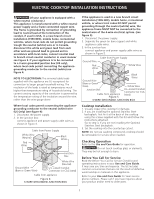
ELECTRIC COOKTOP INSTALLATION INSTRUCTIONS
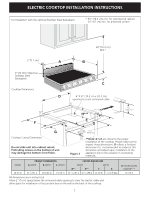
All dimensions are in inches (cm).
Allow 2" (5 cm) space below the armoured cable opening to clear the electric cable and
allow space for installation of the junction box on the wall at the back of the cooktop.
IMPORTANT INSTALLATION INFORMATION
• All electric cooktops run off a single phase, three-wire or four-wire cable, 240/208 volt, 60 hertz, AC only elec-
trical supply with ground.
• Minimum distance between cooktop and overhead cabinetry is 30" (76.2 cm).
Figure 1
P/N 318201413 (0901) Rev. H
English – pages 1-5
Español – pages 6-10
Français - pages 11-16
A
B
C
E
F
G
H***
D
Cooktop Dimensions
* 30" (76.2 cm) min. for
unprotected cabinet
24" (61 cm) min. for
protected surface
Cooktop Cutout Dimensions
30" Min. *
(76.2 cm)
For Standard Installation:
35 1/8"
(89.2 cm)
1" (2.5 cm)
4"X 8" (10.2 cm x 20.3 cm)
opening to route armoured cable.
7¼"
(18.4 cm)
**Note: D
&
E
are critical to the proper installation
of the cooktop. Please make sure to respect those
dimensions.
D
reflects a finished dimension it is
recommended to undercut this dimension and
adjust upon installation of the appliance due to
the variation in countertop materials.
Do not slide unit into cabinet cutout.
Protruding screws on the bottom of
unit may damage the bottom front
finish.
MODEL
PRODUCT DIMENSIONS
CUTOUT DIMENSIONS
H.
HEIGHT BELOW
COOKTOP***
A.
WIDTH
B.
DEPTH
C.
HEIGHT
WIDTH
DEPTH
D**
E**
F
G
36 (91.4)
35
7
/
8
(91.1)
25¾ (65.4)
7¾ (19.7)
35
15
/
16
(91.3)
35
3
/
16
(89.4)
22 (55.9)
1
1
/
8
(2.9) Max.
7½ (19.1)
INSTALLATION AND SERVICE MUST BE PERFORMED
BY A QUALIFIED INSTALLER.
IMPORTANT: SAVE FOR LOCAL ELECTRICAL INSPECTOR’S USE.
READ AND SAVE THESE INSTRUCTIONS FOR FUTURE REFERENCE.
WARNING
FOR YOUR SAFETY:
Do not store or use gasoline or other
flammable vapors and liquids in the vicinity of this or any other appliance.
Canada
United States