Epson 15000 User Manual - Page 44
Make sure the base of the feeder is flush, against the back of the scanner.
 |
UPC - 010343845893
View all Epson 15000 manuals
Add to My Manuals
Save this manual to your list of manuals |
Page 44 highlights
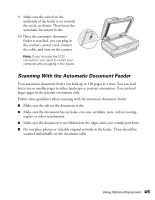
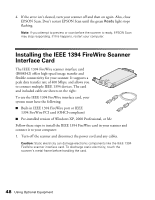
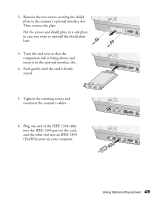
6. Align the screws with the holes in the automatic document feeder. Then slide the holes over the installation screws. Make sure the small pegs below the holes on the feeder go all the way into the back of the scanner. Warning: Have someone help you lift the automatic document feeder. 7. Secure the knobs to the ends of the installation screws using the screwdriver. Make sure the base of the feeder is flush against the back of the scanner. 8. Attach the cable to the scanner's ADF connector and tighten the screws. 44 Using Optional Equipment
-
 1
1 -
2
-
3
-
4
-
5
-
6
-
7
-
8
-
9
-
10
-
11
-
12
-
13
-
14
-
15
-
16
-
17
-
18
-
19
-
20
-
21
-
22
-
23
-
24
-
25
-
26
-
27
-
28
-
29
-
30
-
31
-
32
-
33
-
34
-
35
-
36
-
37
-
38
-
 39
39 -
 40
40 -
 41
41 -
 42
42 -
 43
43 -
 44
44 -
 45
45 -
 46
46 -
 47
47 -
 48
48 -
 49
49 -
50
-
51
-
52
-
53
-
54
-
55
-
56
-
57
-
58
-
59
-
60
-
61
-
62
-
63
-
64
-
65
-
66
-
67
-
68
-
69
-
70
-
71
-
72
-
73
-
74
-
75
-
76
-
77
-
78
-
79
-
80
 |
 |

44
Using Optional Equipment
6.
Align the screws with the holes in the automatic document feeder. Then slide the
holes over the installation screws. Make sure the small pegs below the holes on the
feeder go all the way into the back of the scanner.
Warning:
Have someone help you lift the automatic document feeder.
7.
Secure the knobs to the ends of the
installation screws using the screwdriver.
Make sure the base of the feeder is flush
against the back of the scanner.
8.
Attach the cable to the scanner’s
ADF
connector and tighten the screws.