Epson 1640XL User Manual - Page 32
Scanning Tips, Selecting Resolution
 |
UPC - 010343833548
View all Epson 1640XL manuals
Add to My Manuals
Save this manual to your list of manuals |
Page 32 highlights
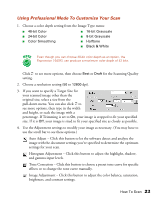
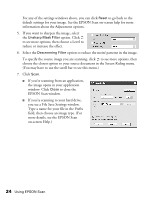
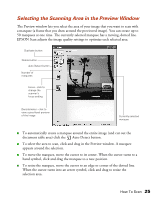
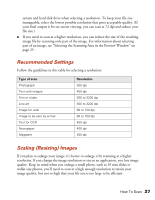
■ To zoom to the selected area, click the Zoom button. If you have multiple marquees, the currently selected one appears in the Zoom preview. ■ To erase a marquee, click the marquee and click the Delete button. ■ To create multiple marquees of the same dimensions, select one marquee, then click the Duplicate button. ■ To scan all marquees at once, click the All button. Scanning Tips Getting the best scan possible depends on several factors, including the quality of your original and the resolution you select. The better your original is, the better your scan will be. To get the best possible scan, keep the document table clean, and make sure the document is flat against the glass surface. You can make many corrections in your scanning software (EPSON Scan, or LaserSoft SilverFast if you have the Graphic Arts Edition model of the scanner). For additional photo retouching, use an image editing program such as Adobe Photoshop Elements. Selecting Resolution Resolution refers to how many dots per inch (dpi) or dots per centimeter (dpcm) your image contains. The best resolution for a scanned image depends on the type of image you're scanning and your final output device. For most images except line art, use a scanning resolution that is approximately one third of your output resolution. For example, use a scanning resolution up to 100 dpi with a 300 dpi laser printer, and up to 200 dpi with a 600 dpi laser printer. If you're scanning an image to view on-screen, choose a resolution of 96 dpi. For ink jet printers such as the EPSON Stylus® Photo series, use a scanning resolution of up to 300 dpi. Try a scanning resolution of 240 dpi for 720 dpi printing. Keep the following in mind when you choose a resolution: ■ The higher the resolution you select, the larger the resulting image file will be. For example, an 8.5 × 11-inch original scanned at 300 dpi can produce a 24MB file. The same original scanned at 72 dpi creates only a 1.3MB file. Large files take longer to process and print, so consider the practical limitations of your computer 26 Scanning Tips
-
 1
1 -
2
-
3
-
4
-
5
-
6
-
7
-
8
-
9
-
10
-
11
-
12
-
13
-
14
-
15
-
16
-
17
-
18
-
19
-
20
-
21
-
22
-
23
-
24
-
25
-
26
-
 27
27 -
 28
28 -
 29
29 -
 30
30 -
 31
31 -
 32
32 -
 33
33 -
 34
34 -
 35
35 -
 36
36 -
 37
37 -
38
-
39
-
40
-
41
-
42
-
43
-
44
-
45
-
46
-
47
-
48
-
49
-
50
-
51
-
52
-
53
-
54
-
55
-
56
-
57
-
58
-
59
-
60
-
61
-
62
-
63
-
64
-
65
-
66
-
67
-
68
-
69
-
70
-
71
-
72
-
73
-
74
-
75
-
76
-
77
-
78
-
79
-
80
-
81
-
82
-
83
-
84
-
85
-
86
-
87
-
88
-
89
-
90
-
91
-
92
-
93
-
94
-
95
-
96
 |
 |