Epson 2190N Product Information Guide
Epson 2190N - FX B/W Dot-matrix Printer Manual
 |
UPC - 010343850026
View all Epson 2190N manuals
Add to My Manuals
Save this manual to your list of manuals |
Epson 2190N manual content summary:
- Epson 2190N | Product Information Guide - Page 1
section to be added to the EPSON Product Information Guide. The table of contents of this section is listed below. EPSON FX-890/FX-2190 TABLE OF CONTENTS User Replaceable Parts EPSON FX-890/FX-2190 - 1 Options ...EPSON FX-890/FX-2190 - 1 Printer Specifications EPSON FX-890/FX-2190 - 2 Control - Epson 2190N | Product Information Guide - Page 2
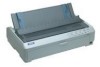
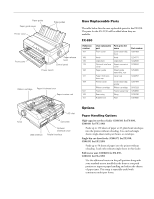
EPSON FX-890/FX-2190 Paper guide Paper guide cover Printer cover Edge guides Front cover Paper release lever Control panel Power switch Ribbon cartridge Paper thickness lever Paper tension unit User Replaceable Parts The table below lists the user replaceable parts for the FX-890. The parts - Epson 2190N | Product Information Guide - Page 3
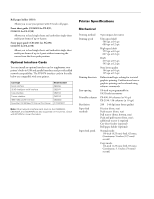
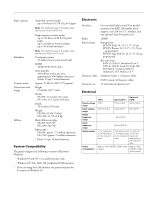
Note: Other network interface cards (such as the C823622A, C823632A, and C823642A) are also supported on this printer. Check with EPSON for more information. Printer Specifications Mechanical Printing method Printing speed Printing direction Line spacing Printable columns Resolution Paper feed - Epson 2190N | Product Information Guide - Page 4
21.7 lb (9.6 kg) Black ribbon cartridge FX-890: S015329 FX-2190: S015327 The printer supports the following support, one USB (ver 1.1) interface, and one optional Type B interface slot 128KB Bitmap fonts: EPSON Draft 10, 12, 15, 17, 20 cpi EPSON Roman 10, 12, 15 , 17, 20 cpi, proportional EPSON - Epson 2190N | Product Information Guide - Page 5
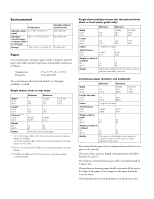
mm) using the optional cut-sheet feeder. Single-sheet multipart forms (for the optional front sheet or front paper guide only): Minimum Maximum Width (inch) (mm) FX-890: FX-2190: 3.9 10.1 16.5 100 257 420 and vertical perforation cuts should not cross. 4 - EPSON FX-890/FX-2190 6/03 - Epson 2190N | Product Information Guide - Page 6
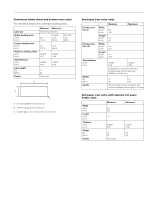
0.16 0.0075 0.19 17 64 Plain paper A 2.5 inches (63.5 mm) minimum B 15/16 inch (23.8 mm) minimum C Corner radius = 0.1 inch (2.5 mm) minimum EPSON FX-890/FX-2190 Envelopes (rear entry only): Envelope size (No. 6) Envelope size (No. 10) Total thickness (inch) (mm) Weight (lb) (g/m²) Quality - Epson 2190N | Product Information Guide - Page 7
EPSON FX-890/FX-2190 Printable Area Single sheets Envelopes A The minimum top and bottom margins are 0.17 inch (4.2 mm). B The minimum left . 950 EN 60950 EMI FCC part 15 subpart B class B CSA C108.8 class B EN 55022 (CISPR pub. 22) class B AS/NZS 3548 class B 6 - EPSON FX-890/FX-2190 6/03 - Epson 2190N | Product Information Guide - Page 8
EPSON FX-890/FX-2190 Control Panel Buttons and Lights Button/Light Function 1 Font button Selects one of the fonts. See "Selecting a Font and Pitch" on page 8. Font lights Indicate which font is selected. 2 Reset When you press both the Font and Pitch buttons simultaneously, the printer - Epson 2190N | Product Information Guide - Page 9
EPSON FX-890/FX-2190 Error Indicators If the printer stops working and one or more control panel lights are on or flashing, or the printer beeps, use the following table to diagnose and fix the problem. Light status O Paper Out O Pause Beep pattern ••• ••• O Pause ••• O Paper Out ••• O - Epson 2190N | Product Information Guide - Page 10
EPSON FX-890/FX-2190 Selecting a Paper Source Paper can be fed into the printer from the top, front, bottom, or rear. Select the paper source that best suits from the rear slot. The labels may come off the backing sheets inside the printer and cause a paper jam. 6/03 EPSON FX-890/FX-2190 - 9 - Epson 2190N | Product Information Guide - Page 11
EPSON FX-890/FX-2190 Setting the Paper Release Lever Set the paper release lever to indicate the paper source you want to use, as described in the table below. Adjusting the Paper-Thickness Setting First turn off the printer and open the printer cover. Then set the paper-thickness setting for the - Epson 2190N | Product Information Guide - Page 12
position down on the page. 2. Hold down the Pause button for about three seconds. The Pause light begins flashing and the printer enters Micro Adjust mode. 3. Open the paper guide cover and press LF/FF D to feed paper backward, or Load/Eject U to feed paper forward, until the paper perforation is - Epson 2190N | Product Information Guide - Page 13
Because the rear paper path is curved, labels may come off their backing sheets inside the printer and cause a paper jam. ❏ Do not load paper that is curled or has been No. 6 envelopes, make sure the left edge guide is aligned with the arrow on the paper guide. 12 - EPSON FX-890/FX-2190 6/03 - Epson 2190N | Product Information Guide - Page 14
the optional front sheet guide to printing with the front push tractor, you need to remove the front sheet guide. 1. If a single sheet remains in the printer, press the Load/Eject using. Your printer loads the continuous paper automatically when you begin printing. 6/03 EPSON FX-890/FX-2190 - 13 - Epson 2190N | Product Information Guide - Page 15
to do this: ❏ Using the EPSON Remote Configuration Manager on the printer software CD-ROM. (See the User's Guide for more information.) ❏ From the printer's control panel using the default-setting mode. For instructions on using the Remote Configuration Manager, see the PDF manual on the CD-ROM. To - Epson 2190N | Product Information Guide - Page 16
), On (Yes) Note: The FX-890 and FX-2190 do not support the USB interface in Okidata mode. If you want to use your printer in Okidata mode, do not install the Windows driver that came with your printer. If you have been using an Okidata driver, you can continue to use it with your - Epson 2190N | Product Information Guide - Page 17
from the paper guide. Follow these steps to perform the bidirectional adjustment: 1. Make sure paper is loaded, then turn off the printer. 2. While holding down the Pause button, turn on the printer. The printer enters the bidirectional adjustment mode and then prints instructions and the first - Epson 2190N | Product Information Guide - Page 18
EPSON FX-890/FX-2190 Printing a Self Test Running the printer's self test helps you determine whether the printer or the computer is causing the problem: ❏ If the self test results are satisfactory, the printer is working properly and the problem probably results from your printer driver settings, - Epson 2190N | Product Information Guide - Page 19
and the tractor is installed in the rear push position. Also make sure the printer cover and front cover are closed. 7. Repack the printer, paper guide, ribbon cartridge, and power cord in the original packing materials and place them in the printer's original box. 18 - EPSON FX-890/FX-2190 6/03
-
 1
1 -
 2
2 -
 3
3 -
 4
4 -
 5
5 -
 6
6 -
 7
7 -
8
-
9
-
10
-
11
-
12
-
13
-
14
-
15
-
16
-
17
-
18
-
19
 |
 |

P R O D U C T
I N F O R M A T I O N
G U I D E
6/03
EPSON
UPDATE
6/11/03
This package provides a new dot matrix printer product section to be added to the
EPSON Product Information
Guide
. The table of contents of this section is listed below.
EPSON FX-890/FX-2190
TABLE OF CONTENTS
User Replaceable Parts
......................................................................................
EPSON FX-890/FX-2190 - 1
Options
............................................................................................................
EPSON FX-890/FX-2190 - 1
Printer Specifications
........................................................................................
EPSON FX-890/FX-2190 - 2
Control Panel Buttons and Lights
....................................................................
EPSON FX-890/FX-2190 - 7
Error Indicators
................................................................................................
EPSON FX-890/FX-2190 - 8
Selecting a Font and Pitch
................................................................................
EPSON FX-890/FX-2190 - 8
Selecting a Paper Source
...................................................................................
EPSON FX-890/FX-2190 - 9
Setting the Paper Release Lever
.........................................................................
EPSON FX-890/FX-2190 - 10
Adjusting the Paper-Thickness Setting
.............................................................
EPSON FX-890/FX-2190 - 10
Using the Micro Adjust Function
.....................................................................
EPSON FX-890/FX-2190 - 11
Loading Special Papers
.....................................................................................
EPSON FX-890/FX-2190 - 12
Switching Paper Types
.....................................................................................
EPSON FX-890/FX-2190 - 13
Clearing Paper Jams
.........................................................................................
EPSON FX-890/FX-2190 - 14
Changing the Default Settings
..........................................................................
EPSON FX-890/FX-2190 - 14
Emulating the Okidata Microline 320/321 Turbo
............................................
EPSON FX-890/FX-2190 - 15
Locking the Control Panel Buttons
..................................................................
EPSON FX-890/FX-2190 - 16
Aligning Vertical Lines in Your Printout
..........................................................
EPSON FX-890/FX-2190 - 16
Printing a Self Test
...........................................................................................
EPSON FX-890/FX-2190 - 17
Printing a Hex Dump
.......................................................................................
EPSON FX-890/FX-2190 - 17
Resetting the Printer
.........................................................................................
EPSON FX-890/FX-2190 - 17
Cleaning the Printer
.........................................................................................
EPSON FX-890/FX-2190 - 18
Transporting the Printer
...................................................................................
EPSON FX-890/FX-2190 - 18
Related Documentation
....................................................................................
EPSON FX-890/FX-2190 - 18