Epson 3800 Service Manual - Page 98
Housing, Front, Right
 |
UPC - 010343862081
View all Epson 3800 manuals
Add to My Manuals
Save this manual to your list of manuals |
Page 98 highlights
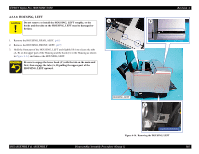
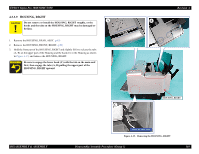
EPSON Stylus Pro 3800/3800C/3850 4.3.3.4 HOUSING, FRONT, RIGHT 1. Open the STACKER, C. 2. Remove the screw that secures the HOUSING, FRONT, RIGHT to the main unit. „ One C.B.P. 3 x 8 screw (6 ± 1 kgf.cm) 3. Pull the upper part of the HOUSING, FRONT, RIGHT toward you to release the upper rib and the two lower tabs, and remove the HOUSING, FRONT, RIGHT. Be sure to engage the two lower tabs with the cutouts, and align the positioning socket with the rib on the main unit. Revision A rib C.B.P. 3x8 HOUSING, FRONT, RIGHT DISASSEMBLY & ASSEMBLY tabs STACKER, C hooks Figure 4-10. Removing the HOUSING, FRONT, RIGHT Disassembly/Assembly Procedure (Group 1) 98
-
 1
1 -
2
-
3
-
4
-
5
-
6
-
7
-
8
-
9
-
10
-
11
-
12
-
13
-
14
-
15
-
16
-
17
-
18
-
19
-
20
-
21
-
22
-
23
-
24
-
25
-
26
-
27
-
28
-
29
-
30
-
31
-
32
-
33
-
34
-
35
-
36
-
37
-
38
-
39
-
40
-
41
-
42
-
43
-
44
-
45
-
46
-
47
-
48
-
49
-
50
-
51
-
52
-
53
-
54
-
55
-
56
-
57
-
58
-
59
-
60
-
61
-
62
-
63
-
64
-
65
-
66
-
67
-
68
-
69
-
70
-
71
-
72
-
73
-
74
-
75
-
76
-
77
-
78
-
79
-
80
-
81
-
82
-
83
-
84
-
85
-
86
-
87
-
88
-
89
-
90
-
91
-
92
-
 93
93 -
 94
94 -
 95
95 -
 96
96 -
 97
97 -
 98
98 -
 99
99 -
 100
100 -
 101
101 -
 102
102 -
 103
103 -
104
-
105
-
106
-
107
-
108
-
109
-
110
-
111
-
112
-
113
-
114
-
115
-
116
-
117
-
118
-
119
-
120
-
121
-
122
-
123
-
124
-
125
-
126
-
127
-
128
-
129
-
130
-
131
-
132
-
133
-
134
-
135
-
136
-
137
-
138
-
139
-
140
-
141
-
142
-
143
-
144
-
145
-
146
-
147
-
148
-
149
-
150
-
151
-
152
-
153
-
154
-
155
-
156
-
157
-
158
-
159
-
160
-
161
-
162
-
163
-
164
-
165
-
166
-
167
-
168
-
169
-
170
-
171
-
172
-
173
-
174
-
175
-
176
-
177
-
178
-
179
-
180
-
181
-
182
-
183
-
184
-
185
-
186
-
187
-
188
-
189
-
190
-
191
-
192
-
193
-
194
-
195
-
196
-
197
-
198
-
199
-
200
-
201
-
202
-
203
-
204
-
205
-
206
-
207
-
208
-
209
-
210
-
211
-
212
-
213
-
214
-
215
-
216
-
217
-
218
-
219
-
220
-
221
-
222
-
223
-
224
-
225
-
226
-
227
-
228
-
229
-
230
-
231
-
232
-
233
-
234
-
235
-
236
-
237
-
238
-
239
-
240
-
241
-
242
-
243
-
244
-
245
-
246
-
247
-
248
-
249
-
250
-
251
-
252
-
253
-
254
-
255
-
256
-
257
-
258
-
259
-
260
-
261
-
262
-
263
-
264
-
265
-
266
-
267
-
268
-
269
-
270
-
271
-
272
-
273
-
274
-
275
-
276
-
277
-
278
-
279
-
280
-
281
-
282
-
283
-
284
-
285
-
286
 |
 |

EPSON Stylus Pro 3800/3800C/3850
Revision A
DISASSEMBLY & ASSEMBLY
Disassembly/Assembly Procedure (Group 1)
98
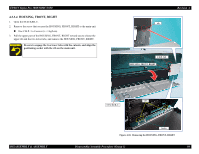
4.3.3.4
HOUSING, FRONT, RIGHT
1.
Open the STACKER, C.
2.
Remove the screw that secures the HOUSING, FRONT, RIGHT to the main unit.
±
One C.B.P. 3 x 8 screw (6 ± 1 kgf.cm)
3.
Pull the upper part of the HOUSING, FRONT, RIGHT toward you to release the
upper rib and the two lower tabs, and remove the HOUSING, FRONT, RIGHT.
Figure 4-10.
Removing the HOUSING, FRONT, RIGHT
Be sure to engage the two lower tabs with the cutouts, and align the
positioning socket with the rib on the main unit.
rib
hooks
tabs
HOUSING, FRONT, RIGHT
C.B.P. 3x8
STACKER, C