Epson 8100i User Manual - Page 35
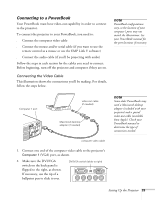
Connecting to a PowerBook, VGA port, as shown.
 |
View all Epson 8100i manuals
Add to My Manuals
Save this manual to your list of manuals |
Page 35 highlights
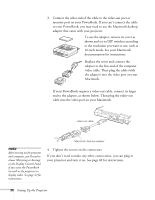
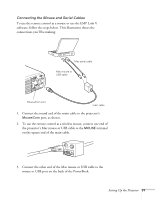
Connecting to a PowerBook Your PowerBook must have video-out capability in order to connect to the projector. To connect the projector to your PowerBook, you need to: s Connect the computer video cable s Connect the mouse and/or serial cable (if you want to use the remote control as a mouse or use the EMP Link V software) s Connect the audio cable (if you'll be projecting with audio) Follow the steps in each section for the cables you need to connect. Before beginning, turn off the projector and computer if they are on. Connecting the Video Cable This illustration shows the connections you'll be making. For details, follow the steps below. note PowerBook configurations vary, so the location of your computer's ports may not match the illustrations. See your PowerBook manual for the port locations if necessary. Computer 1 port video-out cable (if needed) Macintosh desktop adapter (if needed) note Some older PowerBooks may need a Macintosh desktop adapter (included with your projector) and a special video-out cable (available from Apple). Check your PowerBook manual to determine the type of connections needed. computer video cable 1. Connect one end of the computer video cable to the projector's Computer 1 (VGA) port, as shown. 2. Make sure the DVI/VGA switch on the back panel is flipped to the right, as shown. If necessary, use the tip of a ballpoint pen to slide it over. DVI/VGA switch (slide to right) Computer 1 Computer 2 /Component Video R/Cr/Pr G/Y B/Cb/Pb H/C Sync V Sync Setting Up the Projector 29
-
 1
1 -
2
-
3
-
4
-
5
-
6
-
7
-
8
-
9
-
10
-
11
-
12
-
13
-
14
-
15
-
16
-
17
-
18
-
19
-
20
-
21
-
22
-
23
-
24
-
25
-
26
-
27
-
28
-
29
-
 30
30 -
 31
31 -
 32
32 -
 33
33 -
 34
34 -
 35
35 -
 36
36 -
 37
37 -
 38
38 -
 39
39 -
 40
40 -
41
-
42
-
43
-
44
-
45
-
46
-
47
-
48
-
49
-
50
-
51
-
52
-
53
-
54
-
55
-
56
-
57
-
58
-
59
-
60
-
61
-
62
-
63
-
64
-
65
-
66
-
67
-
68
-
69
-
70
-
71
-
72
-
73
-
74
-
75
-
76
-
77
-
78
-
79
-
80
-
81
-
82
-
83
-
84
-
85
-
86
-
87
-
88
-
89
-
90
-
91
-
92
-
93
-
94
-
95
-
96
-
97
-
98
-
99
-
100
-
101
-
102
-
103
-
104
-
105
-
106
-
107
-
108
-
109
-
110
-
111
-
112
-
113
-
114
-
115
-
116
-
117
-
118
-
119
-
120
 |
 |
