Epson AcuLaser CX11NF Supplemental / Late Breaking Information - Page 2
Epson AcuLaser ® CX11N/CX11NF Packing Instructions - change toner
 |
View all Epson AcuLaser CX11NF manuals
Add to My Manuals
Save this manual to your list of manuals |
Page 2 highlights
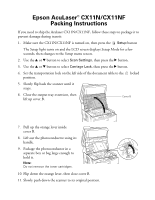
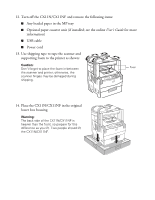
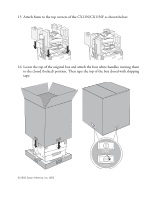
Epson AcuLaser® CX11N/CX11NF Packing Instructions If you need to ship the Aculaser CX11N/CX11NF, follow these steps to package it to prevent damage during transit: 1. Make sure the CX11N/CX11NF is turned on, then press the Setup button The Setup light turns on and the LCD screen displays Setup Mode for a few seconds, then changes to the Setup menu screen. 2. Use the u or d button to select Scan Settings, then press the r button. 3. Use the u or d button to select Carriage Lock, then press the r button. 4. Set the transportation lock on the left side of the document table to the locked position. 5. Slowly flip back the scanner until it stops. 6. Close the output tray extension, then lift up cover B. Cover B 7. Pull up the orange lever inside cover B. 8. Lift out the photoconductor using its handle. 9. Package the photoconductor in a separate box or bag large enough to hold it. Note: Do not remove the toner cartridges. 10. Flip down the orange lever, then close cover B. 11. Slowly push down the scanner to its original position.
-
 1
1 -
 2
2 -
 3
3 -
 4
4 -
 5
5 -
 6
6
 |
 |
