Epson AcuLaser CX11NF Supplemental / Late Breaking Information - Page 3
Place the CX11N/CX11NF in the original, User's Guide - user guide
 |
View all Epson AcuLaser CX11NF manuals
Add to My Manuals
Save this manual to your list of manuals |
Page 3 highlights
12. Turn off the CX11N/CX11NF and remove the following items: ■ Any loaded paper in the MP tray ■ Optional paper cassette unit (if installed; see the online User's Guide for more information) ■ USB cable ■ Power cord 13. Use shipping tape to tape the scanner and supporting foam to the printer as shown: Caution: Don't forget to place the foam in-between the scanner and printer; otherwise, the scanner hinges may be damaged during shipping. Foam 14. Place the CX11N/CX11NF in the original lower box housing. Warning: The back side of the CX11N/CX11NF is heavier than the front, so prepare for this difference as you lift. Two people should lift the CX11N/CX11NF.
-
 1
1 -
 2
2 -
 3
3 -
 4
4 -
 5
5 -
 6
6
 |
 |

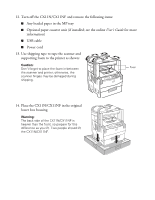
12. Turn off the CX11N/CX11NF and remove the following items:
■
Any loaded paper in the MP tray
■
Optional paper cassette unit (if installed; see the online
User’s Guide
for more
information)
■
USB cable
■
Power cord
13. Use shipping tape to tape the scanner and
supporting foam to the printer as shown:
Caution:
Don’t forget to place the foam in-between
the scanner and printer; otherwise, the
scanner hinges may be damaged during
shipping.
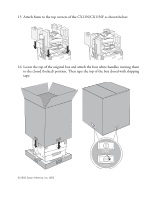
14. Place the CX11N/CX11NF in the original
lower box housing.
Warning:
The back side of the CX11N/CX11NF is
heavier than the front, so prepare for this
difference as you lift. Two people should lift
the CX11N/CX11NF.
Foam