Epson BrightLink 697Ui Procedure for Measuring Projection Surface Flatness
Epson BrightLink 697Ui Manual
 |
View all Epson BrightLink 697Ui manuals
Add to My Manuals
Save this manual to your list of manuals |
Epson BrightLink 697Ui manual content summary:
- Epson BrightLink 697Ui | Procedure for Measuring Projection Surface Flatness - Page 1
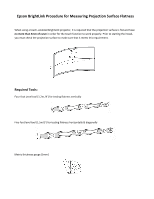
Epson BrightLink Procedure for Measuring Projection Surface Flatness When using a touch-enabled BrightLink projector, it is required that the projection surface is flat and have no more than 5mm of curve in order for the touch function to work properly. Prior to starting the install, you must check - Epson BrightLink 697Ui | Procedure for Measuring Projection Surface Flatness - Page 2
measurement. Perform the following Multi-Point Flatness Test to determine if the projection surface is flat enough to proceed with installation of the BrightLink projector: 1. Divide the projection surface equally into 16 quadrants as shown below. 1. With the level tool(s) against the surface of - Epson BrightLink 697Ui | Procedure for Measuring Projection Surface Flatness - Page 3
there are any visible bumps or indentations elsewhere on the board surface, perform additional horizontal and vertical measurements at those points as described in the instructions above.
-
 1
1 -
 2
2 -
 3
3
 |
 |

Epson BrightLink Procedure for Measuring Projection Surface Flatness
When using a touch
–
enabled BrightLink projector, it is required that the projection surface is flat and have
no more than 5mm of curve
in order for the touch function to work properly. Prior to starting the install,
you must check the projection surface to make sure that it meets this requirement.
Required Tools:
Four-foot Level tool (1.2m /
4’
) for testing flatness vertically
Five-foot level tool (1.5m/5
’
) for testing flatness horizontally & diagonally
Metric thickness gauge (5mm)