Epson BrightLink 710Ui Installation Guide - Control Pad and Touch Unit - Page 19
Warning
 |
View all Epson BrightLink 710Ui manuals
Add to My Manuals
Save this manual to your list of manuals |
Page 19 highlights
2. Select Touch Unit Setup. 3. Select Power and set to On. The Touch Unit power turns on and the indicator light turns blue. Warning Do not look into the projector's projection window or the Touch Unit's laser diffusion ports (located on the back of the Touch Unit); this could cause injury to eyesight. When Power is set to On, the Touch Unit automatically powers up the next time the projector is turned on. 4. Select Angle Adjustment. 18
-
 1
1 -
2
-
3
-
4
-
5
-
6
-
7
-
8
-
9
-
10
-
11
-
12
-
13
-
 14
14 -
 15
15 -
 16
16 -
 17
17 -
 18
18 -
 19
19 -
 20
20 -
 21
21 -
 22
22 -
 23
23 -
 24
24 -
25
-
26
-
27
-
28
-
29
-
30
-
31
-
32
-
33
-
34
-
35
-
36
-
37
-
38
-
39
-
40
-
41
-
42
-
43
-
44
-
45
-
46
-
47
-
48
-
49
-
50
-
51
-
52
-
53
-
54
-
55
-
56
-
57
-
58
-
59
-
60
-
61
-
62
-
63
-
64
-
65
-
66
-
67
-
68
-
69
-
70
-
71
-
72
-
73
-
74
-
75
-
76
-
77
-
78
-
79
-
80
-
81
-
82
-
83
-
84
-
85
-
86
-
87
-
88
-
89
-
90
 |
 |

18
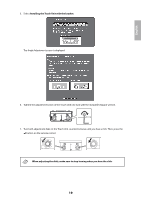
2.
Select
Touch Unit Setup
.
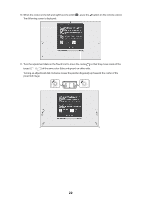
3.
Select
Power
and set to
On
.
The Touch Unit power turns on and the indicator light turns blue.
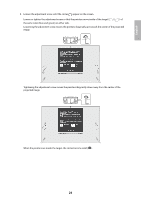
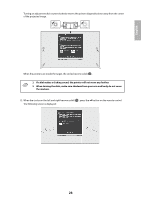
4.
Select
Angle Adjustment
.
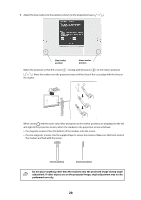
When Power is set to On, the Touch Unit automatically powers up the next time the
projector is turned on.
Do not look into the projector’s projection window or the Touch Unit’s laser diffusion ports
(located on the back of the Touch Unit); this could cause injury to eyesight.
Warning