Epson C11CA53201 Quick Guide
Epson C11CA53201 - Artisan 710 Color Inkjet Manual
 |
UPC - 010343871687
View all Epson C11CA53201 manuals
Add to My Manuals
Save this manual to your list of manuals |
Epson C11CA53201 manual content summary:
- Epson C11CA53201 | Quick Guide - Page 1
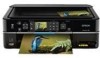
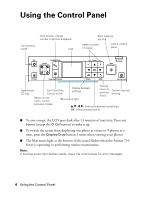
Artisan® 710 Series Quick Guide Basic Copying, Printing, and Scanning Maintenance Solving Problems - Epson C11CA53201 | Quick Guide - Page 2
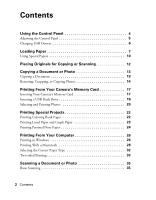
Contents Using the Control Panel 4 Adjusting the Control Panel 5 Charging USB Devices 6 Loading Paper 7 Using Special Papers 10 Placing Originals for Copying or Scanning 12 Copying a Document or Photo 13 Copying a Document 13 Restoring, Cropping, or Copying Photos 14 Printing From Your - Epson C11CA53201 | Quick Guide - Page 3
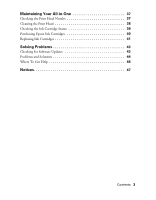
Maintaining Your All-in-One 37 Checking the Print Head Nozzles 37 Cleaning the Print Head 38 Checking the Ink Cartridge Status 39 Purchasing Epson Ink Cartridges 40 Replacing Ink Cartridges 41 Solving Problems 43 Checking for Software Updates 43 Problems and Solutions 44 Where To Get Help - Epson C11CA53201 | Quick Guide - Page 4
it up. ■ To switch the screen from displaying one photo at a time to 9 photos at a time, press the Display/Crop button 3 times when viewing your photos. ■ The blue status light at the bottom of the panel flashes when the Artisan 710 Series is operating or performing routine maintenance. Note: If - Epson C11CA53201 | Quick Guide - Page 5
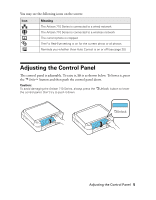
raise it, lift it as shown below. To lower it, press the button and then push the control panel down. Caution: To avoid damaging the Artisan 710 Series, always press the the control panel. Don't try to push it down. button to lower Adjusting the Control Panel 5 - Epson C11CA53201 | Quick Guide - Page 6
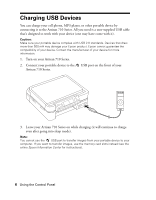
to the Artisan 710 Series. All you need is a user-supplied USB cable that's designed to work with your device (one may have come with it). Caution: Make sure your portable device complies with USB 2.0 standards. Devices that draw more than 500 mA may damage your Epson product. Epson cannot guarantee - Epson C11CA53201 | Quick Guide - Page 7
Artisan 710 Series inch photo paper. You can load up to 20 sheets. Check your online Epson Information Center for detailed information about sheet capacity for each paper size and type the photo tray and lift it up. 2. Squeeze the edge guides and slide them out. Then insert paper with the glossy or - Epson C11CA53201 | Quick Guide - Page 8
3. Slide the left edge guide against the paper. Make sure the paper stack fits under the edge guide 4. Adjust the front edge guide to your paper size. 5. Lower the photo tray. 8 Loading Paper - Epson C11CA53201 | Quick Guide - Page 9
slide them out. Then insert photo paper with the glossy or printable side face-down. 7. Slide the left edge guide against the paper. Then adjust the front edge guide to your paper size. Note: Make sure the paper fits under the edge guide. 8. Keep the cassette flat as you insert it. Loading Paper 9 - Epson C11CA53201 | Quick Guide - Page 10
creative projects. You can purchase genuine Epson ink and paper at Epson Supplies CentralSM at www.epson.com/ink3 (U.S. sales) or www.epson.ca (Canadian sales). You can also purchase supplies from an Epson authorized reseller. To find the nearest one, call 800-GO-EPSON (800-463-7766). Paper name - Epson C11CA53201 | Quick Guide - Page 11
8 × 10 inches Letter (8.5 × 11 inches) Borderless 4 × 6 inches Letter (8.5 × 11 inches) Borderless 4 × 6 inches Letter (8.5 × 11 inches) Epson Ultra Premium Presentation Paper Matte Epson Premium Presentation Paper Matte Letter (8.5 × 11 inches) Borderless 8 × 10 inches Letter (8.5 × 11 inches - Epson C11CA53201 | Quick Guide - Page 12
1/4 inch (5 mm) Placing Originals for Copying or Scanning You can place one or two photos or a document up to letter-size (or A4) on the scanner glass to make color or black and white copies. 1. Open the - Epson C11CA53201 | Quick Guide - Page 13
copies. Copying a Document 1. Load letter-size plain paper, Epson Bright White Paper, or Epson Presentation Paper Matte. 2. Press the Home button until Copy Fit Page (to automatically size the image to fit your paper), or one of the specific sizes listed. Then press OK. ■ Press d to scroll down to - Epson C11CA53201 | Quick Guide - Page 14
borders, convert photos to black and white, and crop your photos. 1. Place one or two photos on the scanner glass. Place them at least 1/4 inch (5 mm × 7-inch paper in the photo tray or 8 × 10-inch or letter- size Epson photo paper in the main tray. Load it printable side down. 3. Press the Home - Epson C11CA53201 | Quick Guide - Page 15
asking you to select the number of copies, press OK. 8. If you placed two photos on the scanner glass, press l or r to view the second one and select the number of copies. 9. To print more than 1 copy, press + or - to select the number (up to 99). If you are copying 2 photos - Epson C11CA53201 | Quick Guide - Page 16
, press y Stop/ Clear Settings. Note: When you scan with your computer, you can use additional options to transform faded, dusty, or badly exposed photos into ones with true-to-life color and sharpness. See the online Epson Information Center for details. 16 Copying a Document or Photo - Epson C11CA53201 | Quick Guide - Page 17
The Artisan 710 Series lets you print photos from your digital camera's memory card, or from an external storage device such as a USB flash drive. Note: You can print directly from your camera if it supports PictBridge™ printing. See the online Epson Information Center for instructions. Inserting - Epson C11CA53201 | Quick Guide - Page 18
card: 1. Make sure the memory card access light is not flashing. 2. If the Artisan 710 Series is connected to your computer with a USB cable, do one of the following before removing the memory card or turning off the printer: ■ Windows®:Click the or icon on the taskbar and select Safely remove USB - Epson C11CA53201 | Quick Guide - Page 19
from an external storage device connected to the Artisan 710 Series, such as a USB flash drive, external hard drive, or CD burner. Note: Epson cannot guarantee the compatibility of any drives. slots instead (see the online Epson Information Center for instructions). Inserting a USB Flash Drive 19 - Epson C11CA53201 | Quick Guide - Page 20
Epson photo paper. See page 10 for a list. 2. Press the Home button until Print Photos is selected, then press OK. 3. Select View and Print Photos and press OK. 4. Press l or r to move through your photos and display one (see page 21). 5. To print more than one copy, press + or - to select the number - Epson C11CA53201 | Quick Guide - Page 21
. To cancel printing, press y Cancel. Note: To switch the display screen from displaying one photo at a time to 9 photos at a time, press the Display/Crop button 3 times when viewing your photos. See the online Epson Information Center to learn about other ways you can lay out photos when printing - Epson C11CA53201 | Quick Guide - Page 22
your favorite photos. Printing Coloring Book Pages Your Artisan 710 Series can turn any photo or drawing into a coloring book page. 1. Load letter- or A4-size plain paper, Epson Bright White Paper, Epson Presentation Paper Matte, or Epson Premium Presentation Paper Matte. 2. Press the Home button - Epson C11CA53201 | Quick Guide - Page 23
When you're ready to print, press x Start. To cancel printing, press y Stop/ Clear Settings. Printing Lined Paper and Graph Paper You can have the Artisan 710 Series print lined paper or graph paper whenever you need it. 1. Load letter- or A4-size plain paper. 2. Press the Home button. 3. Press l or - Epson C11CA53201 | Quick Guide - Page 24
17) or USB drive (see page 19). 3. Press the Home button. 4. Press l or r to select Print Ruled Papers, then press OK. 5. Press l or r and select one of the Stationery settings (with or without lines) for your paper size. Then press OK. 6. When you see this screen, press OK. 24 Printing Special - Epson C11CA53201 | Quick Guide - Page 25
how your stationery will look with a photo in the background. 7. To rotate the layout, press d. 8. Press l or r to move through your photos and display the one you want to use for your notepaper. 9. Press OK. 10. When you see a message asking you to load paper, press OK. 11. To print more - Epson C11CA53201 | Quick Guide - Page 26
printing instructions and to learn about CD printing, see the online Epson Information Center. Before you start, make sure you've installed your printer software and connected the Artisan 710 Series to your computer or network as described on the Start Here sheet or Network Installation Guide. Tip - Epson C11CA53201 | Quick Guide - Page 27
3. Select your Epson Artisan 710 Series, then click the Preferences or Properties button. Note: If you see a Setup, Printer, or Options button, click quick access to the most common settings, click the Shortcuts tab and select one of the presets. You can create your own presets by clicking the Save - Epson C11CA53201 | Quick Guide - Page 28
ink cartridge status Cancel printing Printing With a Macintosh See the section below for your Mac OS® operating system. Mac OS X 10.5 1. Open a photo or document in an application. 2. Open the File menu and select Print. 3. Select your Epson Artisan 710 Series as the Printer setting. Select EPSON - Epson C11CA53201 | Quick Guide - Page 29
quality or faster printing (if available) Select Automatic mode 7. Choose any other printing options you may need from the pop-up menu. See the online Epson Information Center for details. Printing With a Macintosh 29 - Epson C11CA53201 | Quick Guide - Page 30
10.3 and 10.4 1. Open a photo or document in an application. 2. Select Page Setup from the File menu. Select the following settings: Select Artisan 710 Series Select your Paper Size Select your document or image orientation For borderless photos, choose a Borderless option in the Paper Size list for - Epson C11CA53201 | Quick Guide - Page 31
from the File menu. You see a window like this one: Select Print Settings 5. Choose Print Settings from the pop you can select Print Settings. For more information about printer settings, click the ? button. 6. Click the Advanced Epson Information Center for details. Printing With a Macintosh 31 - Epson C11CA53201 | Quick Guide - Page 32
29 or 31) setting in your printer software. This tells the Artisan 710 Series what kind of paper you're using, so the ink coverage can be adjusted accordingly. For this paper/media Plain paper Epson Bright White Paper Epson Photo Quality Self-adhesive Sheets Epson Iron-on Cool Peel Transfer paper - Epson C11CA53201 | Quick Guide - Page 33
or Epson Bright White Paper. Note: If you remove the auto duplexer, you cannot print or copy. Windows Follow the Windows printing instructions beginning on page 26, but complete the additional steps below before you start printing. 1. Click the Page Layout tab in the printer - Epson C11CA53201 | Quick Guide - Page 34
Note: If you see a message indicating that the auto duplexer is not installed, open EPSON Printer Utility3 (in the Applications folder on your hard drive), select Artisan 710 Series, click OK, click the Printer and Option Information button, and click OK again. Then close and reopen the print window - Epson C11CA53201 | Quick Guide - Page 35
Scanning a Document or Photo You can use the included Epson Scan software to scan original documents and photos and save them as digital files on your computer. See "Basic Scanning" below. You can also scan from your Artisan 710 Series control panel and send the images to a memory card or to your - Epson C11CA53201 | Quick Guide - Page 36
want to automatically restore a color photo as you scan, click the Customize button, then check the Color Restoration box. ■ If you are scanning from Epson Scan directly, the image is scanned and you see its icon in Windows Explorer or Macintosh Finder. ■ If you are scanning from an application, the - Epson C11CA53201 | Quick Guide - Page 37
Maintaining Your All-in-One Follow the steps here to check and clean the print head, and replace ink cartridges. To align the print head, if necessary, see the online Epson Information Center. Checking the Print Head Nozzles If your printouts are faint or have gaps in them, the print head nozzles - Epson C11CA53201 | Quick Guide - Page 38
ink, so clean it only if necessary. Note: You cannot clean the print head if an ink . Caution: Never turn off the printer during a cleaning cycle or you may Artisan 710 Series turned on and wait at least six hours to let any dried ink soften. Then try printing again. If you do not use your Artisan 710 - Epson C11CA53201 | Quick Guide - Page 39
Checking the Ink Cartridge Status Your Artisan 710 Series will let you know when an ink cartridge is low or expended by displaying a message on its screen or on your computer. You cannot print or copy when an ink cartridge is expended even if the other cartridges are not expended (but you can still - Epson C11CA53201 | Quick Guide - Page 40
Cartridges You can purchase genuine Epson ink and paper at Epson Supplies CentralSM at www.epson.com/ink3 (U.S. sales) or www.epson.ca (Canadian sales). You can also purchase supplies from an Epson authorized reseller. To find the nearest one, call 800-GO-EPSON (800-463-7766). Use the following list - Epson C11CA53201 | Quick Guide - Page 41
reinstall and use it. 1. Turn on the Artisan 710 Series. If a cartridge is low or expended, you see a message on the display screen. Note which cartridges need to be replaced and press OK. If you're replacing an expended ink cartridge, follow the instructions on the display screen. (You cannot print - Epson C11CA53201 | Quick Guide - Page 42
Remove the yellow tape from the bottom of the cartridge. Caution: Do not remove any other labels or seals, or ink will leak. 6. Insert the new cartridge into the holder and push it down until it clicks into place. 7. Close scanner and press down the cartridge securely. 42 Maintaining Your All-in-One - Epson C11CA53201 | Quick Guide - Page 43
com/support (U.S.) or epson.ca/support (Canada). With Windows, you can select Driver Update on the Maintenance tab in the printer settings window. You can also click or Start, select All Programs or Programs, select EPSON, select EPSON Artisan 710 Series, and click Driver Update. Solving Problems 43 - Epson C11CA53201 | Quick Guide - Page 44
If the screen is dark, press any button to wake the printer from sleep mode. Printing and Copying Problems ■ Make sure your paper is loaded printable side down (usually the whiter, brighter, or glossy side). Don't load paper above the edge guides. ■ Make sure the type of paper you loaded matches the - Epson C11CA53201 | Quick Guide - Page 45
the Artisan 710 Series. Then remove the paper as shown, including any torn pieces. 3. Reattach the cover and close the scanner. 4. You may also need to check other locations for jammed paper, such as the auto duplexer, the paper cassette, and underneath the printer. See the online Epson Information - Epson C11CA53201 | Quick Guide - Page 46
to common problems. You can download drivers and documentation, get FAQs and troubleshooting advice, or e-mail Epson with your questions. Speak to a Support Representative Before you call Epson for support, please have the following information ready: ■ Product name (Artisan 710 Series) ■ Product - Epson C11CA53201 | Quick Guide - Page 47
one, read and follow these safety instructions: ■ Be sure to follow all warnings and instructions P On light stops flashing before unplugging the printer or cutting off power to the electrical outlet. on its side, or turn it upside down; otherwise ink may leak from the cartridges. ■ Avoid placing the - Epson C11CA53201 | Quick Guide - Page 48
Adjust only those controls that are covered by the operating instructions. Except as specifically explained in your documentation, do not attempt to service the product yourself. ■ Unplug the product and refer servicing to qualified service personnel under the following conditions: if the power cord - Epson C11CA53201 | Quick Guide - Page 49
printer and the duplexer. What Epson Will Do To Correct Problems: Should your Epson printer prove defective during the warranty period, please call the Epson ConnectionSM at (562) 276-4382 (U.S.) or (905) 709-3839 (Canada) for warranty repair instructions and return authorization. An Epson service - Epson C11CA53201 | Quick Guide - Page 50
lightning, improper electrical current, software problems, interaction with non-Epson products, or service other than by an Epson Authorized Servicer. If a claimed defect cannot not apply to you. This warranty gives you specific legal rights and you may have other rights which vary from jurisdiction to - Epson C11CA53201 | Quick Guide - Page 51
Care Center nearest you, visit http://www.epson.com/support. You can also write to: Epson America, Inc., P.O. Box 93012, Long Beach, CA 90809-3012 including interference that may cause undesired operation. Trade Name: Epson Type of Product: Multifunction printer Model: C391A Notices 51 - Epson C11CA53201 | Quick Guide - Page 52
energy and, if not installed and used in accordance with the instructions, may cause harmful interference to radio or television reception. However, interface cable with this device. If this equipment has more than one interface connector, do not leave cables connected to unused interfaces. Changes - Epson C11CA53201 | Quick Guide - Page 53
with Seiko Epson Corporation's operating and maintenance instructions. Seiko Epson Corporation shall not be liable for any damages or problems arising from is a service mark of Seiko Epson Corporation. Artisan is a registered trademark and Epson Connection is a service mark of Epson America, Inc - Epson C11CA53201 | Quick Guide - Page 54
- Epson C11CA53201 | Quick Guide - Page 55
- Epson C11CA53201 | Quick Guide - Page 56
CPD-27507 Printed in XXXXXX
-
 1
1 -
 2
2 -
 3
3 -
 4
4 -
 5
5 -
 6
6 -
 7
7 -
8
-
9
-
10
-
11
-
12
-
13
-
14
-
15
-
16
-
17
-
18
-
19
-
20
-
21
-
22
-
23
-
24
-
25
-
26
-
27
-
28
-
29
-
30
-
31
-
32
-
33
-
34
-
35
-
36
-
37
-
38
-
39
-
40
-
41
-
42
-
43
-
44
-
45
-
46
-
47
-
48
-
49
-
50
-
51
-
52
-
53
-
54
-
55
-
56
 |
 |
Artisan
710 Series
Quick Guide
Basic Copying, Printing, and Scanning
Maintenance
Solving Problems
®