Epson ELP-7500 User Manual - Page 77
Setting Menu, The Setting menu enables you to adjust basic projector settings.
 |
UPC - 010343820388
View all Epson ELP-7500 manuals
Add to My Manuals
Save this manual to your list of manuals |
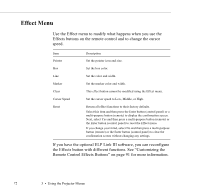
Page 77 highlights
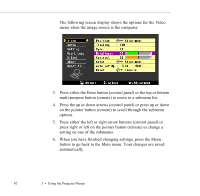
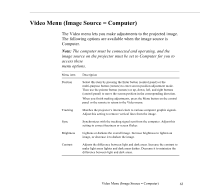
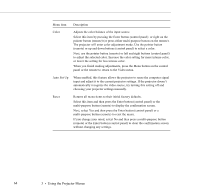
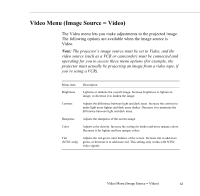
Menu item Description SRS CENTER Adjusts stereo sound. Changing the value balances the SRS sound. Reset Returns all menu items to their initial factory defaults. Select this item and then press the Enter button (control panel) or a multi-purpose button (remote) to display the confirmation screen. Next, select Yes and then press a multi-purpose button (remote) or the Enter button (control panel) to reset the Video menu. If you change your mind, select No and then press a multi-purpose button (remote) or the Enter button (control panel) to clear the confirmation screen without changing any settings. Setting Menu The Setting menu enables you to adjust basic projector settings. Menu item Prompt Color Temperature Ceiling Description Temporarily displays a message on the projector screen to identify which source (computer or video) is providing the image. Adjusts the whiteness of the screen. Positive color temperature values provide a cold white; negative values provide a warmer white. Press the right arrow button (control panel) or press right on the pointer button (remote) to increase the color temperature value; press the left arrow button (control panel) or left on the pointer button (remote) to decrease the color temperature value. Flips the projected image so it looks correct when you're hanging the projector upside-down from the ceiling. Selecting ON turns this feature on, while OFF turns it off (for a normal image). Setting Menu 67
-
 1
1 -
2
-
3
-
4
-
5
-
6
-
7
-
8
-
9
-
10
-
11
-
12
-
13
-
14
-
15
-
16
-
17
-
18
-
19
-
20
-
21
-
22
-
23
-
24
-
25
-
26
-
27
-
28
-
29
-
30
-
31
-
32
-
33
-
34
-
35
-
36
-
37
-
38
-
39
-
40
-
41
-
42
-
43
-
44
-
45
-
46
-
47
-
48
-
49
-
50
-
51
-
52
-
53
-
54
-
55
-
56
-
57
-
58
-
59
-
60
-
61
-
62
-
63
-
64
-
65
-
66
-
67
-
68
-
69
-
70
-
71
-
 72
72 -
 73
73 -
 74
74 -
 75
75 -
 76
76 -
 77
77 -
 78
78 -
 79
79 -
 80
80 -
 81
81 -
 82
82 -
83
-
84
-
85
-
86
-
87
-
88
-
89
-
90
-
91
-
92
-
93
-
94
-
95
-
96
-
97
-
98
-
99
-
100
-
101
-
102
-
103
-
104
-
105
-
106
-
107
-
108
-
109
-
110
-
111
-
112
-
113
-
114
-
115
-
116
-
117
-
118
-
119
-
120
-
121
-
122
-
123
-
124
-
125
-
126
-
127
-
128
-
129
-
130
-
131
-
132
-
133
-
134
-
135
-
136
-
137
-
138
-
139
-
140
-
141
-
142
-
143
-
144
-
145
-
146
-
147
-
148
-
149
-
150
-
151
-
152
-
153
-
154
-
155
-
156
 |
 |