Epson EPL-7500 User Setup Information - Page 2
UNPACKING, ASSEMBLING, Installing the imaging cartridge - cartridges
 |
View all Epson EPL-7500 manuals
Add to My Manuals
Save this manual to your list of manuals |
Page 2 highlights
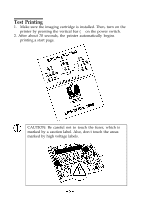
Unpacking 1. Remove the accessory pack from the large box. 2. Remove the printer from the box and set it on a flat, stable surface. 3. Remove the plastic bags protecting the printer and the paper cassette. Save the packing material in case you need to transport the printer. 4. Locate the protective plate. Use the wrench to unscrew the two screws as shown below; open the printer and remove the protective plate. Power cord -Wrench Accessory pack Printer Assembling Installing the imaging cartridge To install the imaging cartridge and the cleaning pad, follow the instructions in the imaging cartridge box. CAUTIONS: l Do not turn the cartridge upside down. l Never transport the printer with the imaging cartridge installed. -2-
-
 1
1 -
 2
2 -
 3
3 -
 4
4 -
 5
5 -
 6
6 -
 7
7 -
 8
8
 |
 |

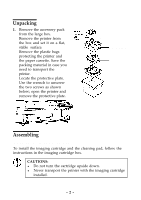
Unpacking
1.
2.
3.
4.
Remove the accessory pack
from the large box.
Remove the printer from
the box and set it on a flat,
stable surface.
Remove the plastic bags
protecting the printer and
the paper cassette. Save the
packing material in case you
need to transport the
printer.
Locate the protective plate.
Use the wrench to unscrew
the two screws as shown
below; open the printer and
remove the protective plate.
Power cord
-
W
r
e
n
c
h
Accessory pack
Printer
Assembling
Installing the imaging cartridge
To install the imaging cartridge and the cleaning pad, follow the
instructions in the imaging cartridge box.
CAUTIONS:
l
Do not turn the cartridge upside down.
l
Never transport the printer with the imaging cartridge
installed.
-2-