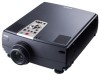
Epson EPL7250 Product Information Guide - Page 7
Cleaning the Air Filter, Replacing the Lamp, LAMP REPLACE
 |
UPC - 010343820852
View all Epson EPL7250 manuals
Add to My Manuals
Save this manual to your list of manuals |
Page 7 highlights
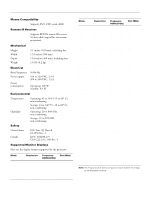
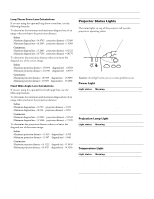
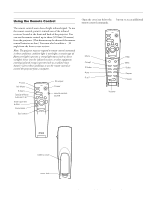
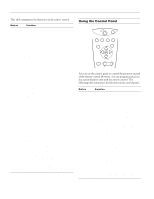
EPSON PowerLite 5350/7250/7350 Projector Button Enter Shift - Keystone + - Volume + Function Selects a menu option or the next menu/help screen. Pressing Enter when no menu or help screen is displayed optimizes the computer image. Pressing the shift and Keystone buttons at the same time increases or decreases the sound volume. Adjusts a trapezoid distorted image to normal. Adjusts the volume when used in conjunction with the Shift button. Cleaning the Air Filter Clean the air filter at the bottom of the projector after every 100 hours of use. If it is not cleaned periodically, it can become clogged with dust, preventing proper ventilation. This can cause overheating and damage the projector. To clean the air filter, follow these steps: 1. Turn off the projector and unplug the power cable. 2. Turn the projector on its side so that the handle is on top and you can access the filter easily. Note: Standing the projector with the handle at the top keeps dust from getting inside the projector housing. 3. Pull the filter cover tab to release the filter cover. Remove the cover. Replacing the Lamp The projection lamp typically lasts for about 1500 to 2000 hours of use. It is time to replace the lamp when: t The projected image gets darker or starts to deteriorate. t The projection lamp indicator is either red, or flashing orange and red alternately. t The message LAMP REPLACE appears on the screen when the projection lamp comes on. Warning: Let the lamp cool before replacing it. Also, do not touch the glass portion of the lamp assembly. Touching the glass portion of the lamp will result in premature lamp failure. 1. Turn off the projector and unplug the power cable. 2. Turn the projector over so you can access the lamp cover. 3. Use a screwdriver, coin, or similar object to loosen the two retaining screws on the lamp cover. When the screws are loose, lift off the lamp cover. (You cannot remove these screws from the cover.) 2 1 2 1 4. Use a screwdriver, coin, or similar object to loosen the two screws holding the lamp unit in position. (You cannot remove these screws completely.) 4. The filter is attached to the inside of the filter cover. It is recommended that you use a small vacuum cleaner designed for computers and other office equipment to clean the filter. If you don't have one, use a dry, lint-free cloth. If the dirt is difficult to remove or the filter is torn, replace it. 5. Replace the filter cover when you're done. 2 1 5. Lift up the handle and pull out the lamp unit. 8/99 EPSON PowerLite 5350/7250/7350 Projector - 7
-
 1
1 -
 2
2 -
 3
3 -
 4
4 -
 5
5 -
 6
6 -
 7
7 -
 8
8
 |
 |
