Epson Expression 1640XL - Graphic Arts User Manual - Page 33
Recommended Settings, Scaling (Resizing) Images
 |
View all Epson Expression 1640XL - Graphic Arts manuals
Add to My Manuals
Save this manual to your list of manuals |
Page 33 highlights
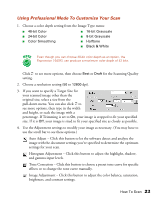
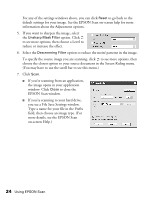
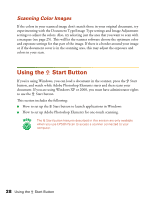
system and hard disk drive when selecting a resolution. To keep your file size manageable, select the lowest possible resolution that gives acceptable quality. (If your final output is for on-screen viewing, you can scan at 72 dpi and reduce your file size.) ■ If you need to scan at a higher resolution, you can reduce the size of the resulting image file by scanning only part of the image. For information about selecting part of an image, see "Selecting the Scanning Area in the Preview Window" on page 25. Recommended Settings Follow the guidelines in this table for selecting a resolution: Type of scan Photograph Text with images Film or slides Line art Image for web Image to be sent by e-mail Text for OCR Newspaper Magazine Resolution 300 dpi 400 dpi 300 to 3200 dpi 300 to 3200 dpi 96 to 150 dpi 96 to 150 dpi 400 dpi 400 dpi 300 dpi Scaling (Resizing) Images If you plan to enlarge your image, it's better to enlarge it by scanning at a higher resolution. If you change the image resolution or size in an application, you lose image quality. Keep in mind when you enlarge a small photo, such as 35 mm slides or wallet-size photos, you'll need to scan at a high enough resolution to retain your image quality, but not so high that your file size is too large to be efficient. How To Scan 27
-
 1
1 -
2
-
3
-
4
-
5
-
6
-
7
-
8
-
9
-
10
-
11
-
12
-
13
-
14
-
15
-
16
-
17
-
18
-
19
-
20
-
21
-
22
-
23
-
24
-
25
-
26
-
27
-
 28
28 -
 29
29 -
 30
30 -
 31
31 -
 32
32 -
 33
33 -
 34
34 -
 35
35 -
 36
36 -
 37
37 -
 38
38 -
39
-
40
-
41
-
42
-
43
-
44
-
45
-
46
-
47
-
48
-
49
-
50
-
51
-
52
-
53
-
54
-
55
-
56
-
57
-
58
-
59
-
60
-
61
-
62
-
63
-
64
-
65
-
66
-
67
-
68
-
69
-
70
-
71
-
72
-
73
-
74
-
75
-
76
-
77
-
78
-
79
-
80
-
81
-
82
-
83
-
84
-
85
-
86
-
87
-
88
-
89
-
90
-
91
-
92
-
93
-
94
-
95
-
96
 |
 |