Epson NX300 Start Here - Page 4
Connect the phone cord - instructions
 |
UPC - 010343869080
View all Epson NX300 manuals
Add to My Manuals
Save this manual to your list of manuals |
Page 4 highlights
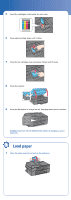
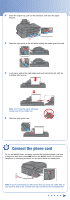
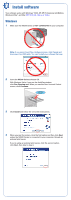
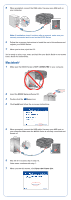
2 Open the output tray, pull out the extension, and raise the paper stopper. 3 Slide the edge guide to the left while holding the feeder guard forward. 4 Load paper against the right edge guide and behind the tab, with the printable side face up. Note: Don't load the paper sideways; always load it short edge first. 5 Slide the edge guide over. 6 Connect the phone cord To use the NX300 Series for faxing, connect the included phone cord from a telephone wall jack to the LINE port on the NX300 Series. To connect a telephone or answering machine, see the Quick Guide for instructions. Note: If you're connecting to a DSL phone line, you must use a DSL filter or you won't be able to fax. Contact your DSL provider for the necessary filter.
-
 1
1 -
 2
2 -
 3
3 -
 4
4 -
 5
5 -
 6
6 -
 7
7 -
 8
8
 |
 |

2
Open the output tray, pull out the extension, and raise the paper
stopper.
3
Slide the edge guide to the left while holding the feeder guard forward.
4
Load paper against the right edge guide and behind the tab, with the
printable side face up.
Note
: Don’t load the paper sideways;
always load it short edge first.
5
Slide the edge guide over.
To use the NX300 Series for faxing, connect the included phone cord from
a telephone wall jack to the
LINE
port on the NX300 Series. To connect a
telephone or answering machine, see the
Quick Guide
for instructions.
Note:
If you’re connecting to a DSL phone line, you must use a DSL filter or
you won’t be able to fax. Contact your DSL provider for the necessary filter.
Connect the phone cord
6