Epson PictureMate Pal - PM 200 Start Here Card - Page 2
Plug In and Turn On, Install the Initial Photo Cartridge
 |
View all Epson PictureMate Pal - PM 200 manuals
Add to My Manuals
Save this manual to your list of manuals |
Page 2 highlights
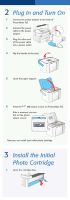
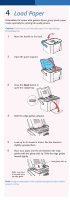
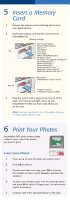
2 Plug In and Turn On 1 Connect the power adapter to the back of PictureMate Pal. 2 Connect the power cable to the power adapter. 3 Plug the other end of the power cable into a power outlet. 4 Flip the handle to the back. 5 Open the paper support. 6 Press the On button to turn on PictureMate Pal. After a moment, you see this on the photo viewer screen: Now you can install your initial photo cartridge. 3 Install the Initial Photo Cartridge 1 Open the cartridge door.
-
 1
1 -
 2
2 -
 3
3 -
 4
4 -
 5
5 -
 6
6
 |
 |

2
Plug In and Turn On
1
Connect the power adapter to the back of
PictureMate Pal.
2
Connect the power
cable to the power
adapter.
3
Plug the other end
of the power cable
into a power outlet.
4
Flip the handle to the back.
5
Open the paper support.
6
Press the
On
button to turn on PictureMate Pal.
After a moment, you see
this on the photo
viewer screen:
Now you can install your initial photo cartridge.
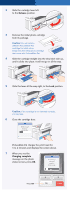
3
Install the Initial
Photo Cartridge
1
Open the cartridge door.