Epson PictureMate Snap - PM 240 Basics
Epson PictureMate Snap - PM 240 Manual
 |
View all Epson PictureMate Snap - PM 240 manuals
Add to My Manuals
Save this manual to your list of manuals |
Epson PictureMate Snap - PM 240 manual content summary:
- Epson PictureMate Snap - PM 240 | Basics - Page 1
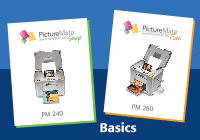
® personal photo lab ® personal photo lab PM 240 PM 280 Basics - Epson PictureMate Snap - PM 240 | Basics - Page 2
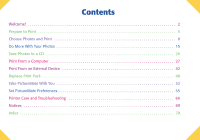
Prepare to Print 5 Choose Photos and Print 8 Do More With Your Photos 15 Save Photos to a CD 25 Print From a Computer 27 Print From an External Device 42 Replace Print Pack 48 Take PictureMate With You 52 Set PictureMate Preferences 55 Printer Care and Troubleshooting 60 Notices 69 Index - Epson PictureMate Snap - PM 240 | Basics - Page 3
taking your photos, review them on your digital camera's screen. Delete the photos you don't want. 2. Print Insert your camera's memory card in PictureMate, choose your photos, and print. 3. Save To preserve your digital photo files (just like film negatives), save them to a CD, flash drive, or - Epson PictureMate Snap - PM 240 | Basics - Page 4
without convenient electrical outlets, you can buy the optional PictureMate battery. (See page 53.) If you have a Bluetooth®-enabled PDA, cell phone, or computer, you can send photos wirelessly to PictureMate for printing using the optional Epson® Bluetooth Photo Print Adapter. (See page 43.) 3 - Epson PictureMate Snap - PM 240 | Basics - Page 5
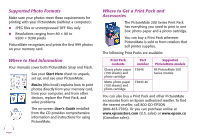
paper (150 sheets) and photo cartridge Matte photo paper (100 sheets) and photo cartridge Part number T5846 T5845-M Supported PictureMate models All PictureMate 200 Series models You can also buy a Print Pack and other PictureMate accessories from an Epson authorized reseller. To find the nearest - Epson PictureMate Snap - PM 240 | Basics - Page 6
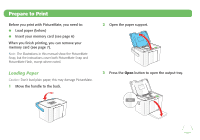
illustrations in this manual show the PictureMate Snap, but the instructions cover both PictureMate Snap and PictureMate Flash, except where noted. Loading Paper Caution: Don't load plain paper; this may damage PictureMate. 1 Move the handle to the back. 2 Open the paper support. 3 Press the Open - Epson PictureMate Snap - PM 240 | Basics - Page 7
arrow on edge guides Note: Load a maximum of 20 sheets at a time. Load your paper glossy or whiter side up to prevent smearing. 7 Store any unused paper in the original package and keep it flat in a dry area to prevent curling. Note: When you need more paper, order a PictureMate 200 Series Print - Epson PictureMate Snap - PM 240 | Basics - Page 8
Card When you are ready to remove a memory card, first make sure the memory card light is not flashing. Caution: Do not remove a card while the memory card light is flashing; you may lose photos on your card. Top slot: Push in the card and release it, then pull it straight out of - Epson PictureMate Snap - PM 240 | Basics - Page 9
page 13. To store and display your printed photos, see page 14. Viewing Photos on PictureMate PictureMate's photo viewer screen makes it easy to select the photos you want to print. Total number of prints Number of copies of this photo Layout icon Guide to available options Left selection button - Epson PictureMate Snap - PM 240 | Basics - Page 10
your photos. 2 When you see a photo you want, press OK to select it for printing. The selected photo is highlighted orange. If you've set the screen to display one photo at a time, an orange frame shows you the area that will print. Note: If you want to edit your photo, see page 15 for instructions - Epson PictureMate Snap - PM 240 | Basics - Page 11
OK to select it. Repeat step 3 to select more copies, if necessary. 5 To preview your photos, press Print Preview. (Or skip directly to step 7 to print your photos.) Press l or r to review your selected photos. If you change your mind, press the Back button. 6 Press Layout to select the layout of - Epson PictureMate Snap - PM 240 | Basics - Page 12
, press Print Preview. (Or skip directly to step 7 to print your photos.) Press l or r to review your selected photos. If you change your mind, press Back. 6 Press Layout to select the layout of your photos on the paper. (See page 16.) 7 Make sure you have enough paper loaded, then press Print to - Epson PictureMate Snap - PM 240 | Basics - Page 13
, press Print Preview. (Or skip directly to step 10 to print your photos.) Press l or r to review your selected photos. If you change your mind, press Back. 9 Press Layout to select the layout of your photos on the paper. (For more information, see page 16.) 10 Make sure you have enough paper loaded - Epson PictureMate Snap - PM 240 | Basics - Page 14
If your camera supports DPOF (Digital Print Order Format), you can use it to pre-select which photos and how many copies you want to print. See your camera's manual to choose photos for printing with DPOF, then insert your memory card in PictureMate. PictureMate automatically reads your preselected - Epson PictureMate Snap - PM 240 | Basics - Page 15
Your PictureMate Photos Photos printed on PictureMate photo paper are beautiful and long-lasting. Follow these guidelines to make sure they will look great for generations. Caring for Your Photos ● To avoid scratches or smudging, do not rub the printed side of the photo. ● If you stack photos, do - Epson PictureMate Snap - PM 240 | Basics - Page 16
pressing the Menu button, you can: ● Choose from a variety of layouts (see page 16) ● Crop and enlarge a section of your photo (see page 17) ● Remove red eyes from your photos (see page 18) ● Add a date stamp to your photos (see page 19) ● Print in black-and-white or sepia (see page 19) ● Fix - Epson PictureMate Snap - PM 240 | Basics - Page 17
Getting Help If you need help with cropping, adjusting colors, or other PictureMate features, you can get instructions right on the photo viewer screen. 1 Press Menu. 2 Press u or d to highlight Setup, then press OK. 3 Press u or d to highlight Help, then press OK. 4 Press u or d to highlight the - Epson PictureMate Snap - PM 240 | Basics - Page 18
cropping; see page 56 for instructions. 4 At the photo selection screen, press OK to select the current photo for printing. (See page 9.) Or you can print all photos (page 10) or a range of photos (page 11). For the US Passport, ID, and 10 Per Page layouts, PictureMate prints multiple copies of each - Epson PictureMate Snap - PM 240 | Basics - Page 19
red eyes. You can use red-eye reduction to help eliminate this problem. Note: Red-eye reduction may not correct red eyes in all photos. To use red-eye reduction whenever you print, see page 58. 1 Select a photo with the red-eye problem. 2 Press Menu. 3 Press u or d to highlight Edit, then press OK - Epson PictureMate Snap - PM 240 | Basics - Page 20
Adding a Date Stamp You can add the date your photos were originally taken to the bottom right corner of each photo. Note: The date comes from your camera, not from the printer. If this information is incorrect, adjust the date setting on your camera. 1 Press Menu. 2 Press u or d to highlight Setup, - Epson PictureMate Snap - PM 240 | Basics - Page 21
your photos. Fixing Photos PictureMate lets you correct the color and improve the image quality of your photos without using a computer. Two types of adjustments are available: ● Automatic adjustments If your camera supports PRINT Image Matching (P.I.M.) or Exif Print, the printer's P.I.M. setting - Epson PictureMate Snap - PM 240 | Basics - Page 22
settings you want, then press Print to print your photos. Manually Fixing Your Photos You can manually fix individual photos or fix all your photos at once. You can make different corrections for each photo on your memory card. 1 Select a photo that you want to adjust. 2 Press Menu. 3 Press u or - Epson PictureMate Snap - PM 240 | Basics - Page 23
, including a variety of Disney character frames. Note: Additional frames are included on the PictureMate CD that came with your printer. See the on-screen User's Guide for instructions on adding them to PictureMate. 1 Select a photo that you want to place in a frame. 2 Press Menu. 3 Press u or d to - Epson PictureMate Snap - PM 240 | Basics - Page 24
you selected. ● If necessary, press Display to view each photo at full size with the frame. ● If your photo doesn't fit in the frame, you can crop it and adjust the picture area. Press Menu, select Edit, and select Crop Photo. Follow the instructions on page 17. 8 Press OK to select the current - Epson PictureMate Snap - PM 240 | Basics - Page 25
any other settings you want, then press Print to print your photos. Rotating You can rotate a photo on PictureMate's photo viewer screen. This does not affect how the photo prints, only how you see it on the screen. 1 Select the photo you want to rotate. 2 Press Menu. 3 Press u or d to highlight - Epson PictureMate Snap - PM 240 | Basics - Page 26
. See the on-screen User's Guide for instructions. Saving Photos to the Built-in CD Burner You can save photos to a CD using the built-in CD drive in PictureMate Flash. Use only 12-cm CDs and select a quality brand. The following types are compatible with this printer: ● CD-R ● CD-RW Multi ● CD - Epson PictureMate Snap - PM 240 | Basics - Page 27
the instructions on the screen to complete the backup. The CD is ejected automatically when the backup is finished. Each time you copy photos to the same CD, PictureMate creates a new numbered folder (001, 002, etc.) where it stores your photos. Caution: Avoid handling the printer during backup - Epson PictureMate Snap - PM 240 | Basics - Page 28
Guide for instructions. Periodically, it's a good idea to check Epson's support website at epson.com/support for free updates to your PictureMate printer software. Download instructions have problems installing the software, see page 65. Installing Software for Windows 1 Make sure PictureMate is NOT - Epson PictureMate Snap - PM 240 | Basics - Page 29
. Click the option to run RUNEPSON.exe, then click Allow at the User Account Control screen. 6 After a moment, you see this screen: 4 Insert the PictureMate CD in your CD/DVD drive. 5 With Windows Vista, you see this screen: Click Next. 7 Read the license agreement screen and click Agree. You see - Epson PictureMate Snap - PM 240 | Basics - Page 30
USB cable to any open USB port on your computer. Then connect the other end to the USB port on the back of PictureMate. 10 When you see the screen below, click No if you have another printer connected to your computer. If PictureMate is your only printer, click Yes. The installer installs your - Epson PictureMate Snap - PM 240 | Basics - Page 31
that your printer driver is installed, click Next. ArcSoft® PhotoImpression™ and your on-screen User's Guide are installed. 12 When you see this screen, follow the on-screen instructions to install the optional web links. Installing Software for Macintosh 1 Make sure PictureMate does NOT have - Epson PictureMate Snap - PM 240 | Basics - Page 32
icon. You see a screen reminding you to connect PictureMate. 7 Click Next. 8 Read the license agreement and click Agree. 9 Click Install Printer Driver and Utilities, then follow the on-screen instructions to install the driver. 12 At the Install Menu, click Install Optional Web Links and - Epson PictureMate Snap - PM 240 | Basics - Page 33
.2 or 10.3, select EPSON USB at the top and your PictureMate model below.) 20 Click Add, then quit the Printer Setup Utility (or Print Center). Now you can print photos from your Macintosh on PictureMate. Printing From a Computer Follow these basic printing instructions for your computer: ● Windows - Epson PictureMate Snap - PM 240 | Basics - Page 34
icon at the top of the screen, then select Print from the drop-down menu that appears. Options 4 Make sure your printer is selected, then choose PictureMate Photo Paper as the Paper type setting. (4 × 6 in is automatically selected as the Paper size setting.) 5 Click Options in the lower right - Epson PictureMate Snap - PM 240 | Basics - Page 35
You see the printer settings window: Sample photo 6 Choose from the following settings: ● Select Borderless to print a photo without borders. Select Borders to print with a white border all around. ● Borderless prints are automatically expanded. If too much of your photo edges are cut off, set the - Epson PictureMate Snap - PM 240 | Basics - Page 36
resume printing, and view your Print Pack status. Printing with the Windows XP Picture and Fax Viewer 1 Locate the photo you want to print on your computer. 2 Right-click the photo, highlight Open With, and select Windows Picture and Fax Viewer. Pause or resume Cancel Print icon 3 Click the Print - Epson PictureMate Snap - PM 240 | Basics - Page 37
5 When you see this screen, select the photo(s) you want to print and click Next. 6 When you see this screen, select your EPSON PictureMate model and click Printing Preferences. Printing Preferences 36 - Epson PictureMate Snap - PM 240 | Basics - Page 38
You see the printer settings screen: Sample image 7 Choose from the following settings: ● Select Borderless to print a photo without borders. Select Borders to print with a white border all around. ● Borderless prints are automatically expanded. If too much of your photo edges are cut off, set the - Epson PictureMate Snap - PM 240 | Basics - Page 39
Printing Wizard screen, click Next. 10 When you see this screen, select Full page photo print and click Next. During printing, this window appears on your computer screen showing the progress of your print job. You can cancel, pause, or - Epson PictureMate Snap - PM 240 | Basics - Page 40
your print program and open the photo you want to print. 2 From the File menu, select Page Setup. 3 Select your PictureMate model from the Format for menu. image to the maximum print area, so you may see small borders in iPhoto prints. 5 Select the direction you want your photo to print ( for - Epson PictureMate Snap - PM 240 | Basics - Page 41
of your photos edges are cut off, set the Expansion slider to Min. If you see a white edge on your photo, select Mid or Max. Note: iPhoto expands two sides of an image to the maximum print area, so you may see small borders in iPhoto prints. Tip: For more information about printer settings - Epson PictureMate Snap - PM 240 | Basics - Page 42
12 To monitor the progress of your print job, click the PictureMate or Print Center icon when it appears in the dock. If you clicked the Print Center icon, double-click your PictureMate model. 13 From this window, you can do the following: ● To cancel - Epson PictureMate Snap - PM 240 | Basics - Page 43
Flash only; see page 46) Tip: Once you've connected PictureMate to an external drive, you can copy photos from your camera's memory card to the drive for safekeeping. See your on-screen User's Guide for instructions. Printing From a Digital Camera You can connect a digital camera that supports - Epson PictureMate Snap - PM 240 | Basics - Page 44
back of PictureMate. 5 Use your camera's controls to select and print photos on PictureMate. (See your camera manual for instructions.) Note: You Epson Bluetooth Photo Print Adapter. The adapter (part# C12C824383) is available from your local reseller or Epson (see page 68). Note: While PictureMate - Epson PictureMate Snap - PM 240 | Basics - Page 45
file sharing and sending files. Printing starts automatically. If you see a Bluetooth error message on the PictureMate screen, try printing the photo from a memory card or your computer instead. Note: For instructions on selecting PictureMate's Bluetooth settings, see the on-screen User's Guide. 44 - Epson PictureMate Snap - PM 240 | Basics - Page 46
External Drive If you saved your photos to a CD, Zip disk, or flash memory (thumb) drive, you can connect the drive to the back of PictureMate and print just like you do when you insert a memory card. You can also print photos from a CD that you get from a photo processing lab. (Images should be in - Epson PictureMate Snap - PM 240 | Basics - Page 47
. Note: If you're using PictureMate Snap and you want to print photos from a CD, you can install the PictureMate software and connect the printer to your computer, and then print them from there. See the section starting on page 27 for instructions. 1 Make sure PictureMate Flash is turned on. 46 - Epson PictureMate Snap - PM 240 | Basics - Page 48
addition to printing from a CD, you can also back up photos on your camera's memory card by saving them on a CD in PictureMate Flash's built-in CD drive (see page 25) or an external drive on PictureMate Snap (see your on-screen User's Guide). Ejecting the CD 1 Press the 5 eject button. The CD comes - Epson PictureMate Snap - PM 240 | Basics - Page 49
paper (150 sheets) and photo cartridge Matte photo paper (100 sheets) and photo cartridge Part number T5846 T5845-M Supported PictureMate models All PictureMate 200 Series models You can also buy a Print Pack and other PictureMate accessories from an Epson authorized reseller. To find the nearest - Epson PictureMate Snap - PM 240 | Basics - Page 50
new one right away. Caution: Before you replace the cartridge, read the "Photo Cartridge Safety Instructions" on page 71. 1 Make sure PictureMate is on but not printing. 2 Open the cartridge door on the back of PictureMate. 3 Slide the cartridge lever left, to the Release position. Caution: Do not - Epson PictureMate Snap - PM 240 | Basics - Page 51
with water. If discomfort or vision problems continue after flushing, see a doctor immediately. Caution: Do not attempt to refill the photo cartridge. This could result in ink spills or other damage to PictureMate not covered by Epson's warranty. 50 Note: The cartridge won't go in all the way - Epson PictureMate Snap - PM 240 | Basics - Page 52
7 Slide the lever all the way right, to the Lock position. Caution: If the cartridge is not inserted correctly, PictureMate will not be able to print. 8 Close the cartridge door all the way. PictureMate starts charging and displays a message. 9 When it's finished charging, press OK. Checking Print - Epson PictureMate Snap - PM 240 | Basics - Page 53
CD if you have one in the CD drive (PictureMate Flash only). 2 Press the On button to turn PictureMate off. 3 Wait until the On light goes out, then unplug the power cable from the power outlet. 4 Remove all paper and printed photos. 52 5 Close the paper support and output tray. 6 Unplug the power - Epson PictureMate Snap - PM 240 | Basics - Page 54
print about 100 photos (or 60 photos when printing from PictureMate Flash's built-in CD drive). Installing the Battery 1 Make sure PictureMate is turned off. 2 Unplug the AC adapter from PictureMate. 3 Release the latch and remove the battery cover from the back of the printer. 4 Insert the battery - Epson PictureMate Snap - PM 240 | Basics - Page 55
photo viewer screen: Charging Full 2/3 full 1/3 full Low Almost out Battery status icon Note: If you are running PictureMate with the battery, the printer problem with your battery, or you want to replace it with one that is already charged, you need to remove the battery. 1 Make sure PictureMate - Epson PictureMate Snap - PM 240 | Basics - Page 56
Display Options You can select how many photos display on the photo viewer screen whenever you insert a card, and whether a photo displays with or without the guide near the bottom of the photo. You can choose from these display preferences: 1 photo 1 photo (no guide) 6 photos 15 photos 55 - Epson PictureMate Snap - PM 240 | Basics - Page 57
you prefer, then press OK. Note: The setting you choose takes effect after you insert a memory card or cancel all settings. While viewing photos, you can temporarily change the setting by pressing the Display button. 56 Adjusting Borderless Expansion and Cropping When you print borderless pictures - Epson PictureMate Snap - PM 240 | Basics - Page 58
or Clearing Settings You can either keep the print settings and photos you selected or return to your personal default settings after you Setting Audible Alerts You can turn on or off the sounds that PictureMate uses to alert you to various problems. 1 Press Menu. 2 Press u or d to highlight Setup, - Epson PictureMate Snap - PM 240 | Basics - Page 59
4 Press u or d to select the setting you want to change, then press OK: ● Battery status: Beeps when the battery is low. ● Error status: Beeps when the Print Pack is expended or getting low. ● Button: Beeps when you try to select an unavailable (or grayed-out) option. 5 At the next screen, select On - Epson PictureMate Snap - PM 240 | Basics - Page 60
Returning to Default Settings You can return your personal settings to the PictureMate original default settings. 1 Press Menu. 2 Press u or d to highlight Setup, then press OK. 3 Press u or d to highlight Reset Default Settings, then press OK. You see - Epson PictureMate Snap - PM 240 | Basics - Page 61
Printer Care and Troubleshooting If you have problems with your PictureMate, or you want to improve print quality, read these sections: ● Cleaning the print head (on the right) ● Aligning the print head (on page 62) ● Cleaning PictureMate (on page 63) ● Printing and operation problems (on page 63) ● - Epson PictureMate Snap - PM 240 | Basics - Page 62
takes about 60 seconds. PictureMate makes some noise and you see a Cleaning message. When cleaning is complete, PictureMate prints a nozzle check pattern you don't see any improvement after cleaning three times, see "Print Quality Problems" on page 65. Note: You can run a nozzle check before you - Epson PictureMate Snap - PM 240 | Basics - Page 63
-if your prints look fuzzy or have light or dark lines running through them-you may need to align the print head. 1 Load paper in PictureMate so you can print the head alignment pattern. 2 Press Menu. 3 Press u or d to highlight Maintenance, then press OK. 4 Press u or d to highlight Head Alignment - Epson PictureMate Snap - PM 240 | Basics - Page 64
case. Don't get water on the components and don't spray lubricants or oils inside PictureMate. Printing and Operation Problems The On light and photo viewer screen don't turn on. ● Press the On button to turn on PictureMate. ● Make sure the power cable and AC adapter are securely connected at both - Epson PictureMate Snap - PM 240 | Basics - Page 65
makes an unexpected noise after you install a photo cartridge. The first time you install the photo cartridge, PictureMate charges its print head for about three minutes. Wait until charging finishes before you turn it off, or it may charge improperly and use more - Epson PictureMate Snap - PM 240 | Basics - Page 66
Guide. ● To print over a network, see the on-screen User's Guide for instructions on setting up printing. Print Quality Problems is blurry or smeared. ● Use PictureMate photo paper to ensure proper saturation, absorption need cleaning. See page 60. ● The photo cartridge may be old or low. See page 48 - Epson PictureMate Snap - PM 240 | Basics - Page 67
photo cartridge may photo again. ● Turn on the PhotoEnhance or P.I.M. setting. See page 20. ● Try manually adjusting the brightness, saturation, or sharpness. See page 21. Problems guides. ● Don't load plain paper; this may damage PictureMate. ● Use only PictureMate photo paper or Epson Premium Photo - Epson PictureMate Snap - PM 240 | Basics - Page 68
can download drivers and documentation, get FAQs and troubleshooting advice, or e-mail Epson with your questions. Speak to a Support Representative Before you call Epson for support, please have the following information ready: ● Product name (PictureMate Snap [PM 240] or PictureMate Flash [PM 280 - Epson PictureMate Snap - PM 240 | Basics - Page 69
GOEPSON (800-463-7766). Or you can purchase online at www.epsonstore.com (U.S. sales) or www.epson.ca (Canadian sales). Other Software Technical Support ArcSoft PhotoImpression Telephone: (510) 440-9901, 8:30 AM to 5:30 PM, Pacific Time, Monday through Friday Fax: (510) 440-1270 Online: www.arcsoft - Epson PictureMate Snap - PM 240 | Basics - Page 70
as in airplanes or hospitals, follow all instructions in those places. ● Do not insert objects through the slots in the printer. ● Take care not to spill liquid on the printer and the AC adapter. ● Do not put your hand inside the printer or touch the photo cartridge during printing. ● Do not use - Epson PictureMate Snap - PM 240 | Basics - Page 71
, and options by yourself except as specifically explained in the printer's guides. ● Unplug the printer and the AC adapter, remove the optional battery from the printer, and refer servicing to qualified service personnel under the following conditions: The power cord or plug is damaged; liquid - Epson PictureMate Snap - PM 240 | Basics - Page 72
cause birth defects or other reproductive harm. Wash hands after handling. (Provided in accordance with Proposition 65 in Cal. Health & Safety Code §25249.5 et seq.) Photo Cartridge Safety Instructions ● Keep photo cartridges out of the reach of children and do not drink the ink. ● Do not shake the - Epson PictureMate Snap - PM 240 | Basics - Page 73
vision problems Instructions ● If battery acid gets into your eyes or on your skin, immediately rinse the affected area thoroughly with water and seek medical treatment. If a battery is swallowed, seek medical treatment immediately. ● Use only an Epson Li-ion battery model EU-112 for this printer - Epson PictureMate Snap - PM 240 | Basics - Page 74
Will Do To Correct Problems: Should your Epson printer prove defective during the warranty period, please call the Epson ConnectionSM at (562) 276-7282 (U.S.) or (905) 709-2567 (Canada) for warranty repair instructions and return authorization. An Epson service technician will provide telephone - Epson PictureMate Snap - PM 240 | Basics - Page 75
software problems, interaction with non-Epson products, or service other than by an Epson Authorized Servicer. Epson Authorized Reseller nearest you, visit our website at: http://www.epson.com. To find the Epson Customer Care Center nearest you, visit epson.com/support. You can also write to: Epson - Epson PictureMate Snap - PM 240 | Basics - Page 76
problems or more fading. Both a PictureMate Photo Cartridge and some PictureMate Photo Paper were included in the box with your PictureMate printer. The included cartridge the dated sales receipt and UPC code from the PictureMate Print Pack packaging within one year of purchase and Epson will give - Epson PictureMate Snap - PM 240 | Basics - Page 77
This Satisfaction Guarantee also applies to the PictureMate Photo Cartridge and PictureMate Photo Paper which were included in the box with your PictureMate printer, if you are dissatisfied because you receive fewer prints with the cartridge than the number of sheets included. The per-sheet refund - Epson PictureMate Snap - PM 240 | Basics - Page 78
. Trade Name: Epson Type of Product: Ink Jet Printer Model: B382A (PictureMate Snap) B282B (PictureMate Flash) FCC Compliance Statement energy and, if not installed and used in accordance with the instructions, may cause harmful interference to radio or television reception. However, there - Epson PictureMate Snap - PM 240 | Basics - Page 79
or alterations to this product, or (excluding the U.S.) failure to strictly comply with Seiko Epson Corporation's operating and maintenance instructions. Seiko Epson Corporation shall not be liable for any damages or problems arising from the use of any options or any consumable products other than - Epson PictureMate Snap - PM 240 | Basics - Page 80
7 Add Frame to Photo, 22 to 23 Alerts, sound, 57 to 58 Aligning print head, 62 All photos, printing, 10 to to 54 installing, 3, 53 removing, 54 safety instructions, 72 to 73 status, 54 Black-and-white problems, 67 Borderless layout, 16 to 17, 37, 39 problems, 67 Borderless expansion, 37, 40, 56 79 - Epson PictureMate Snap - PM 240 | Basics - Page 81
35, 38 Care of photos, 14 Care of PictureMate, 60 to 62 Carrying PictureMate, 52 Cartridge, photo see Photo cartridge Case, optional, 52 80 43 to 44 Charging battery, 53 to 54 photo cartridge, 51, 64 Checking nozzles, 61 Choosing photos, 8 to 13 Cleaning PictureMate, 63 print head, 60 to 61, 65 - Epson PictureMate Snap - PM 240 | Basics - Page 82
to 77 Door, cartridge, 49 to 51 DPOF (Digital Print Order Format), 3, 13 Drive, built-in CD, see CD Drive, external, see External device E Effects, color, 19 to 20 Enhance Fine Details setting, 37, 40 Enhancing photos, 20 to 22 Epson accessories, 4, 43, 48, 52, 68 technical support, 67 to 68 Error - Epson PictureMate Snap - PM 240 | Basics - Page 83
control panel, 16 Epson, 67 to 68 82 I Icons on screen, 15, 54 ID photos, 16 to 17 Image formats, 4 quality, 20 to 22 quality problems, 65 to 66 Incorrect colors, 66 margins, 56, 67 Index, CD, 16 to 17, 26, 47 Ink, see Photo cartridge Instructions, control panel, 16 Internet support, 67 J Jammed - Epson PictureMate Snap - PM 240 | Basics - Page 84
, 60 to 62 Manuals, 4, 29, 31 Margins incorrect, 56, 67 selecting, 16 to 17 Memory card adapters, 7 compatibility, 7 light, 6 to 7 problems, 64 removing, 7, 27 Menu button, 11 to 26 Mini-wallet photos, 16 to 17 Missing colors, 66 N Network installation, 65 Noise, PictureMate, 64 Nozzles checking - Epson PictureMate Snap - PM 240 | Basics - Page 85
setting, Macintosh, 39 Output tray, 5, 52 P Packing PictureMate, 52 Page Setup window, 39 Paper buying, 4, 48, 68 feeding problems, 66 jam, 66 loading, 5 to 6, 66 orientation, 39 output tray, 5, 52 size, 6, 39 storing, 14 support, 5 to 6, 52 Passport photos, 16 to 17 PDA, printing from, 43 to 44 - Epson PictureMate Snap - PM 240 | Basics - Page 86
cartridge buying, 4, 48, 68 charging, 51 door, 49 to 51 information, 75 to 76 lock, 49 to 51 release lever, 49 to 51 replacing, 48 to 51 safety instructions, 71 status, 51 Photo viewer screen adjusting angle, 8 blank, 9, 54, 63 display options, 9, 55 to 56 icons, 15, 54 instructions on, 16 problems - Epson PictureMate Snap - PM 240 | Basics - Page 87
42 to 46 individual photos, 9 to 10 Macintosh, 39 to 41 photos by date, 12, 19 preview, 10 to 13, 37 problems, 63 to 64 range of photos, 11 to 12 Windows 65 Proof Sheet layout, 16 to 17 Q Quality problems, 65 to 66 Quality, adjusting, 20 to 22, 37 R Range of photos, 11 to 12 Red-eye reduction, 15, 18 - Epson PictureMate Snap - PM 240 | Basics - Page 88
56 icons, 15, 54 instructions on, 16 problems, 63 safety instructions, 72 using, 8 to 62 Select All, 3, 10 to 11 Sepia, 19 to 20, 37, 40 Sequence of photos, 11 to 12 Service, 67 to 68 Settings default prints, 14 Supplies, 4, 43, 48, 52, 68 Support, paper, 5 to 6, 52 Support, technical, 67 to 68 87 - Epson PictureMate Snap - PM 240 | Basics - Page 89
T Technical support, 67 to 68 Thumb drive, printing from, 45 to 46 TIFF, 4 Transporting PictureMate, 52 Troubleshooting, 60 to 67 Turning printer on or off, 6, 27, 52, 63, 69 U USB cable, 27, 29 to 30, 43, 46, 52 USB DIRECT-PRINT camera, 3, 42 to 43 User's Guide, 4, 29, 31 W Wallet-size photos, 16 - Epson PictureMate Snap - PM 240 | Basics - Page 90
menu Move through photos and menu options Paper support (load photo paper here) Edge guides EXT. I/F port for external devices Memory card light Memory card slots Output tray (catches printed photos) Built-in CD burner (Picturemate Flash only) USB port for computer Photo viewer screen Selects - Epson PictureMate Snap - PM 240 | Basics - Page 91
Print Pack has everything you need to print in one box: photo paper and a photo cartridge. You can buy a PictureMate 200 Series Print Pack wherever PictureMate Snap and Flash are sold or from retailers that sell printer supplies. The following Print Packs are available: Print Pack contents Glossy
-
 1
1 -
 2
2 -
 3
3 -
 4
4 -
 5
5 -
 6
6 -
 7
7 -
8
-
9
-
10
-
11
-
12
-
13
-
14
-
15
-
16
-
17
-
18
-
19
-
20
-
21
-
22
-
23
-
24
-
25
-
26
-
27
-
28
-
29
-
30
-
31
-
32
-
33
-
34
-
35
-
36
-
37
-
38
-
39
-
40
-
41
-
42
-
43
-
44
-
45
-
46
-
47
-
48
-
49
-
50
-
51
-
52
-
53
-
54
-
55
-
56
-
57
-
58
-
59
-
60
-
61
-
62
-
63
-
64
-
65
-
66
-
67
-
68
-
69
-
70
-
71
-
72
-
73
-
74
-
75
-
76
-
77
-
78
-
79
-
80
-
81
-
82
-
83
-
84
-
85
-
86
-
87
-
88
-
89
-
90
-
91
 |
 |
Basics
PM 280
®
personal photo lab
PM 240
®
personal photo lab