Epson PictureMate Snap - PM 240 Basics - Page 24
Decorating Photos, Display, Crop Photo, Print, Add Decoration
 |
View all Epson PictureMate Snap - PM 240 manuals
Add to My Manuals
Save this manual to your list of manuals |
Page 24 highlights
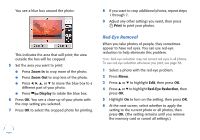
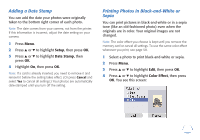
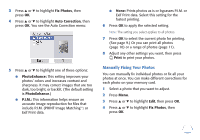
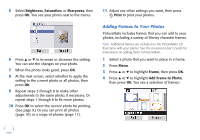
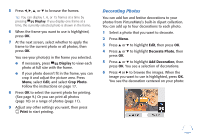
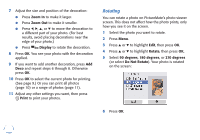
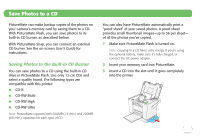
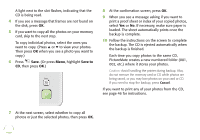
5 Press l, r, u, or d to browse the frames. Tip: You can display 1, 6, or 15 frames at a time by pressing Display. If you display one frame at a time, the currently selected photo is shown in the frame. 6 When the frame you want to use is highlighted, press OK. 7 At the next screen, select whether to apply the frame to the current photo or all photos, then press OK. You see your photo(s) in the frame you selected. ● If necessary, press Display to view each photo at full size with the frame. ● If your photo doesn't fit in the frame, you can crop it and adjust the picture area. Press Menu, select Edit, and select Crop Photo. Follow the instructions on page 17. 8 Press OK to select the current photo for printing. (See page 9.) Or you can print all photos (page 10) or a range of photos (page 11). 9 Adjust any other settings you want, then press Print to start printing. Decorating Photos You can add fun and festive decorations to your photos from PictureMate's built-in clipart collection. You can add up to four decorations to each photo. 1 Select a photo that you want to decorate. 2 Press Menu. 3 Press u or d to highlight Edit, then press OK. 4 Press u or d to highlight Decorate Photo, then press OK. 5 Press u or d to highlight Add Decoration, then press OK. You see a selection of decorations. 6 Press l or r to browse the images. When the image you want to use is highlighted, press OK. You see the decoration centered on your photo: 23
-
 1
1 -
2
-
3
-
4
-
5
-
6
-
7
-
8
-
9
-
10
-
11
-
12
-
13
-
14
-
15
-
16
-
17
-
18
-
 19
19 -
 20
20 -
 21
21 -
 22
22 -
 23
23 -
 24
24 -
 25
25 -
 26
26 -
 27
27 -
 28
28 -
 29
29 -
30
-
31
-
32
-
33
-
34
-
35
-
36
-
37
-
38
-
39
-
40
-
41
-
42
-
43
-
44
-
45
-
46
-
47
-
48
-
49
-
50
-
51
-
52
-
53
-
54
-
55
-
56
-
57
-
58
-
59
-
60
-
61
-
62
-
63
-
64
-
65
-
66
-
67
-
68
-
69
-
70
-
71
-
72
-
73
-
74
-
75
-
76
-
77
-
78
-
79
-
80
-
81
-
82
-
83
-
84
-
85
-
86
-
87
-
88
-
89
-
90
-
91
 |
 |
