Epson PowerLite 9300i User Manual - Addendum - Page 1
Epson PowerLite 9300i - PowerLite 9300NL Multimedia Projector Manual
 |
View all Epson PowerLite 9300i manuals
Add to My Manuals
Save this manual to your list of manuals |
Page 1 highlights
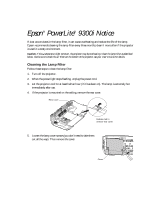
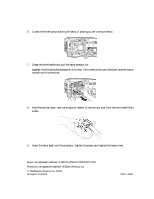
Epson® PowerLite® 9300i Notice If dust accumulates in the lamp filter, it can cause overheating and reduce the life of the lamp. Epson recommends cleaning the lamp filter every three months; clean it more often if the projector is used in a dusty environment. Caution: If the temperature light comes on, the projector may be overheating. Clean the lamp filter as described below. Also be sure to check the air filters on the bottom of the projector; see your User's Guide for details. Cleaning the Lamp Filter Follow these steps to clean the lamp filter: 1. Turn off the projector. 2. When the power light stops flashing, unplug the power cord. 3. Let the projector cool for at least half an hour (if it has been on). The lamp is extremely hot immediately after use. 4. If the projector is mounted on the ceiling, remove the rear cover. Rear cover Release tab to remove rear cover 5. Loosen the lamp cover screws (you don't need to take them out all the way). Then remove the cover. Cover
-
 1
1 -
 2
2
 |
 |