Epson PowerLite Pro Cinema 6010 User's Guide - Page 48
Customizing Projector Features, Image Sizing
 |
View all Epson PowerLite Pro Cinema 6010 manuals
Add to My Manuals
Save this manual to your list of manuals |
Page 48 highlights
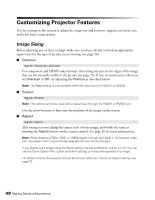
Customizing Projector Features Use the settings in this section to adjust the image size and position, suppress on-screen text, and select basic setup options. Image Sizing Before adjusting any of these settings, make sure you have already selected an appropriate aspect ratio for the type of picture you're viewing (see page 26). ■ Overscan Signal > Advanced > Overscan For component and HDMI video formats, this setting lets you see the edges of the image that are not normally visible in the picture (see page 73). If you see interference when you set Overscan to Off, try adjusting the Position as described below. Note: The Auto setting is only available when the input source is HDMI1 or HDMI2. ■ Position Signal > Position Note: This setting cannot be used with a signal input through the HDMI1 or HMDI2 port. Use the arrow buttons to fine-tune the position of the image on the screen. ■ Aspect Signal > Aspect This setting lets you change the aspect ratio of your image, and works the same as pressing the Aspect button on the remote control. See page 26 for more information. Note: When displaying 720p, 1080i, or 1080p signals through the HDMI or Component video port, the aspect ratio is automatically selected and you cannot change it. If you display a 4:3 image using the Zoom setting, the top and bottom will be cut off. You can use the Zoom Caption Pos. option and other settings to resize and reposition the image. For details on how the projector resizes the picture when you choose an Aspect setting, see page 73. 48 Making Detailed Adjustments
-
 1
1 -
2
-
3
-
4
-
5
-
6
-
7
-
8
-
9
-
10
-
11
-
12
-
13
-
14
-
15
-
16
-
17
-
18
-
19
-
20
-
21
-
22
-
23
-
24
-
25
-
26
-
27
-
28
-
29
-
30
-
31
-
32
-
33
-
34
-
35
-
36
-
37
-
38
-
39
-
40
-
41
-
42
-
 43
43 -
 44
44 -
 45
45 -
 46
46 -
 47
47 -
 48
48 -
 49
49 -
 50
50 -
 51
51 -
 52
52 -
 53
53 -
54
-
55
-
56
-
57
-
58
-
59
-
60
-
61
-
62
-
63
-
64
-
65
-
66
-
67
-
68
-
69
-
70
-
71
-
72
-
73
-
74
-
75
-
76
-
77
-
78
-
79
 |
 |
