Epson PowerLite Pro Z8455WUNL Quick Guide - Page 2
Turning the Projector On, Changing the Language ofthe Projector Menus, Search, Source, Lens Shift
 |
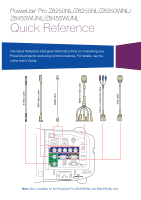
View all Epson PowerLite Pro Z8455WUNL manuals
Add to My Manuals
Save this manual to your list of manuals |
Page 2 highlights
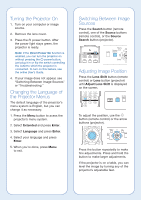
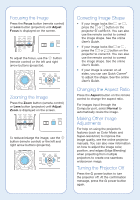
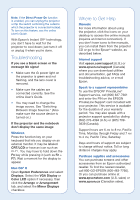
Turning the Projector On 1. Turn on your computer or image source. 2. Remove the lens cover. 3. Press the power button. After the power light stays green, the projector is ready. Note: If the Direct Power On function is enabled, you can turn the projector on without pressing the power button; just plug it in or flip the switch controlling the outlet to which the projector is connected. To turn on this feature, see the online User's Guide. 4. If your image does not appear, see "Switching Between Image Sources" or "Troubleshooting." Changing the Language of the Projector Menus The default language of the projector's menu system is English, but you can change it as necessary. 1. Press the Menu button to acess the projector's menu system. 2. Select Extended and press Enter. 3. Select Language and press Enter. 4. Select your language and press Enter. 5. When you're done, press Menu to exit. Switching Between Image Sources Press the Search button (remote control), one of the Source buttons (remote control), or the Source Search button (projector). Adjusting Image Position Press the Lens Shift button (remote control) or Lens button (projector) until Adjust Lens Shift is displayed on the screen. To adjust the position, use the button (remote control) or the arrow buttons (projector). Press the button repeatedly to make fine adjustments. Press and hold the button to make larger adjustments. If the projector is on a table, you can level the image by turning any of the projector's adjustable feet.
-
 1
1 -
 2
2 -
 3
3 -
 4
4 -
 5
5 -
 6
6
 |
 |
