Epson R2400 Product Information Guide - Page 14
Automatically Checking and Cleaning the Print Head, Running the Head Cleaning Utility, Print Head - ink
 |
UPC - 010343853973
View all Epson R2400 manuals
Add to My Manuals
Save this manual to your list of manuals |
Page 14 highlights
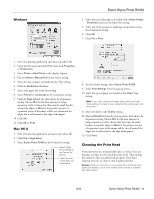
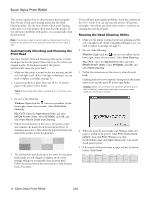
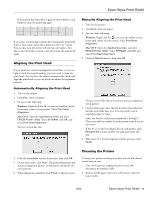
Epson Stylus Photo R2400 This section explains how to clean the print head using the Auto Nozzle Check and Cleaning utility and the Head Cleaning utility. Use the Auto Nozzle Check and Cleaning utility first, to let the printer check and clean the nozzles. If you still notice problems with quality, you can manually clean the print head. Note: You can also clean the print head by holding down the H ink button on the printer for three seconds (when the red H ink light is off). Automatically Checking and Cleaning the Print Head The Auto Nozzle Check and Cleaning utility prints a nozzle check pattern that the printer then reads to see if you have any clogged nozzles. If cleaning is needed, the printer automatically cleans the print head. 1. Make sure the printer is turned on but not printing, and the red H ink light is off. (If the H ink light is flashing or on, you need to replace a cartridge; see page 5.) 2. Load several sheets of plain, letter-size (8.5 × 11 inches) paper in the printer's sheet feeder. Note: Sizes smaller than letter, including 8.5 × 10 inches, won't work. 3. Do one of the following: Windows: Right-click the icon on your taskbar (in the lower right corner of your screen). Select Auto Head Cleaning. Mac OS X: Open the Applications folder and select EPSON Printer Utility. Select SP R2400, click OK, and select Auto Nozzle Check and Cleaning. 4. Follow the instructions on the screen. The printer prints and examines the nozzle check pattern shown below. If cleaning is necessary, it then cleans the print head and prints and checks another nozzle check pattern. 5. The utility prints and checks up to five times. If some print head nozzles are still clogged, it displays an on-screen message telling you to manually clean the print head. Follow the instructions in the next section to clean the print head, if necessary. If you still have print quality problems, check the solutions in the User's Guide. You can also turn the printer off and wait overnight-this allows any dried ink to soften-and then try cleaning the print head again. Running the Head Cleaning Utility 1. Make sure the printer is turned on but not printing, and the red H ink light is off. (If the H ink light is flashing or on, you need to replace a cartridge; see page 5.) 2. Do one of the following: Windows: Right-click the icon on your taskbar (in the lower right corner of your screen). Select Head Cleaning. Mac OS X: Open the Applications folder and select EPSON Printer Utility. Select SP R2400, click OK, and select Head Cleaning. 3. Follow the instructions on the screen to clean the print head. Cleaning takes about two minutes, during which the printer makes noise and the green P power light flashes. Caution: Never turn off the printer while the green P power light is flashing, unless the printer hasn't moved or made noise for more than 5 minutes. 4. When the green P power light stops flashing, make sure paper is loaded in the printer. Click Print nozzle check pattern, then click Print (Windows) or click Confirmation, then click Next (Macintosh). The nozzle check pattern prints. 5. If the nozzle check pattern has no gaps or lines (as shown below), click Finish. 14 - Epson Stylus Photo R2400 2/05
-
 1
1 -
2
-
3
-
4
-
5
-
6
-
7
-
8
-
 9
9 -
 10
10 -
 11
11 -
 12
12 -
 13
13 -
 14
14 -
 15
15 -
 16
16
 |
 |
