Epson Stylus C80WN Product Support Bulletin(s) - Page 5
Run WP-Admin, click CLEAR then click START
 |
View all Epson Stylus C80WN manuals
Add to My Manuals
Save this manual to your list of manuals |
Page 5 highlights
During the update process, you will see a message on the screen at the TFTP prompt that a number of bytes were sent. This means the update is complete. Note: If a timeout error occurs do the following: Check your TCP/IP settings Cycle the power of the print server Run WP-Admin, click CLEAR then click START Check the TCP/IP settings in the Configuration page of the print server, save the settings then Quit. Rerun step 4. 5. Next, go to the print server and perform a reset, then launch WP-Admin again to setup the print server. 6. At WP-Admin in the search screen, click on CLEAR first, then click on START for the print server to reappear. Page 5 of 6
-
 1
1 -
 2
2 -
 3
3 -
 4
4 -
 5
5 -
 6
6 -
 7
7 -
 8
8 -
 9
9 -
 10
10 -
 11
11 -
12
-
13
-
14
-
15
-
16
-
17
-
18
-
19
-
20
-
21
-
22
-
23
-
24
-
25
-
26
-
27
-
28
-
29
-
30
 |
 |
Page
5 of 6
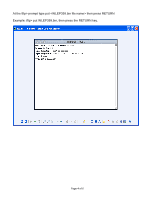
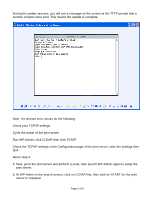
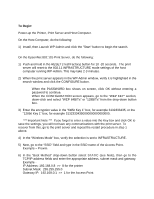
During the update process, you will see a message on the screen at the TFTP prompt that a
number of bytes were sent. This means the update is complete.
Note: If a timeout error occurs do the following:
Check your TCP/IP settings
Cycle the power of the print server
Run WP-Admin, click CLEAR then click START
Check the TCP/IP settings in the Configuration page of the print server, save the settings then
Quit.
Rerun step 4.
5. Next, go to the print server and perform a reset, then launch WP-Admin again to setup the
print server.
6. At WP-Admin in the search screen, click on CLEAR first, then click on START for the print
server to reappear.