Epson Stylus COLOR 3000 Quick Start - Page 4
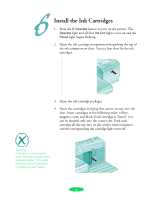
Install the Ink Cartridges
 |
View all Epson Stylus COLOR 3000 manuals
Add to My Manuals
Save this manual to your list of manuals |
Page 4 highlights
Install the Ink Cartridges 1. Press the P Operate button to turn on the printer. The Operate light and all four Ink Out lights come on and the Pause light begins flashing. 2. Open the ink cartridge compartment by pushing the top of the ink compartment door. You see four slots for the ink cartridges. 3. Open the ink cartridge packages. 4. Insert the cartridges, foil plug first, arrow on top, into the slots. Insert cartridges in the following order: yellow, magenta, cyan, and black. Each cartridge is "keyed" so it can be inserted only into the correct slot. Push each cartridge all the way into its slot until it meets resistance and the corresponding ink cartridge light turns off. Warning: If ink gets on your hands, wash them thoroughly with soap and water. If ink gets into your eyes, flush them immediately with water. 4
-
 1
1 -
 2
2 -
 3
3 -
 4
4 -
 5
5 -
 6
6 -
 7
7 -
 8
8 -
 9
9 -
 10
10 -
11
-
12
-
13
-
14
-
15
-
16
-
17
-
18
-
19
-
20
 |
 |
