Epson Stylus NX420 Quick Guide - Page 9
printer and your computer., When you see the Installation Complete screen, print a test - usb cable
 |
View all Epson Stylus NX420 manuals
Add to My Manuals
Save this manual to your list of manuals |
Page 9 highlights
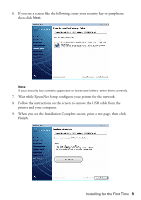
6. If you see a screen like the following, enter your security key or passphrase, then click Next. Note: If your security key contains uppercase or lowercase letters, enter them correctly. 7. Wait while EpsonNet Setup configures your printer for the network. 8. Follow the instructions on the screen to remove the USB cable from the printer and your computer. 9. When you see the Installation Complete screen, print a test page, then click Finish. Installing for the First Time 9
-
 1
1 -
2
-
3
-
 4
4 -
 5
5 -
 6
6 -
 7
7 -
 8
8 -
 9
9 -
 10
10 -
 11
11 -
 12
12 -
 13
13 -
 14
14 -
15
-
16
-
17
-
18
-
19
-
20
-
21
-
22
-
23
-
24
-
25
-
26
-
27
-
28
-
29
-
30
-
31
-
32
-
33
-
34
-
35
-
36
-
37
-
38
-
39
-
40
-
41
-
42
-
43
-
44
-
45
-
46
-
47
-
48
-
49
-
50
-
51
-
52
-
53
-
54
-
55
-
56
 |
 |
Installing for the First Time
9
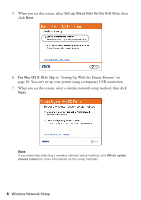
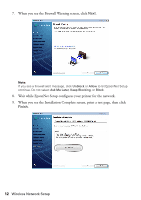
6.
If you see a screen like the following, enter your security key or passphrase,
then click
Next
.
Note:
If your security key contains uppercase or lowercase letters, enter them correctly.
7.
Wait while EpsonNet Setup configures your printer for the network.
8.
Follow the instructions on the screen to remove the USB cable from the
printer and your computer.
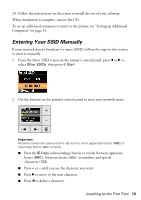
9.
When you see the Installation Complete screen, print a test page, then click
Finish
.