Epson Stylus Photo R2000 Start Here
Epson Stylus Photo R2000 Manual
 |
View all Epson Stylus Photo R2000 manuals
Add to My Manuals
Save this manual to your list of manuals |
Epson Stylus Photo R2000 manual content summary:
- Epson Stylus Photo R2000 | Start Here - Page 1
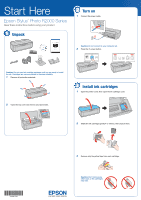
Start Here Epson Stylus® Photo R2000 Series Read these instructions before using your product. 0 Unpack e Turn on Connect the power cable. O llll llllllllllll 0 Caution: Do not open ink cartridge packages until you are ready to install the ink. Cartridges are vacuum packed to maintain reliability. - Epson Stylus Photo R2000 | Start Here - Page 2
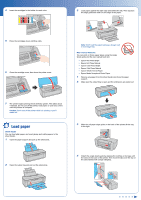
using the single sheet guide and the rear manual feed slot: Epson Hot Press Bright Epson Hot Press Natural Epson Cold Press Bright Epson Cold Press Natural Epson Velvet Fine Art Paper Epson Matte Scrapbook Photo Paper Remove any paper from the sheet feeder and close the paper support. Make sure the - Epson Stylus Photo R2000 | Start Here - Page 3
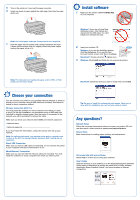
If you see the User Account Control screen, click Yes or Continue. 0 Macintosh®: Double-click the Epson icon. 3 Windows: Click Install and follow the on-screen instructions. Epson Stylus Photo 82000 Series Software Installation ...0•• der Ayr, te e..a...Mal From MA C13 Ovcpulrxl. 19. , psvmrre4 - Epson Stylus Photo R2000 | Start Here - Page 4
Epson Stylus Photo R2000 Series Ink Cartridges Color • Photo Black • Cyan al Magenta Yellow Red Orange • Matte Black Gloss Optimizer Part number 159 159 159 159 159 159 159 159 S Printing Problems • Make sure the size of paper you loaded matches the paper size selected in your printer
-
 1
1 -
 2
2 -
 3
3 -
 4
4
 |
 |

Start
Here
Epson
Stylus
®
Photo
R2000
Series
Read
these
instructions
before
using
your
product.
0
Unpack
llll
l
lll
l
lll
l
ll
l
l
0
Caution:
Do
not
open
ink
cartridge
packages
until
you
are
ready
to
install
the
ink.
Cartridges
are
vacuum
packed
to
maintain
reliability.
I
Remove
all
protective
materials.
O
2
Open
the
top
cover
and
remove
any
tape
inside.
1
e
Turn
on
Connect
the
power
cable.
O
Caution:
Do
not
connect
to
your
computer
yet.
Press
the
0
power
button.
00
wa)
000[
3,3°
0
III
O
Install
ink
cartridges
Open
the
printer
cover,
then
open
the
ink
cartridge
cover.
0
Shake
the
ink
cartridges
gently
4
or
5
times,
then
unpack
them.
Remove
only
the
yellow
tape
from
each
cartridge.
Caution:
Don't
remove
any
other
seals
or
the
cartridges
may
leak.
IF\
II
EXCEED
YOUR
VISION
EPSON®