Epson Stylus Photo User Manual
Epson Stylus Photo - Ink Jet Printer Manual
 |
View all Epson Stylus Photo manuals
Add to My Manuals
Save this manual to your list of manuals |
Epson Stylus Photo manual content summary:
- Epson Stylus Photo | User Manual - Page 1
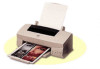
User's Guide Printed on recycled paper with at least 10% post-consumer content - Epson Stylus Photo | User Manual - Page 2
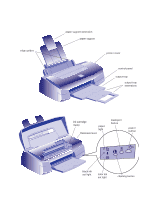
edge guides paper support extension paper support printer cover control panel output tray output tray extensions ink cartridge clamp paper light thickness lever load/eject button power button black ink out light color ink out light cleaning button - Epson Stylus Photo | User Manual - Page 3
and maintenance instructions. SEIKO EPSON CORPORATION shall not be liable for any damages or problems arising from the use of any options or any consumable products other than those designated as Original EPSON Products or EPSON Approved Products by SEIKO EPSON CORPORATION. EPSON, EPSON Stylus, and - Epson Stylus Photo | User Manual - Page 4
energy and, if not installed and used in accordance with the instructions, may cause harmful interference to radio or television reception. However, to unused interfaces. Changes or modifications not expressly approved by the manufacturer could void the user's authority to operate the equipment. For - Epson Stylus Photo | User Manual - Page 5
To Use Your Manuals 3 Warnings, Cautions, Notes, and Tips 4 Where to Get Help 4 Electronic Support Services 5 ENERGY STAR Compliance 6 Energy-saving Tips 7 Important Safety Instructions 7 1 Basic Printing Printing from Windows 1-1 Setting Printer Options from Windows Applications - Epson Stylus Photo | User Manual - Page 6
dpi, High Quality, and Photo Quality Ink Jet Paper 3-3 EPSON 4 × 6 Photo Paper 3-4 EPSON Photo Quality Glossy Paper, Film, and Transparencies 3-5 Envelopes 3-7 EPSON Photo Quality Ink Jet Cards 3-8 EPSON Iron-On Transfer Paper 3-8 EPSON Photo Quality Self Adhesive Sheets 3-8 Printing - Epson Stylus Photo | User Manual - Page 7
5-4 Installing the New Cartridge 5-5 Replacing an Outdated Ink Cartridge 5-7 Aligning the Print Heads 5-8 Cleaning the Printer 5-9 Transporting the Printer 5-10 6 Troubleshooting Diagnosing Problems 6-1 Running a Printer Check 6-2 Improving Print Quality 6-3 The printed image - Epson Stylus Photo | User Manual - Page 8
flashing 6-8 The printer has finished charging the ink cartridge, but the Ppower light is still flashing 6-8 The printer software installed with Paper jams inside the printer 6-12 Paper doesn't eject fully or is wrinkled 6-13 Solving Miscellaneous Printout Problems 6-13 Characters are - Epson Stylus Photo | User Manual - Page 9
A Specifications Printing A-1 Paper A-2 Ink Cartridge A-4 Mechanical A-4 Electrical A-5 Environmental A-5 Safety Approvals A-5 Interface A-5 Glossary Index ix - Epson Stylus Photo | User Manual - Page 10
/ Introduction Your EPSON Stylus® Photo printer is the ideal output device for full-color layout proofs, digital photography, photo editing-or any imaging project you create on your computer. The printer includes the following features: Exclusive Micro Piezo ink jet technology for smaller, cleaner - Epson Stylus Photo | User Manual - Page 11
Note: If you don't have a CD-ROM drive, you can get the printer driver software on diskettes or download it through your modem. Contact EPSON as described on pages 4 and 5. Windows System Requirements To use your printer and its software with a PC, your system should have: An IBM® compatible - Epson Stylus Photo | User Manual - Page 12
5 gives instructions for replacing ink cartridges, cleaning and aligning the print heads, and cleaning and transporting the printer. Chapter 6 provides solutions for any problems you may have. The Appendix provides the technical details on your printer, ink cartridges, and EPSON media. A Glossary - Epson Stylus Photo | User Manual - Page 13
manual: Warnings must be followed carefully to avoid bodily injury. Cautions must be observed to avoid damage to your equipment. Notes contain important information about your printer. Tips contain additional hints for great printing. Where to Get Help EPSON provides customer support and service - Epson Stylus Photo | User Manual - Page 14
purchase ink cartridges, paper, manuals, accessories, and parts from EPSON Accessories at (800) 873-7766 (U.S. sales only). In Canada, please call (800) 873-7766 for dealer referral. If you need help using software with an EPSON product, see the documentation for that program for technical support - Epson Stylus Photo | User Manual - Page 15
Service You can access EPSON's technical information library by calling (800) 442-2110 or (800) 922-8911 and selecting the appropriate phone option. You must provide a return fax number to use Fax-on-Demand. EPSON Forum on CompuServe Members of CompuServe® can type GO EPSON monitors, printers, fax machines - Epson Stylus Photo | User Manual - Page 16
, but you'll save paper and storage space too. Important Safety Instructions Before using your printer, read the following safety instructions to make sure you use the printer safely and effectively. Turn off and unplug the printer before cleaning. Clean with a damp cloth only. Do not spill liquid - Epson Stylus Photo | User Manual - Page 17
the wall outlet does not exceed 15 amperes. Except as specifically explained in this User's Guide, do not attempt to service the printer yourself. Unplug the printer and refer servicing to qualified service personnel under the following conditions: If the power cord or plug is damaged; if liquid - Epson Stylus Photo | User Manual - Page 18
beyond the date printed on the cartridge carton. For best results, use up the ink cartridges within six months of installing them. Do not shake an ink cartridge; this can cause leakage. Always turn the printer off using the Ppower button. When this button is pressed, the Ppower light flashes - Epson Stylus Photo | User Manual - Page 19
new EPSON Stylus Photo. First you have to set up your printer, following the instructions in the Quick Setup guide. Then install the printer driver color or black ink only, for example-are part of your printer driver software. The following sections tell you how to set printer options from Windows - Epson Stylus Photo | User Manual - Page 20
settings you change most often, including the number of copies and the pages you want printed. 2. Make sure your EPSON Stylus Photo printer is selected, and then click the Printer, Setup, Properties, or Options button. (You may have to click a combination of these buttons.) You see a dialog box like - Epson Stylus Photo | User Manual - Page 21
paper 360 dpi Ink Jet Paper Photo Quality Ink Jet Paper Photo Quality Glossy Paper Photo Quality Glossy Film Ink Jet Transparencies The type of document is printing, the EPSON Despooler dialog box appears, showing the printing progress and the status of your printer. (See page 1-5 for more - Epson Stylus Photo | User Manual - Page 22
these steps: 1. Double-click the Control Panel icon in the Main group. 2. Double-click the Printers icon. 3. Select EPSON Stylus Photo from the list of printers and click Setup. You see the Main printer settings dialog box, as shown on page 1-2. Any changes you make will become the default settings - Epson Stylus Photo | User Manual - Page 23
Printer Status While your document is printing, the EPSON Despooler printer's status. An error has occurred. Check your printer or see Chapter 6 for troubleshooting information. The printer is ready to print. The printer is currently printing. The ink level is low or empty; check the B or A Ink - Epson Stylus Photo | User Manual - Page 24
application. If you want to reuse settings, you can create document templates for your favorite applications. Printing from a Macintosh When you set up a new printer for your Macintosh, you need to check the page setup for documents in each application you use. You can then click the print icon or - Epson Stylus Photo | User Manual - Page 25
5. Make sure the Mode option is set to Automatic. The printer software determines the best settings for your print job. This is the easiest Plain Paper 360 dpi Ink Jet Paper Photo Quality Ink Jet Paper Photo Quality Glossy Paper Photo Quality Glossy Film Ink Jet Transparencies The type of - Epson Stylus Photo | User Manual - Page 26
available for EPSON ink jet printers. See Chapter 3 for more information on using special paper and other materials. Media name Size EPSON 360 dpi Ink Jet Paper A4 Letter EPSON High Quality Ink Jet Paper Letter EPSON Photo Quality Ink Jet Paper A4 Letter Legal EPSON Photo Quality Glossy - Epson Stylus Photo | User Manual - Page 27
you need to replace the ink cartridge. See Chapter 5 for instructions. When an ink light flashes, your ink supply is low. Make sure you have a replacement cartridge. When the paper light flashes and the ink out lights are on, you have a paper jam. Turn off the printer and gently pull out all jammed - Epson Stylus Photo | User Manual - Page 28
requirements, you can use the custom settings in your EPSON Stylus Photo software. You can choose predefined settings like PhotoEnhance or Predefined settings provide an easy way to enhance your photos and fine-tune your printer's operation. Follow these steps to print with predefined settings - Epson Stylus Photo | User Manual - Page 29
Custom Printing You see one of the following dialog boxes: Click Advanced, then click here to see a list of project types Note: When you use advanced settings, the Quality/Speed slider disappears. Windows Macintosh Click Advanced, then click here to see a list of project types 2-2 - Epson Stylus Photo | User Manual - Page 30
the best setting for your needs. 3. Select Color or Black Ink. 4. Click Advanced, and then Custom Settings. You see the list of project types. 5. Follow these guidelines to choose the right setting for your project: Photo For printing scanned photographs with increased contrast. Text/Graph For - Epson Stylus Photo | User Manual - Page 31
7. If you're printing on envelopes, EPSON Photo Paper, or other special-size media, make instructions. Customizing Print Quality and Special Effects If you need the maximum control over your photos, or you want to experiment with special effects, you can adjust individual settings in your printer - Epson Stylus Photo | User Manual - Page 32
. Normal - 360 dpi For printing on plain paper, transparencies, or 360 dpi Ink Jet paper. Fine - 720 dpi For the highest-resolution output. Works best on photo quality media. 5. Choose the Media Type and Ink settings you want to use, following the guidelines in Chapters 1 and 3. 6. Choose one of - Epson Stylus Photo | User Manual - Page 33
you may need to align the print heads. See Chapter 5 for instructions. 7. Choose any of the following options. Some of these settings are use for color printing. Super MicroWeave Use with Photo Quality media if MicroWeave doesn't completely eliminate banding in your printer's color settings. 2-6 - Epson Stylus Photo | User Manual - Page 34
Custom Printing Customizing Color Settings You can choose from several color adjustment modes or manually adjust brightness, contrast, and saturation. For professional color correction, you can set individual CMY color values. To achieve the maximum color accuracy, you can use - Epson Stylus Photo | User Manual - Page 35
your image data, and its effect varies widely depending on your image. Photo-realistic consistently increases contrast. You may have to experiment to choose the best settings also affect the light cyan and light magenta inks. Use these sliders to fine-tune the color balance in your printout. 2-8 - Epson Stylus Photo | User Manual - Page 36
adjusts printout colors to match colors on the screen. See "Using ColorSync on the Macintosh" for more information. 5. Click OK to return to the Main printer settings dialog box. 6. Click Save Settings if you want to save your custom settings as a group that you can reuse for special projects. See - Epson Stylus Photo | User Manual - Page 37
available. ColorSync uses profile information from each device- including your EPSON Stylus Photo-to achieve accurate color matching. First you have to make sure your monitor's profile is set. Then you can use your printer software to specify the exact method of gamut mapping (color matching - Epson Stylus Photo | User Manual - Page 38
can save up to 10 groups of settings. 9. Click OK, and then click Print. Custom Printing Saving Custom Settings After you've fine-tuned your printer settings for a special project, you can save your settings as a group. Then you can easily select the settings the next time you print a similar - Epson Stylus Photo | User Manual - Page 39
Your EPSON Stylus Photo lets you print on just about any kind of paper you want to use. You can get great results printing on various sizes of plain paper, letterhead, and envelopes. You'll get even better results with specially coated ink jet paper. For the best output, use EPSON's Photo Paper - Epson Stylus Photo | User Manual - Page 40
Jet Paper Photo Quality Ink Jet Paper EPSON Photo Quality Ink Jet Paper EPSON Special Coated Paper for 720 dpi Printing EPSON Photo Quality Ink Jet Cards EPSON 720 dpi Index Cards EPSON Photo Quality Self Adhesive Sheets EPSON Photo Paper Photo Quality Glossy Paper EPSON Photo Quality Glossy - Epson Stylus Photo | User Manual - Page 41
corner that you need to position correctly; follow any instructions in the package. Always handle sheets by the support extension. Caution: Don't use the cleaning sheets that may be included with your special media; they may damage the printer. EPSON 360 dpi, High Quality, and Photo Quality Ink - Epson Stylus Photo | User Manual - Page 42
on EPSON Photo paper: 1. Load the paper with the whiter side facing up and the perforated margins positioned as shown: You can load up to 20 sheets of Photo paper at a time. Make sure you place the included support sheet beneath the stack, but don't print on it. 2. Slide the left edge guide so - Epson Stylus Photo | User Manual - Page 43
and protect them from heat, humidity, and direct sunlight. Note: Use ink jet papers within one year of purchase. Use glossy media and transparencies and direct sunlight. See the Appendix for more storage information. EPSON Photo Quality Glossy Paper, Film, and Transparencies Follow these steps to - Epson Stylus Photo | User Manual - Page 44
Printing on Special Media 2. Before you load the media, place the included support sheet or a plain paper sheet beneath the stack. You can load up to 20 them as shown: cut corner 4. Remember to choose the correct Media Type setting in your printer software, following the guidelines on page 3-2. 3-6 - Epson Stylus Photo | User Manual - Page 45
You can load up to 10 envelopes at a time. Adjust the left edge guide and load the envelopes as shown, flap edge first and printable side up: + position when you print on envelopes or if ink smears when you print on other thick media. Open the printer cover and position the lever as shown below. - Epson Stylus Photo | User Manual - Page 46
use the Flip Horizontal option in your printer software. EPSON Iron-On Transfer Paper You can print photos, company logos, or anything else you dpi Ink Jet Paper. After you print, follow the instructions that came with the paper to iron the image onto the shirt or other item. EPSON Photo Quality - Epson Stylus Photo | User Manual - Page 47
length you want for easier handling. 2. Insert the paper in the printer as shown. The right edge of the paper should be against the right edge guide. 3. Slide the left edge guide next to the left edge of the paper. 4. Follow the instructions below to print your image on either a Windows computer or - Epson Stylus Photo | User Manual - Page 48
orientation. 2. Click the print icon or choose Print or Print Setup from the File menu. You see a printing dialog box. 3. Make sure your printer is selected, and then click the Printer, Setup, Properties, or Options button. (You may have to click a combination of these buttons.) You see the Main - Epson Stylus Photo | User Manual - Page 49
the Media Type setting. If you're using coated banner paper, try the Photo Quality Ink Jet Paper setting. 6. Type 8.5 inches for the Paper Width and any area if necessary. 8. Click the Main tab to return to the Main printer settings dialog box. Make sure you choose the appropriate media type and - Epson Stylus Photo | User Manual - Page 50
Printing on Special Media You see a dialog box like the following: Click to display list of paper sizes Click to define your own paper size 3. Choose Portrait or Landscape, depending on the orientation you want. Set the printable area if necessary. 4. Click the Customize button. The following - Epson Stylus Photo | User Manual - Page 51
Media Type setting. If you're using coated banner paper, try the Photo Quality Ink Jet Paper setting. 7. To print a panoramic image, type 8.5 inches for the File menu or click the print icon in your application. You see a printer settings dialog box like the one shown on page 1-6. 9. Make sure you - Epson Stylus Photo | User Manual - Page 52
your printer on a network, you need to follow special setup procedures. This chapter provides instructions for automatically when you send a job to the printer. It allows you to print in the background at a later time. If you're using your printer on a network, it also handles multiple print jobs - Epson Stylus Photo | User Manual - Page 53
like the Windows Print Manager. When you send a job to your printer, your printer software creates a temporary journal file, stores it in the C:\TEMP open it at any time, double-click the Spool Manager4 icon in the EPSON program group or folder. You see the Spool Manager window: menus queue journal - Epson Stylus Photo | User Manual - Page 54
things you can do: Hold or release a queue Send journal files to your printer over a network Hold, re-queue, or delete a journal file Select the your default spool directory Deleting a Stalled Print Job If you're having trouble printing, it may be because of a stalled print job. Follow these - Epson Stylus Photo | User Manual - Page 55
the one you created in step 1. Then click OK. 5. Make sure EPSON Stylus Photo is selected, and then choose Setup from the Queue menu. The Queue Setup to the printer. However, you can use it at any time to see how much ink you have left. Follow these steps: 1. Access the Main printer settings dialog - Epson Stylus Photo | User Manual - Page 56
You see the Utility menu: For information about these three utilities, see Chapter 5 3. Click the EPSON Status Monitor icon.You see the Despooler window with the Status Monitor at the bottom: 4. Check the amount of ink you have left. For more information about the Despooler window, see page 1-5. 4-5 - Epson Stylus Photo | User Manual - Page 57
Monitor alerts you to any problems that occur during printing. You can also use it at any time to see how much ink you have left. Using Monitor2 the Chooser from the Apple menu and select the EPSON Stylus(EX) icon. Then click either the printer or modem icon. 2. Under Background Printing, click - Epson Stylus Photo | User Manual - Page 58
the Prefered Size to 3000K. 6. While you're printing, click the EPSON Monitor2 icon on the Application menu at the right end of the menu Status Monitor to check the level of ink in your printer and to control the way your software warns you about printer problems. Follow these steps: 1. Choose Print - Epson Stylus Photo | User Manual - Page 59
button. You see the Utility menu: For information about these three utilities, see Chapter 5 3. Click the Status Monitor icon. The software checks the amount of ink remaining in the printer and displays the Status Monitor window: Click to control messages Click to recheck and warnings - Epson Stylus Photo | User Manual - Page 60
computer to a shared directory on a network server. These files can then be printed from another computer attached to the printer. First you need to install the EPSON Stylus Photo printer software on each computer that is going to print on the network. Then run Spool Manager and identify the shared - Epson Stylus Photo | User Manual - Page 61
these steps to set up the computer connected to the printer: 1. Create an icon for the EPSON Spool Manager (EPSPMGR4.EXE) in the \WINDOWS\SYSTEM folder steps to set up computers on the network: 1. Create an icon for the EPSON Spool Manager (EPSPMGR4.EXE) in the \WINDOWS\SYSTEM folder. 2. Open the - Epson Stylus Photo | User Manual - Page 62
95, you need to set up the port and network path on the computer connected to the printer. Follow these steps: 1. Click Start, point to Settings, and then point to Printers. 2. Right-click the EPSON Stylus Photo icon and choose Properties. Click the Details tab. You see the dialog box shown below - Epson Stylus Photo | User Manual - Page 63
Managing Print Jobs and Network Printing 4. Open the Spool Manager window as described on page 4-2. 5. In the Spool Manager window, double-click your printer's queue. The Queue Setup dialog box appears. 6. Make sure the Use Print Manager for this port option is checked. Then click OK. 4-12 - Epson Stylus Photo | User Manual - Page 64
5 Maintenance and Transportation It's easy to keep your EPSON Stylus Photo printer working at its best. All you have to do is follow the simple instructions in this chapter for replacing ink cartridges, moving the printer, and performing routine maintenance. This chapter covers the following - Epson Stylus Photo | User Manual - Page 65
the B black and A color ink out lights are off. 2. Access the Main printer settings dialog box as described in Chapter 1. 3. Click the Utility tab (Windows) or the Utility button (Macintosh). You see the Utility menu. 4. Click the Head Cleaning icon. 5. Follow the instructions on the screen to clean - Epson Stylus Photo | User Manual - Page 66
5. Click the Nozzle Check icon. See the next section for instructions on examining the nozzle check pattern. If your print quality has not your printer not covered by EPSON's warranty. Replacing an Ink Cartridge When a B black or A color ink out light flashes, the indicated cartridge is low on ink. - Epson Stylus Photo | User Manual - Page 67
out light is flashing or on, the printer cleans the print heads as described on page 5-2. If you need to replace an ink cartridge before the lights flash (because the ink is too old, for example) follow the instructions on page 5-7. Removing an Empty Ink Cartridge You can replace a cartridge when - Epson Stylus Photo | User Manual - Page 68
a cartridge except to replace it with a new one. Once you remove a cartridge, you can't reuse it. Even if the cartridge contains ink, reusing it may damage the print head. 6. Lift the cartridge out of the printer and dispose of it carefully. 7. Follow the steps in the next section to install the new - Epson Stylus Photo | User Manual - Page 69
it. Do not remove the clear seal from the bottom of the cartridge; ink will leak out. black cartridge color cartridge 3. Lower the ink cartridge into its holder with the label facing up and the arrow pointing to the back of the printer. The larger cartridge (color) goes on the right, the black - Epson Stylus Photo | User Manual - Page 70
begins 60 seconds after you close the clamp.) The Ppower light flashes and the printer makes various sounds. Charging takes about two minutes. When it's finished, you can print again. Replacing an Outdated Ink Cartridge If an ink cartridge is more than six months old, you may need to replace it. How - Epson Stylus Photo | User Manual - Page 71
and hold it down for a few seconds until the print heads move to the left. 4. Pull up the ink cartridge clamp. The cartridge rises up from its holder. 5. Lift the cartridge out of the printer and dispose of it carefully. 6. Follow the steps in the previous section, "Installing the New Cartridge," to - Epson Stylus Photo | User Manual - Page 72
cable. 2. Remove all the paper from the sheet feeder. 3. Carefully clean away dust and dirt with a soft brush. 4. Clean the exterior of the printer with a soft, damp cloth. Keep the printer cover closed so water doesn't get inside. 5. Clean ink out of the printer's interior with a damp cloth. 5-9 - Epson Stylus Photo | User Manual - Page 73
heads lock in the far right position. Then turn off the printer. 2. Unplug the power cord from the electrical outlet. Then disconnect the interface cable from the printer. 3. Remove any paper from the sheet feeder and remove the paper support. 4. Push in the output tray extensions and close the tray - Epson Stylus Photo | User Manual - Page 74
to help you diagnose problems: To identify the most common problems, check the lights on the printer's control panel. See "What To Do When the Printer Lights Flash" on page 1-9. You can also use the Status Monitor utility to identify common problems. For instructions, see page 4-4 (Windows 95 - Epson Stylus Photo | User Manual - Page 75
Troubleshooting To determine whether the problem is caused by the printer itself, run a printer operation check. See "Running a Printer Check" for instructions. For the latest information, check the EPSON Stylus Photo Help program and the ReadMe file in the EPSON program group or folder. If - Epson Stylus Photo | User Manual - Page 76
by doing one of the following: Clean the print heads (see Chapter 5 for instructions). Use higher quality paper appropriate for your print job (see Chapter 3 for a list of EPSON papers). Match the Media Type setting in the Main printer settings dialog box to the type of media you loaded in the - Epson Stylus Photo | User Manual - Page 77
option is set to Black. Change the Ink setting to Color. See Chapter 1 for instructions. The Media Type setting doesn't match the loaded paper. Make sure the Media Type setting matches the paper or media you're using. Then the printer software can automatically select other settings for the best - Epson Stylus Photo | User Manual - Page 78
has leaked inside the printer. Clean carefully inside the printer to remove spilled ink. See Chapter 5 for instructions. The color ink cartridge is empty. Replace the color ink cartridge following the instructions in Chapter 5 or choose Black ink in your printer software. You're using the High - Epson Stylus Photo | User Manual - Page 79
Troubleshooting Photographic images look grainy or rough Possible cause The print heads are misaligned. Solution Run the Print Head Alignment utility. See Chapter 5 for instructions the printer software. Solving Printing Problems If the printer won't print, first check that: The printer is - Epson Stylus Photo | User Manual - Page 80
Open the Extensions folder, EPSON folder, and Spool folder. Then delete any queued files. The print heads are clogged or the ink cartridges are too old. If the printer sounds like it's trying to print but doesn't feed paper, clean the print heads; see Chapter 5 for instructions. If cleaning doesn - Epson Stylus Photo | User Manual - Page 81
the instructions on the Notice Sheet in the box. An internal error may have occurred. Turn off your printer, wait a few seconds, and turn it on again. If the lights still flash or stay on, contact EPSON as described in the Introduction. The printer has finished charging the ink cartridge - Epson Stylus Photo | User Manual - Page 82
Troubleshooting The printer software installed with Windows 3.1 does not work correctly after you upgrade to Windows 95 Possible cause Solution Your printer software is not Reinstall the printer printing may be instructions in Chapter 4. allocation for your application, EPSON Monitor2, or both. - Epson Stylus Photo | User Manual - Page 83
Troubleshooting A portion of your image doesn't print (Macintosh) Possible cause Your system doesn't have enough available memory. Solution Close any other applications you are running or turn off background printing. You may need to increase the memory allocation for your application, EPSON - Epson Stylus Photo | User Manual - Page 84
media designed for ink jet printers that meets the media specifications in the Appendix. Follow all loading and handling instructions included with the media. Load the media with the printable side face up, as described in the Quick Setup guide or Chapter 3. If you have problems with paper - Epson Stylus Photo | User Manual - Page 85
. Isn't too old (see Chapter 3 or your paper packaging for more information). Isn't loaded above the arrow on the left edge guide. Isn't jammed inside the printer. (If the S paper out light is flashing, paper is jammed.) Then reload the paper as described in Chapter 3, making sure the left - Epson Stylus Photo | User Manual - Page 86
well as environmental requirements for storage. Solving Miscellaneous Printout Problems If your printout results are not what you expected requirements for EPSON Monitor2, following the instructions in Chapter 4. AppleTalk is activated on a If your printer is connected to the printer port, open - Epson Stylus Photo | User Manual - Page 87
. See your Windows documentation or online help for instructions. Your printer is not selected Open the Chooser and select your printer. See the Quick Setup in the Macintosh Chooser. guide for instructions. Paper settings in the printer Select the correct paper settings for your paper size. See - Epson Stylus Photo | User Manual - Page 88
connected properly. Make sure the cable is securely connected to both the printer and computer. You have the wrong port selected on your Macintosh. If your Macintosh has only one serial port, open the Chooser, click the EPSON Stylus (EX) icon, and then select the modem port. Your Macintosh has - Epson Stylus Photo | User Manual - Page 89
spacing Paper feed speed Input buffer Character tables EPSON's exclusive drop-on-demand Micro Piezo ink jet technology 32 nozzles × 6 (black, and PC850 (Multilingual) can be selected using the following procedure: When the printer is off, hold down the R cleaning button and press the P power - Epson Stylus Photo | User Manual - Page 90
. If you encounter problems, switch to a higher grade of paper. Do not load curled or folded paper. EPSON ink jet papers and other special media are only usable under normal conditions: Temperature: 59 to 77°F (15 to 25°C) Humidity: 40 to 60% RH Printouts on EPSON Photo Quality Glossy Film should - Epson Stylus Photo | User Manual - Page 91
Specifications Printable area A B-L A B-R B-L B-R C C Single sheet Envelope A: The minimum top margin is 0.12 inch (3.0 mm). When loading multiple sheets of EPSON Photo Quality Glossy Film, the minimum top margin is 1.2 inches (30 mm). B: The minimum left margin is 0.12 inch (3.0 mm). - Epson Stylus Photo | User Manual - Page 92
after approximately 3 hours at 77 °F (25 °C). Caution: To ensure good results, use genuine EPSON ink cartridges. Other products may cause damage to your printer not covered by EPSON's warranty. Don't use an ink cartridge if the date on the package has expired. Mechanical Paper feed method Paper - Epson Stylus Photo | User Manual - Page 93
60.5 Hz 0.4A 0.2A Approx. 15W (ISO/IEC 10561 Letter Pattern) Note: Check the label on the back of the printer for the voltage of your printer. Environmental Temperature Humidity Safety Approvals Safety standards EMC Interface Parallel interface Forward channel Operation: 50 to 95 °F (10 to 35 - Epson Stylus Photo | User Manual - Page 94
Handshaking: Refer to the IEEE-1284 specification Signal level: IEEE-1284 Level 1 device Data transmission timing: Refer to the IEEE-1284 specification The printer's built-in serial interface is based on the RS-423 standard. This interface has the following characteristics: Standard: Based on RS-423 - Epson Stylus Photo | User Manual - Page 95
. Cyan (blue-green), magenta, yellow, and black. These colored inks are used to create printed colors. The addition of light magenta and resolution. A software program that sends instructions to a computer device to tell it what to do. For example, your printer driver accepts print data from your - Epson Stylus Photo | User Manual - Page 96
grayscale halftoning host system initialization ink jet interface This halftoning setting smooths out edges by randomly placing dots of varying colors. This has the opposite effect of the Finest Detail setting. A version of the ESC/P (Epson Standard Code for Printers) command language, which gives - Epson Stylus Photo | User Manual - Page 97
MicroWeave parallel interface print queue print server printable area printer driver RAM reset resolution ROM saturation serial interface Materials upon which data is printed, such as envelopes, plain paper, special paper, and transparencies. Ink jet technology that uses an electronic pulse to - Epson Stylus Photo | User Manual - Page 98
then sent to the printer directly or to the print server. An EPSON software program that converts print data into codes that your printer understands. See also spool. An EPSON software program that displays the printer's status, such as paper out or the amount of ink remaining before printing. G-4 - Epson Stylus Photo | User Manual - Page 99
Photo Quality Ink Jet media Characters, garbled, 6-13 Cleaning print heads, 5-1 to 5-3 printer, 5-9 Cleaning sheets, 3-3 Color Adjustment modes, 2-8 Color problems , A-2, A-3 Environmental specifications, A-5 EPSON Accessories, 5 Customer Care Centers, 4 Electronic Support Services, 5 to 6 help, 4 to - Epson Stylus Photo | User Manual - Page 100
Photo Quality Ink Jet media Initialization, A-6 Ink cartridge replacing, 5-3 to 5-7 specifications, A-4 Ink jet cards choosing, 1-8 printing, 3-8 specifications, A-2 Ink 2-8 Maintaining printer, 5-1 to 5-9 Managing print jobs Macintosh, 4-6 to 4-9 Windows, 4-1 to 4-5 Margins problems, 6-14 - Epson Stylus Photo | User Manual - Page 101
from Windows, 3-10 to 3-11 Paper coated, 3-2 glossy, see Photo Quality Glossy media handling problems, 6-11 to 6-13 legal, 3-3 letterhead, 3-3 photo, see Photo paper (4 × 6) plain, 3-2 specifications, A-2 to A-3 support, 3-5 tab, 1-3 thickness lever, 3-7 types, 1-3, 1-7 to 1-8 Paper jams, 1-9, 6-12 - Epson Stylus Photo | User Manual - Page 102
, 1-5, 4-4 to 4-5 Support, EPSON, 4 to 6 System requirements, 2 T Technical specifications, A-1 to A-6 Testing printer, 6-2 Text/Graph setting, 2-3 Thickness lever, 3-7 Transparencies choosing, 1-8 printing, 3-5 to 3-6 specifications, A-2 Transporting printer, 5-10 Troubleshooting, 6-1 to 6-15
-
 1
1 -
 2
2 -
 3
3 -
 4
4 -
 5
5 -
 6
6 -
 7
7 -
8
-
9
-
10
-
11
-
12
-
13
-
14
-
15
-
16
-
17
-
18
-
19
-
20
-
21
-
22
-
23
-
24
-
25
-
26
-
27
-
28
-
29
-
30
-
31
-
32
-
33
-
34
-
35
-
36
-
37
-
38
-
39
-
40
-
41
-
42
-
43
-
44
-
45
-
46
-
47
-
48
-
49
-
50
-
51
-
52
-
53
-
54
-
55
-
56
-
57
-
58
-
59
-
60
-
61
-
62
-
63
-
64
-
65
-
66
-
67
-
68
-
69
-
70
-
71
-
72
-
73
-
74
-
75
-
76
-
77
-
78
-
79
-
80
-
81
-
82
-
83
-
84
-
85
-
86
-
87
-
88
-
89
-
90
-
91
-
92
-
93
-
94
-
95
-
96
-
97
-
98
-
99
-
100
-
101
-
102
 |
 |

User’s Guide
Printed on recycled paper with at least 10% post-consumer content